Quantcast
Channel: django - akiyoko blog
Viewing all 52 articles
Browse latest View live

バージョン1.7 になる前に Django の再入門

$
0
0

Django は、

  • DRY (Don't Repeat Yourself) の精神
  • Python 製の MVC フレームワーク(All-in-One & Pluggable)
  • BSDライセンスの OSS
  • O/R マッピング API
  • 強力なテンプレートエンジン
  • ユーザ認証・セッション
  • 国際化

などの特徴を備えた Webフレームワークです。

Python 製の Webフレームワークとしては、現在ほぼ一択になっていると言ってもいいのではないでしょうか。実際使っていても、足りないところはあまり無いように感じます。


現時点での最新バージョンは、1.6.5 ですが、もうすぐ 1.7 にバージョンアップする予定となっています。
(2014/9/3 追記:9/2 にようやく、バージョン 1.7 がリリースされました!)


(参考)


今回は、バージョンが 1.7 にアップグレードされる前に、Django の使い方をおさらいしておこうと思います。


Python Django入門 (3) - Qiita」によると、

は読んでおいた方がよいとのこと。
ただし、日本語翻訳版は Django のバージョンが 1.4 と若干古いので注意が必要です。


なお、チュートリアルで使用するソースコードの最終版は、
https://github.com/Chive/django-poll-app
にあるので、参考にしてください(公式のものではないようですが・・)。


目的

Django の以下の機能の使い方を復習する。

  • アプリケーションの雛形作成
  • データベース
  • テンプレート
  • 管理サイトの作成
  • 国際化とローカライズ

環境

  • Ubuntu 12.04 (on Vagrant hosted by Mac OS)


Vagrant で Ubuntu 12.04 を起動して、SSHで乗り込む

### 仮想マシンを起動
$ cd Vagrant/precise64/
$ vagrant up

### SSHで接続
$ ssh vagrant@192.168.33.10
vagrant@192.168.33.10's password: (vagrant)


VirtualBox、Vagrant がインストール済みで、Vagrantfile で IPアドレスを「192.168.33.10」で設定済みの前提です。このあたりは、「Mac OS X+Vagrant+VirtualBox で Ubuntu 12.04 仮想環境を構築」を参考にしてください。


pip, virtualenv, virtualenvwrapper をインストール

$ lsb_release -d
Description:    Ubuntu 12.04 LTS
$ python --version
Python 2.7.3

### pip をインストール
$ sudo apt-get update
$ sudo apt-get -yinstall python-pip
$ pip --version
pip 1.0 from /usr/lib/python2.7/dist-packages (python 2.7)
$ sudo pip --version
pip 1.0 from /usr/lib/python2.7/dist-packages (python 2.7)### pip のバージョンが古いのでアップデート
$ sudo pip install-U pip
### このままでは使えないので再起動
$ sudo reboot

$ pip --version
pip 1.5.6 from /usr/local/lib/python2.7/dist-packages (python 2.7)
$ sudo pip --version
pip 1.5.6 from /usr/local/lib/python2.7/dist-packages (python 2.7)

$ sudo pip install virtualenv virtualenvwrapper
$ virtualenv --version
1.11.6
$ which virtualenvwrapper.sh
/usr/local/bin/virtualenvwrapper.sh

### virtualenv環境の設定
$ cat << EOF>> ~/.bash_profileif [ -f ~/.bashrc ]; then    . ~/.bashrcfiEOF

$ cat << EOF>> ~/.bashrcsource /usr/local/bin/virtualenvwrapper.shexport WORKON_HOME=~/.virtualenvsEOF

$ source ~/.bashrc


virtualenv環境で Django サイトを作成

Django ベストプラクティスによると、

我々は慣例的に本番サイトを /opt/webapps/で、開発用サイトを ~/webapps/でホストします。

ということなので、「/opt/webapps/」に Djangoサイトを作っていきます。

### virtualenv環境を作成
$ mkvirtualenv mysite

### Django をインストール(mysite)$ pip install django
(mysite)$ pip list | grep Django
Django (1.6.5)### /opt/webapps配下に Djangoサイトを作成(mysite)$ sudo mkdir-p /opt/webapps
(mysite)$ sudo chown `whoami`. /opt/webapps
(mysite)$ cd /opt/webapps/
(mysite)$ django-admin.py startproject mysite
(mysite)$ tree /opt/webapps
/opt/webapps
`-- mysite|-- manage.py    `-- mysite
        |-- __init__.py
        |-- settings.py
        |-- urls.py
        `-- wsgi.py


はじめての Django アプリ作成、その 1 — Django 1.4 documentation」に、各ファイル・ディレクトリについての説明がありました。

  • 外側の mysite/ ディレクトリは、このプロジェクトのただの入れ物です。 名前は Django に関係しませんので、好きな名前に変更できます。
  • manage.py: Django プロジェクトに対する様々な操作を行うための コマンドラインユーティリティです。詳しくは django-admin.py と manage.pyを参照してください。
  • 内側の mysite/ ディレクトリは、このプロジェクトの本当の Python パッケージです。この名前が Python パッケージの名前であり、 import の際に 使用する名前です (例えば import mysite.settings) 。
  • mysite/__init__.py: このディレクトリが Python パッケージであることを Python に知らせるための空のファイルです。(Python の初心者は、 Python の公式 ドキュメントの パッケージの詳しい説明を読んで下さい。)
  • mysite/settings.py: Django プロジェクトの設定ファイルです。 設定の仕組みは Django の設定を参照してください。
  • mysite/urls.py: Django プロジェクトの URL 宣言、いうなれば Django サイトにおける「目次」に相当します。詳しくは URL ディスパッチャを参照 してください。
  • mysite/wsgi.py: WSGI互換のある Web サーバでプロジェクトを動かすための エントリーポイントです。詳しくは WSGI 環境にデプロイする方法を参照 してください。


Django を起動してみます。

(mysite)$ cd mysite/
(mysite)$ python manage.py runserver 0.0.0.0:8000

ブラウザから
http://192.168.33.10:8000/
にアクセスして、「It worked!」が表示されればひとまずOK。

f:id:akiyoko:20140815222116p:plain


このあたりは、「Ubuntu+virtualenv環境で Djangoアプリケーションを作ってみる」を参照にしてください。


データベースの設定

mysite/settings.py で、データベースの設定が SQLite になっていることを確認します。
 
mysite/settings.py(抜粋)

# Database# https://docs.djangoproject.com/en/1.6/ref/settings/#databases

DATABASES = {
    'default': {
        'ENGINE': 'django.db.backends.sqlite3',
        'NAME': os.path.join(BASE_DIR, 'db.sqlite3'),
    }
}

MySQLの場合は、以下のように変更します。

# Database# https://docs.djangoproject.com/en/1.6/ref/settings/#databases

DATABASES = {
    'default': {
        'ENGINE': 'django.db.backends.mysql',
        'HOST': 'localhost',
        'NAME': 'testdb',
        'USER': 'admin',
        'PASSWORD': 'adminpass',
        'PORT': '3306',
    }
}


ここで、ついでに TIME_ZONE にタイムゾーンをセットしておきます。
(修正前)

# Internationalization# https://docs.djangoproject.com/en/1.6/topics/i18n/

LANGUAGE_CODE = 'en-us'

TIME_ZONE = 'UTC'

(修正後)

# Internationalization# https://docs.djangoproject.com/en/1.6/topics/i18n/

LANGUAGE_CODE = 'ja'

TIME_ZONE = 'Asia/Tokyo'

(参考)


syncdb を使って、データベースを自動生成します。(MySQL の場合はこの前にデータベースを準備しておきます。)

(mysite)$ python manage.py syncdb
  ・
  ・
Would you like to create one now? (yes/no): yes
Username (leave blank to use 'vagrant'): admin
Email address:
Password: adminpass
Password (again): adminpass
Superuser created successfully.
Installing custom SQL ...
Installing indexes ...
Installed 0 object(s) from 0 fixture(s)


「db.sqlite3」が作成されました。
(スーパーユーザは「admin/adminpass」で設定しました。)


アプリケーション

Writing your first Django app, part 1 | Django documentation | Django」を手本に、polls アプリケーションを追加していきます。(日本語翻訳版でもいいのですが、Djangoのバージョンが 1.4 と若干古いので、オリジナル版を参照した方がよいと思います。)


1)polls アプリケーションの雛形を作成

startapp を実行すると、pollsアプリケーションの雛形が生成されます。

(mysite)$ python manage.py startapp polls
(mysite)$ tree /opt/webapps/mysite
/opt/webapps/mysite
|-- db.sqlite3
|-- manage.py
|-- mysite
|   |-- __init__.py
|   |-- settings.py
|   |-- urls.py
|   `-- wsgi.py`-- polls
    |-- admin.py
    |-- __init__.py
    |-- models.py
    |-- tests.py
    `-- views.py


ここで、mysite/settings.py の「INSTALLED_APPS」に「polls」を追加しておきます。(次の「データモデルの作成」などで必要になります。)

 
mysite/settings.py

# Application definition

INSTALLED_APPS = (
    'django.contrib.admin',
    'django.contrib.auth',
    'django.contrib.contenttypes',
    'django.contrib.sessions',
    'django.contrib.messages',
    'django.contrib.staticfiles',
    'polls',
)


2)データモデルの作成

データモデルの開発サイクルにあたっては、

  1. データモデルを models.py でコーディング
  2. python manage.py syncdb

という手順を取ることで、わざわざ CREATE文や ALTER文を用意しなくても、データモデルの変更に応じてテーブルを変更したりすることができるので、開発が楽になります。


では、進めていきます。

 
まず、polls/models.py にモデルを書いていきます。

polls/models.py

from django.db import models

classPoll(models.Model):
    question = models.CharField(max_length=200)
    pub_date = models.DateTimeField('date published')

    def__unicode__(self):
        return self.question


classChoice(models.Model):
    poll = models.ForeignKey(Poll)
    choice = models.CharField(max_length=200)
    votes = models.IntegerField()

    def__unicode__(self):
        return self.choice


syncdb でデータベースを同期します。

(mysite)$ python manage.py syncdb


実行後、polls_choiceテーブルと polls_pollテーブルがちゃんと追加されていました。

$ sqlite3 db.sqlite3
sqlite> .tables
auth_group                  django_admin_log
auth_group_permissions      django_content_type
auth_permission             django_session
auth_user                   polls_choice
auth_user_groups            polls_poll
auth_user_user_permissions


なお、事前に、

(mysite)$ python manage.py sql poll

を実行することで、発行される SQL をチェックすることもできます。


3)リクエストへの応答を作成

pollsアプリケーションで、リクエストに応じた応答をさせるようにしていきます。

以下の3ファイルを新規追加・修正します。

  • poll/views.py
  • polls/urls.py (新規追加)
  • mysite/urls.py

 
polls/views.py を以下のように書き換えます。

from django.http import HttpResponse

from polls.models import Poll

defindex(request):
    return HttpResponse("Hello, world. You're at the poll index.")

defdetail(request, poll_id):
    return HttpResponse("You're looking at poll %s." % poll_id)

defresults(request, poll_id):
    return HttpResponse("You're looking at the results of poll %s." % poll_id)

defvote(request, poll_id):
    return HttpResponse("You're voting on poll %s." % poll_id)


View関数が返すものを、HttpResponse か例外となるようにします。


次に、リクエストを受け取る polls/urls.py を新規作成します。

from django.conf.urls import patterns, url

from polls import views

urlpatterns = patterns('',
    # ex: /polls/
    url(r'^$', views.index, name='index'),
    # ex: /polls/5/
    url(r'^(?P<poll_id>\d+)/$', views.detail, name='detail'),
    # ex: /polls/5/results/
    url(r'^(?P<poll_id>\d+)/results/$', views.results, name='results'),
    # ex: /polls/5/vote/
    url(r'^(?P<poll_id>\d+)/vote/$', views.vote, name='vote'),
)


ここで、url() を少し説明すると、

url(regex, view, kwargs=None, name=None, prefix='')
  • regex

regex には、正規表現形式でリクエストURLを指定します。
「(?P<poll_id>\d+)」という形で記述することで、View関数に渡す引数を指定することができます。

  • view

view には、リクエストURL に対応する views.py の関数(view function)を指定します。

  • kargs

kargsは、「URL dispatcher | Django documentation | Django」のように使います。
例えば、

urlpatterns = patterns('blog.views',
    url(r'^blog/(?P<year>\d{4})/$', 'year_archive', {'foo': 'bar'}),
)

と定義されていて、「http://192.168.32.10:8000/blog/2005/」というリクエストがあった場合には、blog.views.year_archive という関数が、year_archive(request, year='2005', foo='bar') という引数で呼び出されます。

  • name

name は、View関数が同じ URLが URLconfs に複数存在する場合、つまり View関数名から一意に URLを逆引きできない場合に指定するためのものです。
詳しくは、「URL dispatcher | Django documentation | Django」を参照。


最後に、mysite/urls.py に polls/urls.py への include を以下のように追記します。

from django.conf.urls import patterns, include, url

from django.contrib import admin
admin.autodiscover()

urlpatterns = patterns('',
    url(r'^polls/', include('polls.urls')),
    url(r'^admin/', include(admin.site.urls)),
)


4)テンプレートファイルを使う

次は、テンプレートファイルを使った画面表示方法についてです。

Django は、

(Using loader django.template.loaders.filesystem.Loader)
1: /opt/webapps/mysite/templates/polls/index.html


(Using loader django.template.loaders.app_directories.Loader)
2: /home/vagrant/.virtualenvs/mysite/local/lib/python2.7/site-packages/django/contrib/admin/templates/polls/index.html
3: /home/vagrant/.virtualenvs/mysite/local/lib/python2.7/site-packages/django/contrib/auth/templates/polls/index.html
4: /opt/webapps/mysite/polls/templates/polls/index.html

の順にテンプレートファイルを探しに行く仕様になっているので、テンプレートファイルは mysite 配下の、

  • templates/polls/index.html
  • polls/templates/polls/index.html

のどちらかに置くのがよいでしょう。

ここでは、チュートリアルに沿って、polls/templates/polls/index.html にテンプレートファイルを作成していきます。


以下の2ファイルを新規追加・修正します。

  • polls/templates/polls/index.html(新規追加)
  • polls/views.py


ディレクトリを作成しておくのを忘れずに。

mkdir-p polls/templates/polls


polls/templates/polls/index.html

{% if latest_poll_list %}
    <ul>
    {% for poll in latest_poll_list %}
        <li><ahref="/polls/{{ poll.id }}/">{{ poll.question }}</a></li>
    {% endfor %}
    </ul>
{% else %}
    <p>No polls are available.</p>
{% endif %}

 
polls/views.py

from django.shortcuts import render_to_response

from polls.models import Poll

defindex(request):
    latest_poll_list = Poll.objects.all().order_by('-pub_date')[:5]
    context = {'latest_poll_list': latest_poll_list}
    return render_to_response('polls/index.html', context)

テンプレートファイルに渡す context は、テンプレート変数名を Pythonオブジェクトに対応付けた辞書になっています。


現時点のファイル構成は、以下のようになっているはず。

$ tree /opt/webapps/mysite 
/opt/webapps/mysite
|-- db.sqlite3
|-- manage.py
|-- mysite
|   |-- __init__.py
|   |-- settings.py
|   |-- urls.py
|   `-- wsgi.py`-- polls
    |-- admin.py
    |-- __init__.py
    |-- models.py
    |-- templates
    |   `-- polls|       `-- index.html
    |-- tests.py
    |-- urls.py
    `-- views.py


なお、テンプレートでは、次のようなタグが使えます。

  • {% if %} {% elif %} {% else %} {% endif %} タグ
  • {% for %} {% endfor %} タグ
  • {% url %} タグ
  • {% block %} {% extends %} タグ


(参考)


{% url %} タグのサンプルはこちら。
 
polls/index.html

<li><ahref="{% url 'detail' poll.id %}">{{ poll.question }}</a></li>

ただし、Django 1.5未満の場合は、

<li><ahref="{% url detail poll.id %}">{{ poll.question }}</a></li>

とするか、

{% load url from future %}

を先頭行に付けるかしないと、エラーが発生するとのこと。


{% block %} {% extends %} タグについては、
https://docs.djangoproject.com/en/1.6/topics/templates/#template-inheritance
で詳細に解説されています。


5)フォームを使う

https://docs.djangoproject.com/en/1.6/intro/tutorial04/


フォームの書き方です。次の2ファイルを更新していきます。

  • polls/detail.html
  • polls/views.py


polls/detail.html

<h1>{{ poll.question }}</h1>

{% if error_message %}<p><strong>{{ error_message }}</strong></p>{% endif %}

<formaction="{% url 'polls:vote' poll.id %}"method="post">
{% csrf_token %}
{% for choice in poll.choice_set.all %}
    <inputtype="radio"name="choice"id="choice{{ forloop.counter }}"value="{{ choice.id }}" /><labelfor="choice{{ forloop.counter }}">{{ choice.choice_text }}</label><br />
{% endfor %}
<inputtype="submit"value="Vote" /></form>


polls/views.py

from django.shortcuts import get_object_or_404, render
from django.http import HttpResponseRedirect, HttpResponse
from django.core.urlresolvers import reverse
from polls.models import Choice, Poll
# ...defvote(request, poll_id):
    p = get_object_or_404(Poll, pk=poll_id)
    try:
        selected_choice = p.choice_set.get(pk=request.POST['choice'])
    except (KeyError, Choice.DoesNotExist):
        # Redisplay the poll voting form.return render(request, 'polls/detail.html', {
            'poll': p,
            'error_message': "You didn't select a choice.",
        })
    else:
        selected_choice.votes += 1
        selected_choice.save()
        # Always return an HttpResponseRedirect after successfully dealing# with POST data. This prevents data from being posted twice if a# user hits the Back button.return HttpResponseRedirect(reverse('polls:results', args=(p.id,)))


6)クエリの発行(データベースの CRUD)

https://docs.djangoproject.com/en/1.6/topics/db/queries/

書き始めたらキリがないので、↑ を参照のこと。


管理サイトを作る

http://docs.djangoproject.jp/en/latest/intro/tutorial02.html
を手本に、管理サイトpolls アプリケーションを追加していきます。

なお、Django 1.6 から admin(管理サイト)がデフォルトで有効になっています。

(mysite)$ python manage.py startapp polls

すると自動で追加される polls/admin.py の正体は、管理サイト用のファイルなのです。


管理サイトを表示するには、
http://192.168.33.10:8000/admin/
にアクセスすれば OK です。
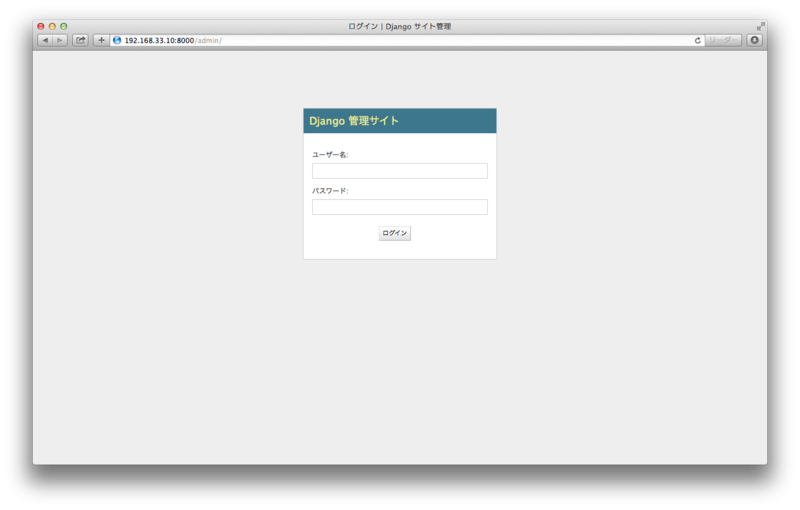
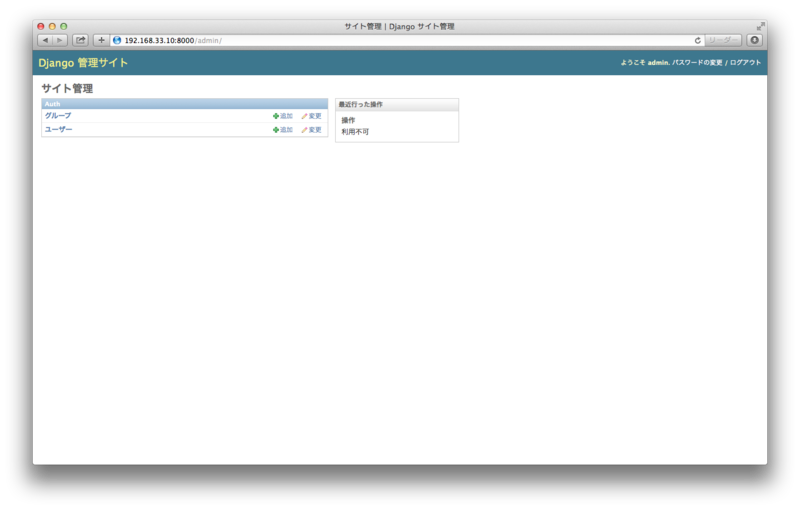
f:id:akiyoko:20140815222303p:plain


スーパーユーザの ID・パスワードでログインすると、

f:id:akiyoko:20140815222312p:plain

という画面が表示されるのですが、polls/admin.py に何も書いていない状態だと、まだ Poll や Choice は追加されていません。


polls/admin.py を追加し、

admin.site.register(Poll)
admin.site.register(Choice)

などと記述すると、管理サイトのページからGUIでCRUD操作ができるようになります。


f:id:akiyoko:20140815222326p:plain


国際化とローカライズ

https://docs.djangoproject.com/en/1.6/topics/i18n/translation/


1)Pythonコードの場合

関数 ugettext() を使います。タイプ数を減らすために、「 _ 」という別名で import するのが慣習的なやり方です。

(例)
polls/views.py

from django.http import HttpResponse
from django.utils.translation import ugettext as _

defindex(request):
    return HttpResponse(_("Welcome to my site."))


2)テンプレートファイルの場合

http://docs.djangoproject.jp/en/latest/topics/i18n/translation.html#specifying-translation-strings-in-template-code

テンプレートファイル内の翻訳では、{% trans %} タグを使います。
またファイルの先頭に、{% load i18n %} タグを入れておく必要があります。
なお、{% blocktrans %} タグを使うことで、プレースホルダを使用した複雑な文章を扱うことができます。


3)ローカライズ: 言語ファイルの作成方法

以下の手順で進めていきます。

  1. settings.py の「MIDDLEWARE_CLASSES」に「django.middleware.locale.LocaleMiddleware」を追加(初回のみ)
  2. django-admin.py makemessages を実行して、翻訳ファイル(poファイル)を作成
  3. poファイルを編集
  4. django-admin.py compilemessages を実行して、moファイルを作成


settings.py の「MIDDLEWARE_CLASSES」に「django.middleware.locale.LocaleMiddleware」を追加します。

mysite/settings.py

MIDDLEWARE_CLASSES = (
    ・
    ・
    'django.middleware.locale.LocaleMiddleware',
)

 
次の工程で makemessages を使うために、gettextをインストールしておきます。

$ sudo apt-get -yinstall gettext
$ gettext --version
gettext (GNU gettext-runtime) 0.18.1


翻訳ファイル(poファイル)を自動生成します。

### アプリケーションディレクトリ配下に移動
$ cd /opt/webapps/mysite/polls
### locale ディレクトリを作成
$ mkdir locale

### poファイルを自動生成
$ django-admin.py makemessages -l ja
processing locale ja


なお、ローカライズする対象文字列が一つも無いと、エラーになってしまいます。

CommandError: errors happened while running msguniq
msguniq: error while opening "/opt/webapps/mysite/polls/locale/django.pot" for reading: No such file or directory

 
poファイルを編集していきます。
polls/locale/ja/LC_MESSAGES/django.po

# SOME DESCRIPTIVE TITLE.# Copyright (C) YEAR THE PACKAGE'S COPYRIGHT HOLDER# This file is distributed under the same license as the PACKAGE package.# FIRST AUTHOR <EMAIL@ADDRESS>, YEAR.##, fuzzy
msgid ""
msgstr """Project-Id-Version: PACKAGE VERSION\n""Report-Msgid-Bugs-To: \n""POT-Creation-Date: 2014-08-16 18:56+0000\n""PO-Revision-Date: YEAR-MO-DA HO:MI+ZONE\n""Last-Translator: FULL NAME <EMAIL@ADDRESS>\n""Language-Team: LANGUAGE <LL@li.org>\n""Language: \n""MIME-Version: 1.0\n""Content-Type: text/plain; charset=UTF-8\n""Content-Transfer-Encoding: 8bit\n""Plural-Forms: nplurals=1; plural=0;\n"#: views.py:11
msgid "Welcome to my site."
msgstr "ようこそ"

 
poファイルをコンパイルして、moファイルを生成します。

$ django-admin.py compilemessages
processing file django.po in /opt/webapps/mysite/locale/ja/LC_MESSAGES


最後にサーバを再起動すると、翻訳が反映されます。

f:id:akiyoko:20140817043816p:plain


最終的なファイル構成はこうなります。

$ tree /opt/webapps/mysite
/opt/webapps/mysite
|-- db.sqlite3
|-- manage.py
|-- mysite
|   |-- __init__.py
|   |-- settings.py
|   |-- urls.py
|   `-- wsgi.py`-- polls
    |-- admin.py
    |-- __init__.py
    |-- locale
    |   `-- ja|       `-- LC_MESSAGES
    |           |-- django.mo
    |           `-- django.po|-- models.py|-- templates|   `-- polls
    |       `-- index.html|-- tests.py|-- urls.py    `-- views.py


(参考)


その他

その1)対話シェル

Django の設定を読み込みんだ対話シェルを起動するには、以下のようにします。

(mysite)$ cd /opt/webapps/mysite/
(mysite)$ python manage.py shell
Python 2.7.3 (default, Apr 202012, 22:39:59) 
[GCC 4.6.3] on linux2
Type "help", "copyright", "credits"or"license"for more information.
(InteractiveConsole)
>>> 

(参考)


その2)South

Django に含まれているわけではないのですが、Django と非常に親和性の高いマイグレーションツール。
しかしながら、Django 1.7 では migration がパワーアップして South と同等の機能を提供してくれるようになるので、1.7 からはサヨナラな感じになってしまうでしょうか。


(参考)


PyCharm で Djangoプロジェクトの開発環境を設定する

$
0
0

Mac (OSX Yosemite) に PyCharm Professional Edition をインストールして、Django プロジェクト開発環境の設定をします。

やりたいこと

  • Mac (OSX Yosemite) に PyCharm Professional Edition をインストール
  • 各種初期設定
  • GitHub から Django プロジェクトを Clone
  • Vagrant の仮想サーバとの連携設定
  • 仮想サーバとのソースコードの同期設定

前提条件

  • クライアントマシンは、OSX 10.10.5 (Yosemite)
  • 以下は Mac にインストール済み(手順は以下の 過去記事を参考)
    • Homebrew & Homebrew Cask
    • pip
    • virtualenv
    • JDK 1.8
    • Git
    • Vagrant & VirtualBox


<過去記事>
akiyoko.hatenablog.jp


1. PyCharm インストール

PyCharm Professional Edition を Homebrew cask を使ってインストールします。

$ brew cask install pycharm


2. PyCharm の初期設定

2.1. IDE theme

IDE theme を「Darcura」に設定します。

f:id:akiyoko:20150923012804p:plain
f:id:akiyoko:20150923012817p:plain
f:id:akiyoko:20150923012833p:plain


2.2. ライセンスキー

ライセンスキーは、起動後の画面から [Register] を選択し、購入後に PDFで送付されるライセンスキーを貼り付ければ完了です。

f:id:akiyoko:20151025223106p:plain
f:id:akiyoko:20151025223118p:plain


2.3. 表示設定

[Preferences] > [Editor] > [General] > [Apparence]

行番号表示

[Show line numbers] にチェックを入れます。

空白スペースの可視化

[Show whitespaces] にチェックを入れます。

f:id:akiyoko:20151102104314p:plain


2.4. フォント設定

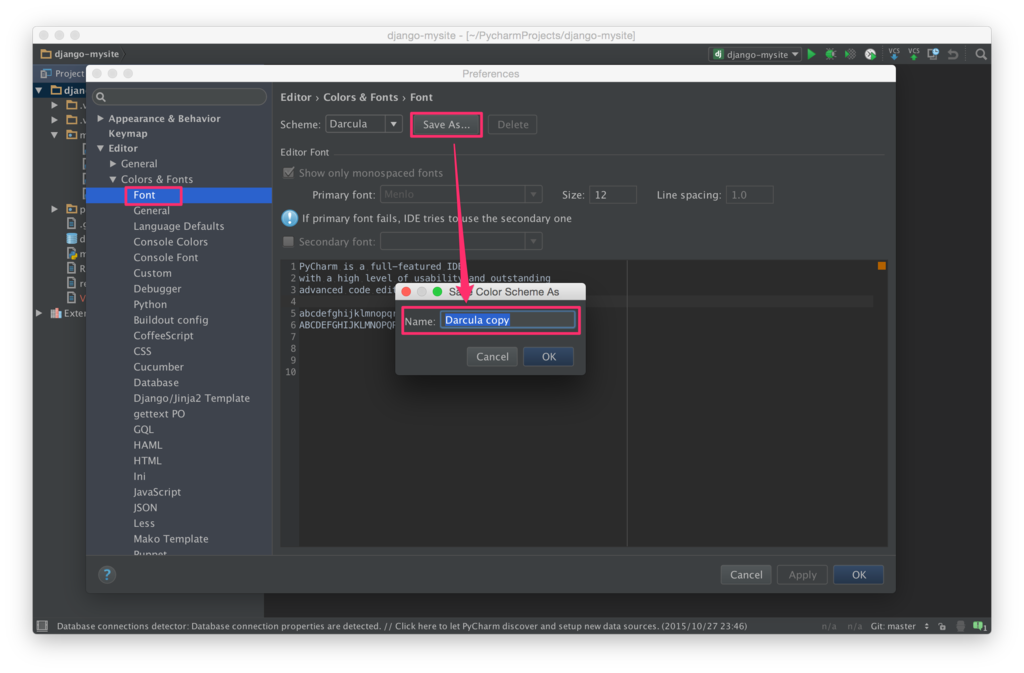
[Preferences] > [Editor] > [Color & Fonts] > [Font]

Scheme から [Save As] で、「Darcula copy」などという名前でコピーすると、フォントサイズが変更できるようになります。

「Size:10」くらいにしておきます。

f:id:akiyoko:20151102104337p:plain
f:id:akiyoko:20151102104356p:plain


3. Djangoプロジェクトの作成

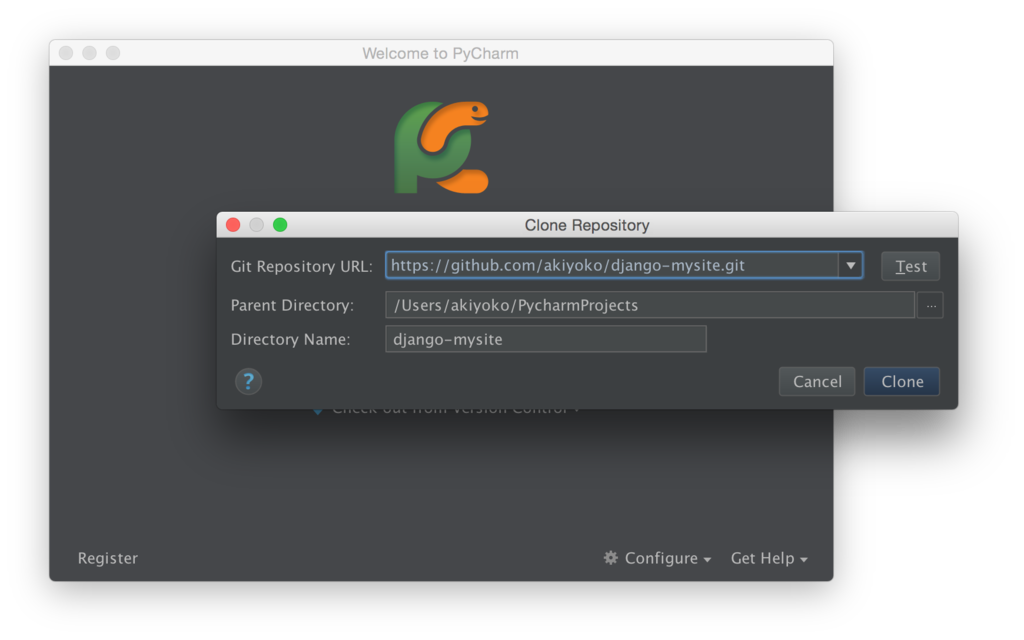
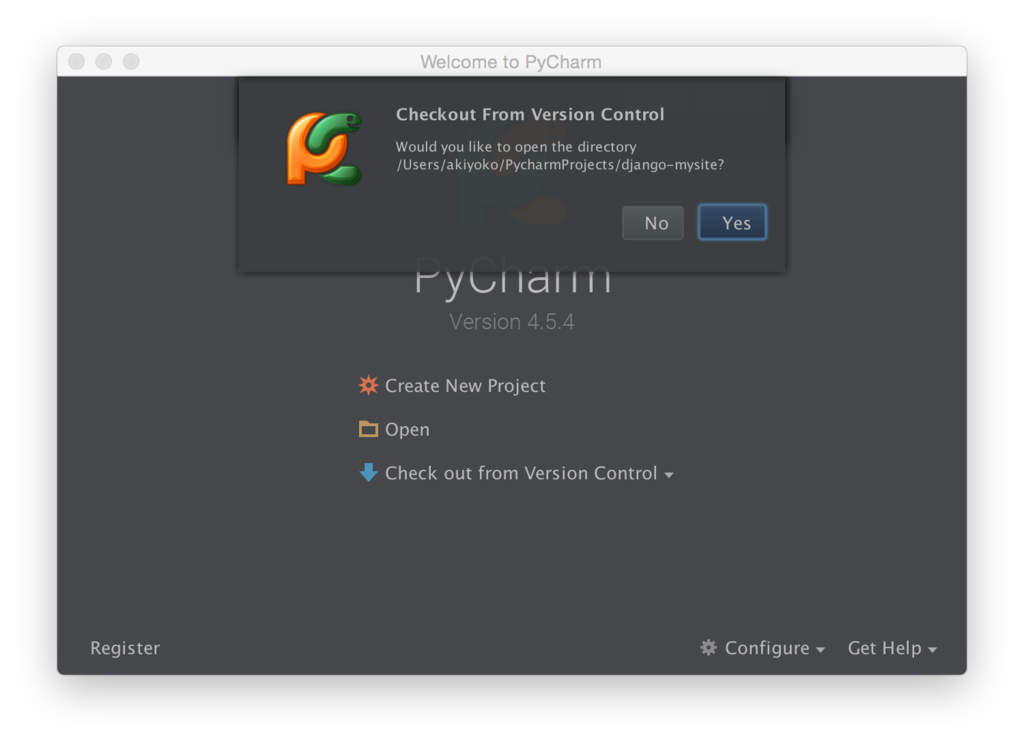
以下の手順で、Djangoプロジェクト(サンプルとして https://github.com/akiyoko/django-mysite.git)を GitHub から Clone して、ローカル(デフォルトでは /Users/akiyoko/PycharmProjects/ 配下)に配置します。


PyCharm を起動し、[Check out from Version Control] > [GitHub] を選択します。

f:id:akiyoko:20151025220625p:plain

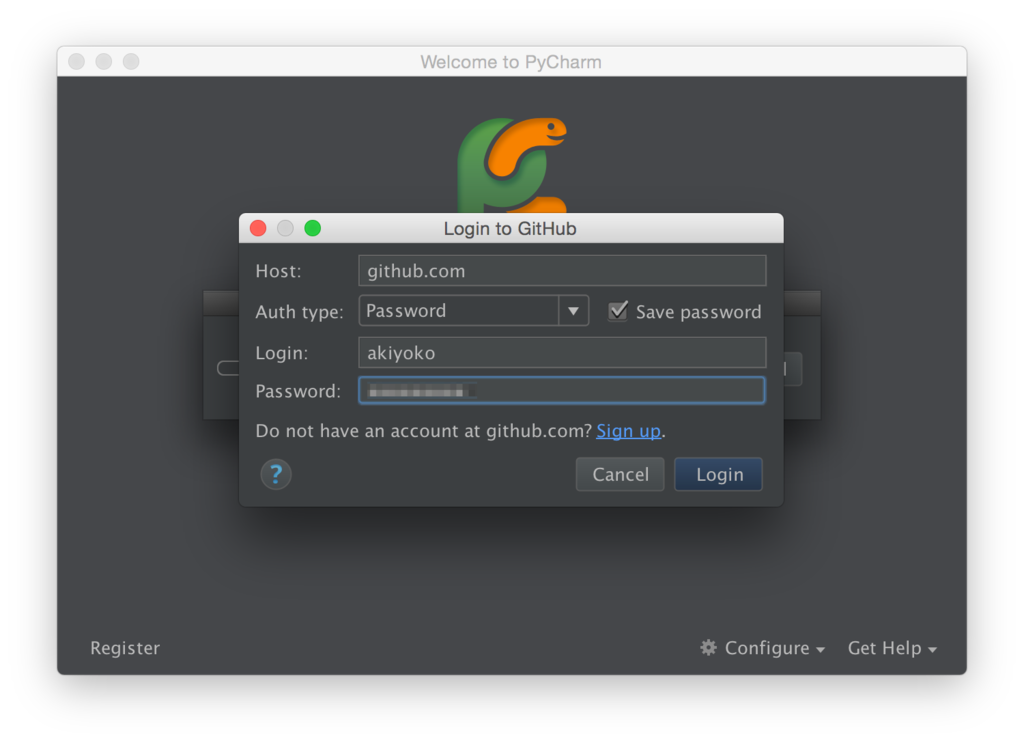
GitHub のアカウント/パスワードでログインします。
f:id:akiyoko:20151025220639p:plain

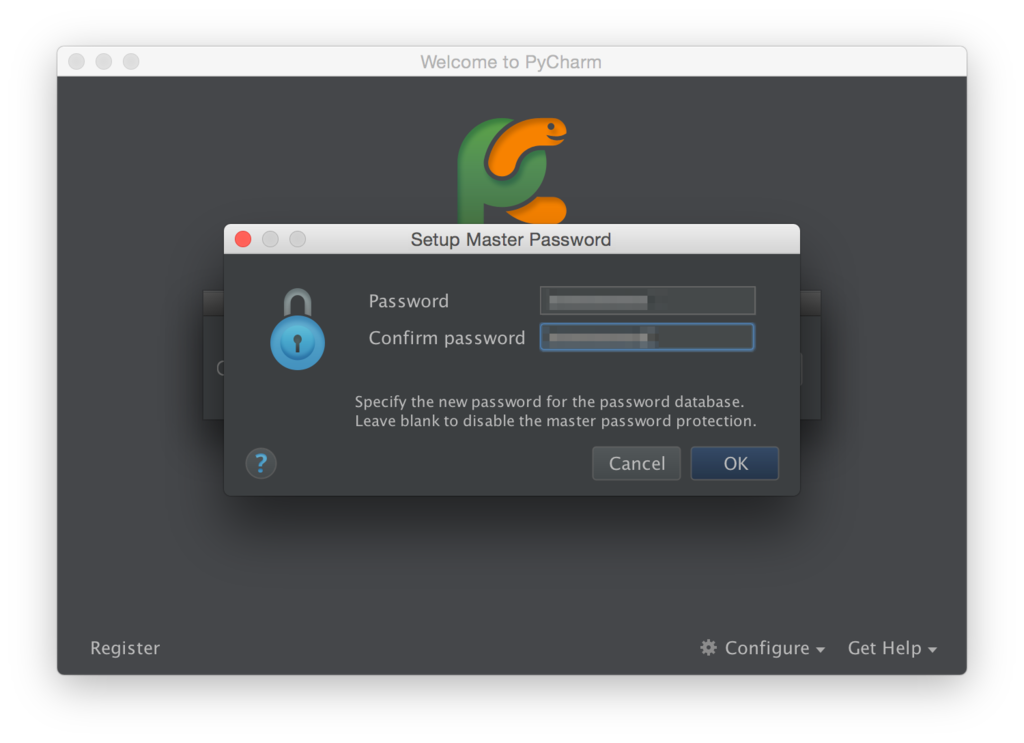
Master Password を設定すれば、GitHub のログインが省略できます(Master Password を入力する必要はありますが)。
f:id:akiyoko:20151025220703p:plain


Git Repository URL に「https://github.com/akiyoko/django-mysite.git」を指定します。
f:id:akiyoko:20151025220757p:plain
f:id:akiyoko:20151025220809p:plain


4. Vagrant連携

ソースコードをデプロイする先の Vagrantサーバを PyCharm 上で操作できるようにします。

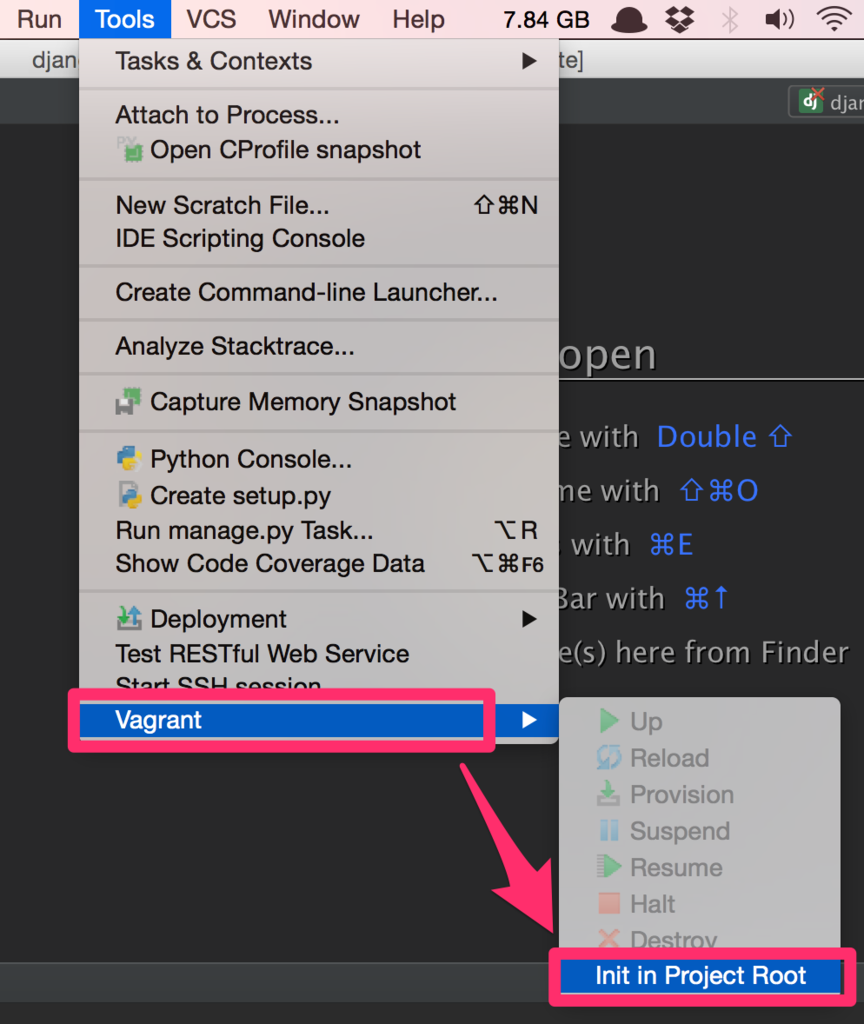
4.1.

[Tools] > [Vagrant] > [Init in Project Root] を選択します。

f:id:akiyoko:20151025224853p:plain


/Users/akiyoko/PycharmProjects/django-mysite 配下に Vagrantfile が作成され、4.2. の [Instance folder] にディレクトリが設定されます。


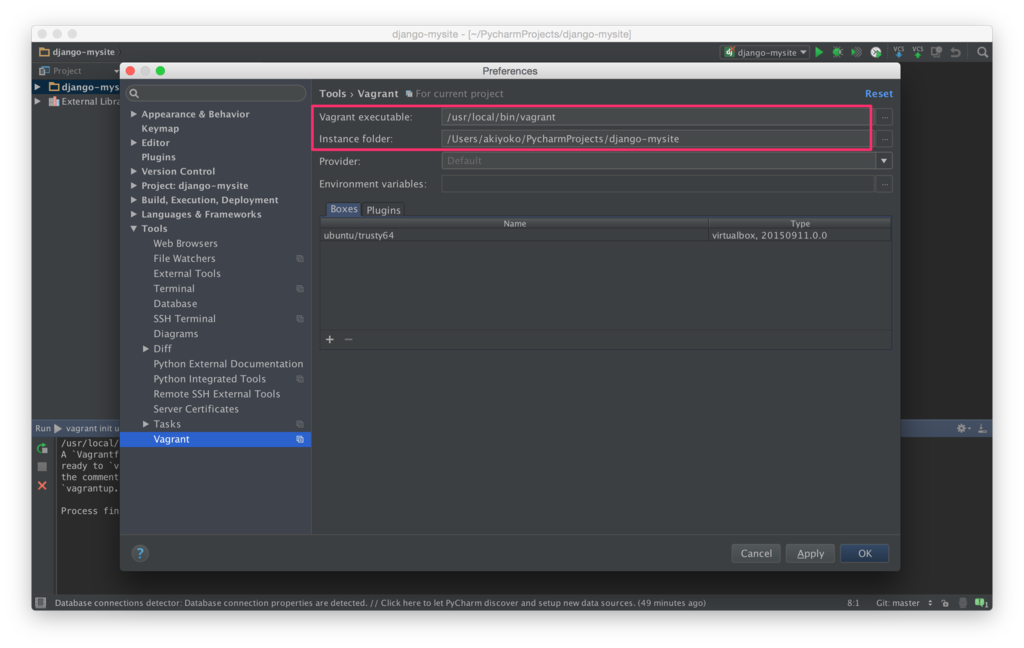
4.2.

[Preferences] > [Tools] > [Vagrant] で、Vagrant の連携設定を確認します。

f:id:akiyoko:20151025225609p:plain

  • Vagrant executable: /usr/local/bin/vagarnt
  • Instance folder: /Users/akiyoko/PycharmProjects/django-mysite

になっていれば OK です。


4.3.

Vagrantfile のIPアドレスを変更して、192.168.33.10 固定でアクセスできるようにします。

vi /Users/akiyoko/PycharmProjects/django-mysite/Vagrantfile
<変更前>
---
  # config.vm.network "private_network", ip: "192.168.33.10"
---
<変更後>
---
  config.vm.network "private_network", ip: "192.168.33.10"
---

f:id:akiyoko:20151025225717p:plain


4.4.

[Tools] > [Vagrant] > [Up] でインスタンスを起動します。


起動後、

$ ssh vagrant@192.168.33.10

で、SSHアクセスできることを確認します。


5. デプロイ先のサーバの設定

デプロイ先となる Vagrantサーバの設定を行います。

5.1.

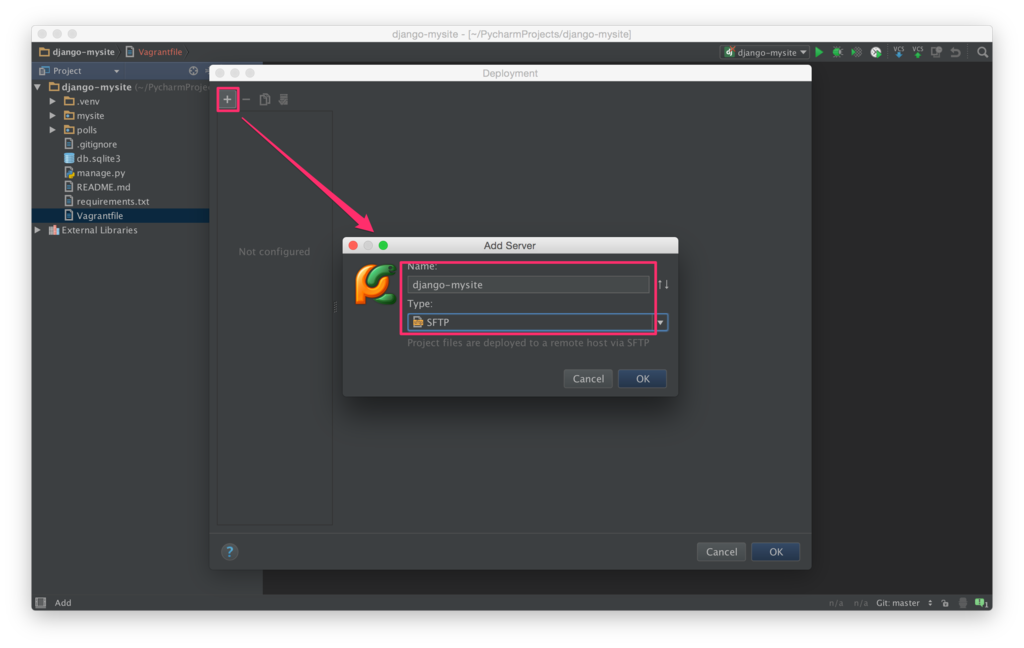
[Tools] > [Deployment] > [Configuration] で設定画面を開き、「+」ボタンをクリックしてサーバの設定を追加します。

f:id:akiyoko:20151025231125p:plain

  • Name: django-mysite
  • Type: SFTP

を設定して、[OK] します。


5.2.

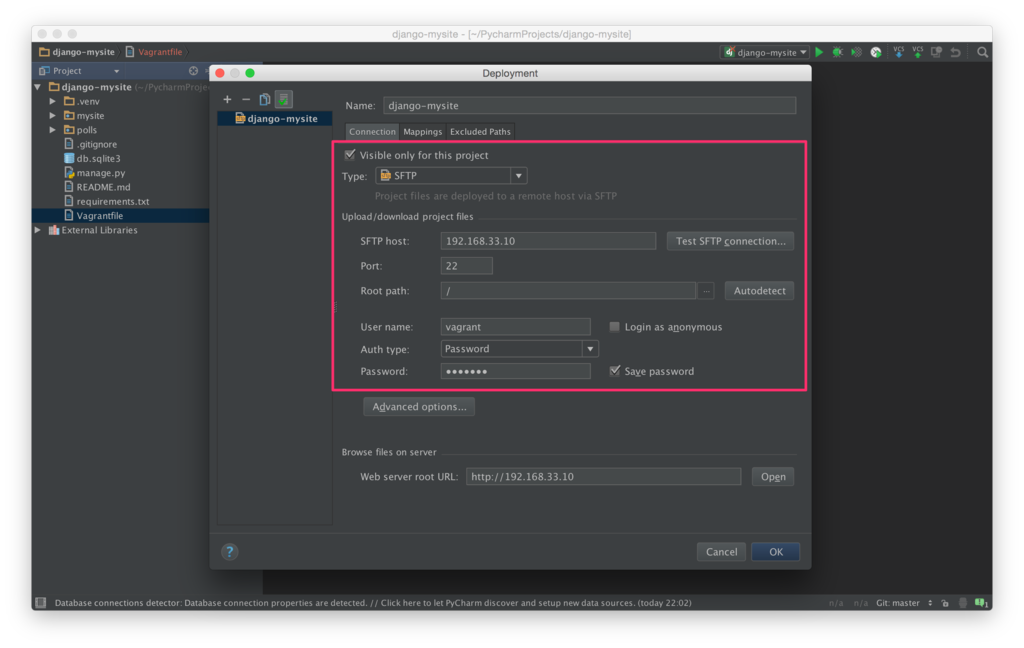
以下、[Connection] タブの設定。

  • SFTP host: 192.168.33.10
  • User name: vagrant
  • Auth type: Password
  • Password: vagrant ([Save password] をチェック)

[Visible only for this project] もチェックしておきます。

f:id:akiyoko:20151025231154p:plain


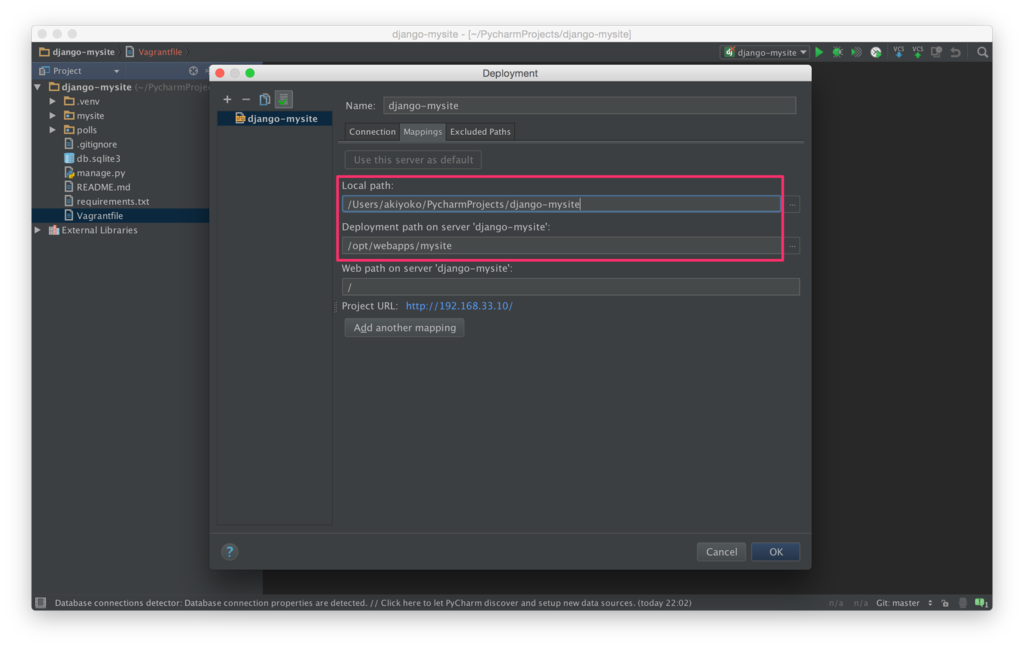
以下、[Mappings] タブの設定。

  • Local path: /Users/akiyoko/PycharmProjects/django-mysite(デフォルト)
  • Deployment path on server 'django-mysite': /opt/webapps/mysite

f:id:akiyoko:20151025231215p:plain


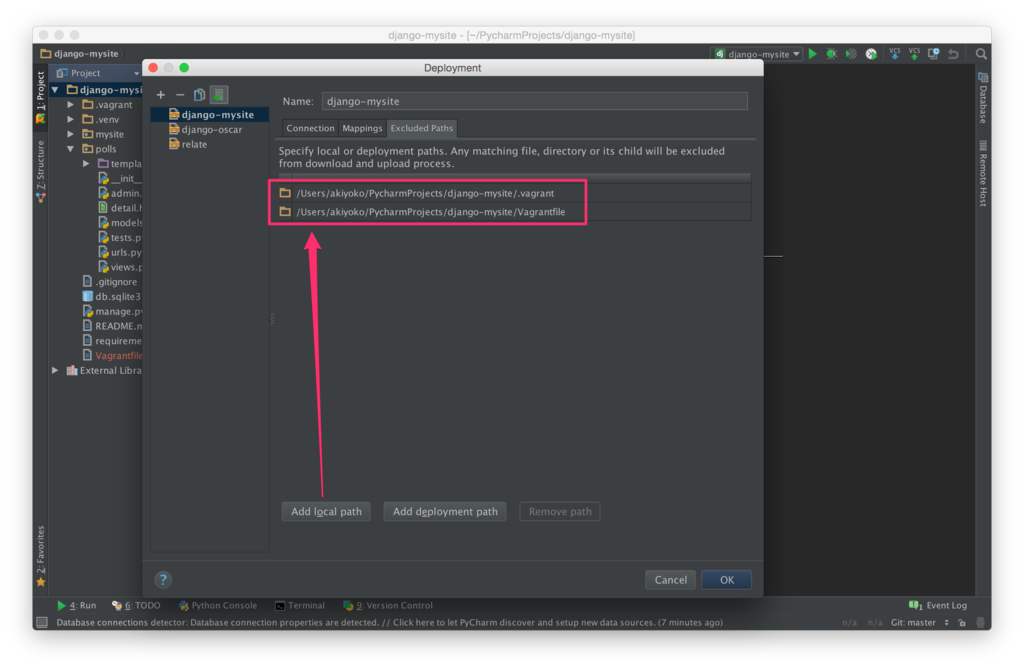
以下、[Excluded path] タブの設定。

[Add local path]

/Users/akiyoko/PycharmProjects/django-mysite/.vagrant
/Users/akiyoko/PycharmProjects/django-mysite/Vagrantfile

[Add deployment path]

なし

f:id:akiyoko:20151206113528p:plain

なお、「.idea」や「.git」は、[Tools] > [Deployment] > [Options] にあらかじめ除外ファイルとして定義されているため、ここで指定する必要はありません。


[OK] ボタンをクリックして完了。


あるいは、
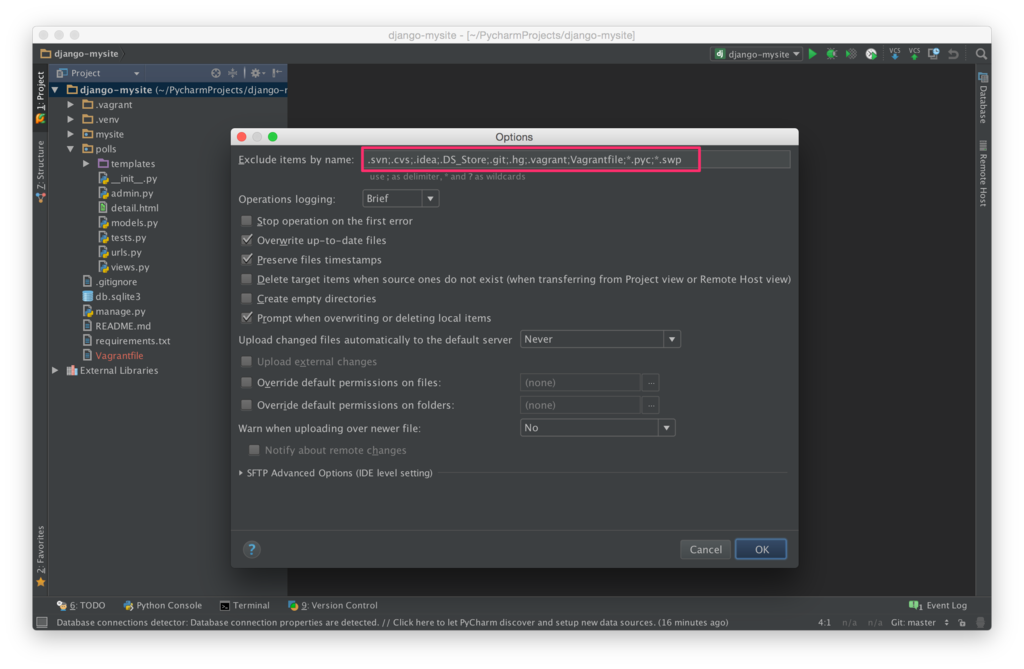
[Tools] > [Deployment] > [Options] の [Exclude items by name] に、以下のように「.vagrant」「Vagrantfile」「*.pyc」「*.swp」を加えておくと、上記の [Add local path] の設定が不要になるため、非常に便利です。

<変更前>
.svn;.cvs;.idea;.DS_Store;.git;.hg

<変更後>
.svn;.cvs;.idea;.DS_Store;.git;.hg;.vagrant;Vagrantfile;*.pyc;*.swp

f:id:akiyoko:20151122034541p:plain


5.3.

最後に、[Tools] > [Deployment] > [Automatic Upload] をチェックしておきます。


6. サーバの初期設定(on Vagrant)

ソースコードを同期する前に、サーバ側(Vagrant仮想環境)で、Djangoプロジェクトの箱を作成しておきます。

$ ssh vagrant@192.168.33.10

で、SSHログインします。

### 最低限のインストール
$ sudo apt-get update
$ sudo apt-get install -y git tree sqlite3

### pip をインストール
$ sudo apt-get install -y python-pip python-dev
$ pip --version
pip 1.5.4 from /usr/lib/python2.7/dist-packages (python 2.7)

### virtualenv, virtualenvwrapper をインストール
$ sudo pip install virtualenv virtualenvwrapper
$ virtualenv --version
13.1.2

### virtualenvwrapper の設定
$ cat << EOF >> ~/.bash_profile

if [ -f ~/.bashrc ]; then
    . ~/.bashrc
fi
EOF
$ cat << EOF >> ~/.bashrc

source /usr/local/bin/virtualenvwrapper.sh
export WORKON_HOME=~/.virtualenvs
EOF
$ source ~/.bashrc

### Djangoプロジェクトの virtualenv 環境を設定
$ mkvirtualenv mysite

### /opt/webapps 配下に Djangoプロジェクトの箱を作成
(mysite)$ sudo mkdir -p /opt/webapps
(mysite)$ sudo chown `whoami`. /opt/webapps


7. ソースコードを同期

サーバ側(Vagrant)にソースコードをアップロードします。


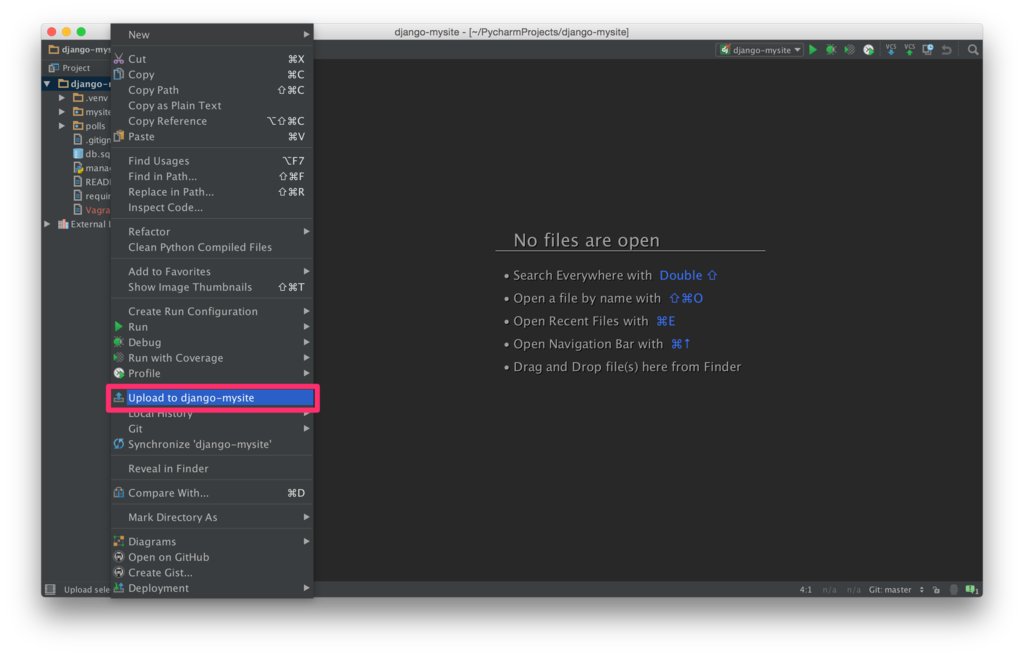
初回は、プロジェクトで右クリック > [Upload to django-mysite] でアップロードします。

f:id:akiyoko:20151025233507p:plain


8. サーバ側の Djangoアプリの起動確認(on Vagrant)

Djangoアプリの起動確認までを行います。

(mysite)$ cd /opt/webapps/mysite/
(mysite)$ pip install -r requirements.txt


データベースを初期化

### models を何も変更していなければ、python manage.py makemigrations はまだ実行不要
(mysite)$ python manage.py migrate


Djangoアプリを起動

(mysite)$ python manage.py runserver 0.0.0.0:8000

ブラウザで
http://192.168.33.10:8000/
あるいは
http://192.168.33.10:8000/polls/
にアクセスして動作確認ができれば、一旦 runserver は停止しておきます。


9. Project Interpreter の設定

ローカル側(PyCharm)のソースコードの Reference を解決したり、サーバ側の Djangoアプリをデバッグ起動させたりするのに、Python Interpreter の設定を行います。


基本的には、

  • Project Interpreter(PyCharm 上のソースコードの Reference 解決)
  • Run/Debug Configuration(Runserver/Debug 起動時の Interpreter)

のいずれにも、サーバ側の virtualenv の Python Interpreter を設定します。
(Run/Debug Configuration は、10. で設定します。)
 

9.1.

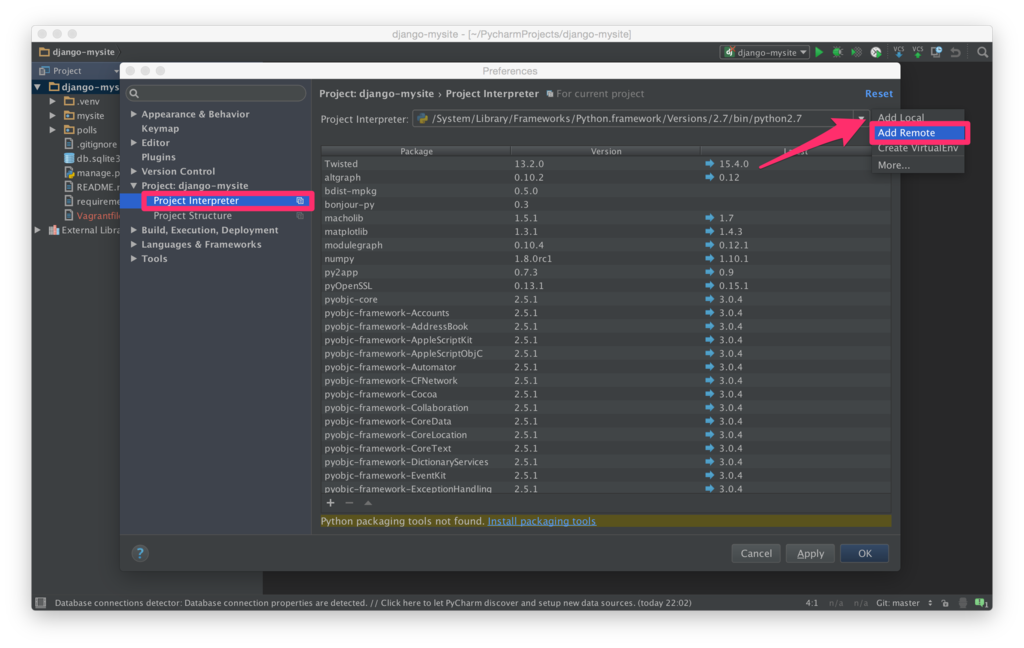
[Preferences] > [Project: django-mysite] > [Project Interpreter] から、[Python Interpreter] の右側の歯車アイコンをクリックし、[Add Remote] を選択します。

f:id:akiyoko:20151026000532p:plain


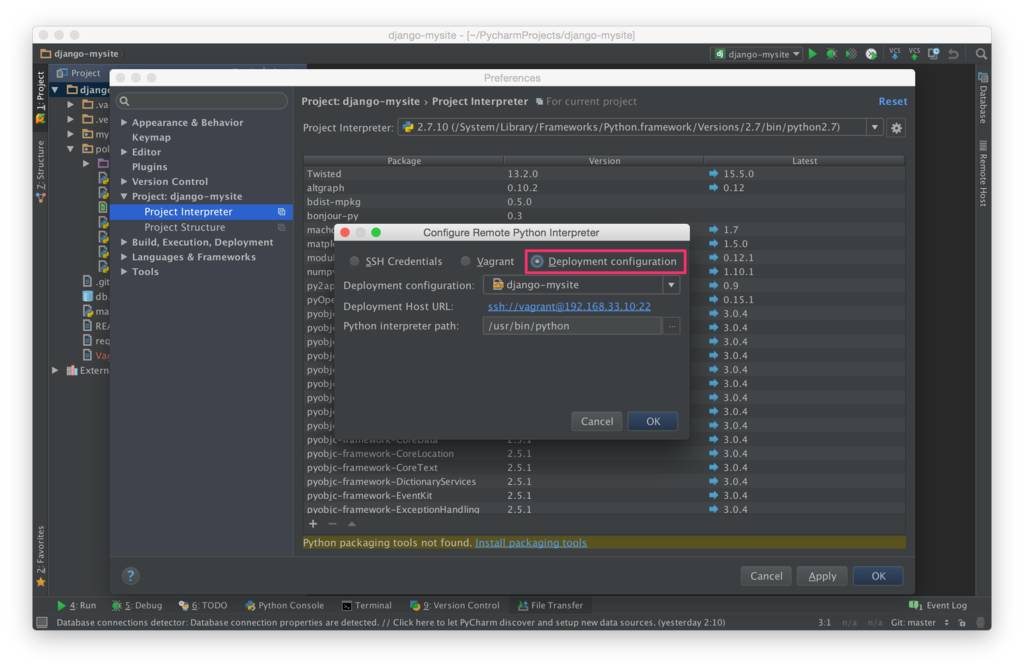
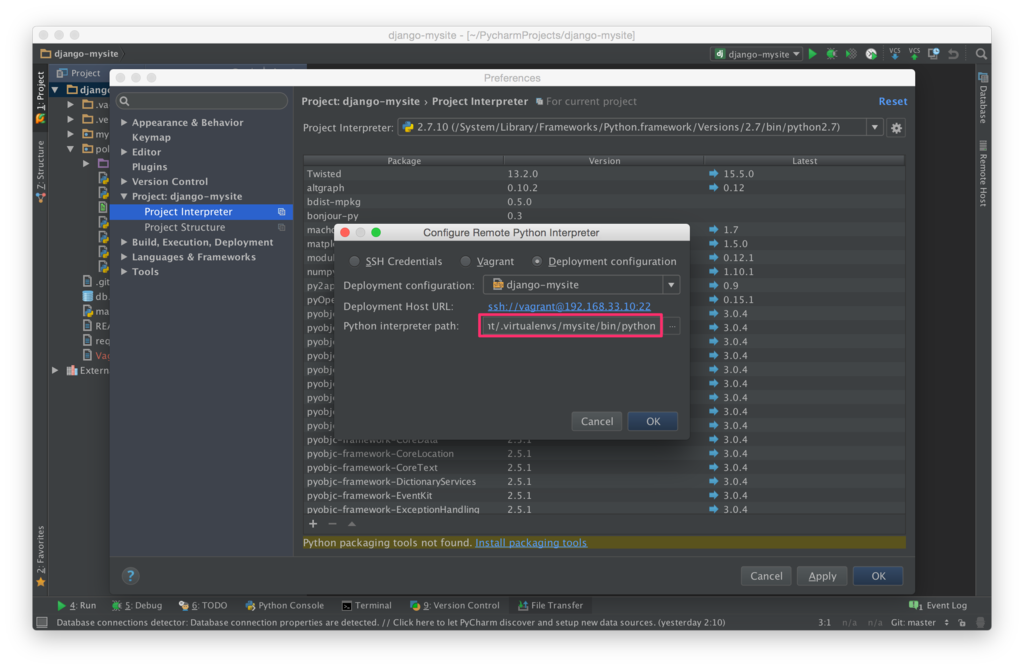
[Deployment configuration] をクリックすると、Deployment での設定した内容が反映されます。
f:id:akiyoko:20151211210801p:plain

ここで、Pythonのパスを virtualenv のものに変更しておきます。
Python interpreter path: /home/vagrant/.virtualenvs/mysite/bin/python
f:id:akiyoko:20151211210831p:plain

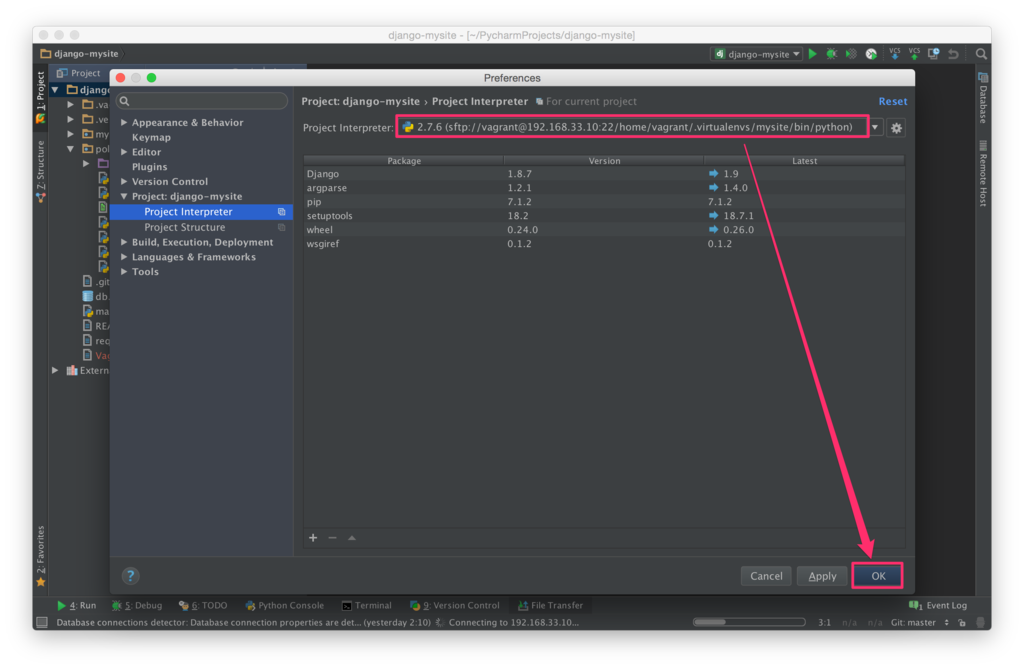
作成した Remote Interpreter が選択されていることを確認して、[OK] をクリックします。
f:id:akiyoko:20151211210851p:plain


9.2.

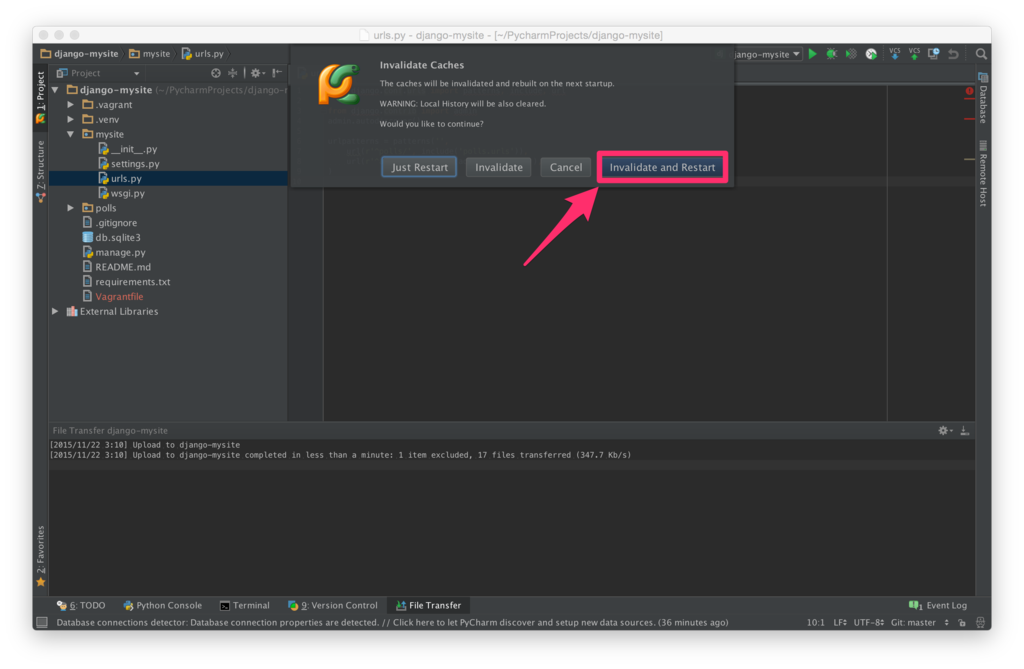
ここで、Python コードに赤いアンダーライン(参照エラー)が出ないようにするために、[File] > [Invalidate Caches / Restart] を選択し、[Invalidate and Restart] をクリックします。
f:id:akiyoko:20151122041314p:plain
(PyCharm が再起動され、再インデックスが実行されるので、多少時間がかかる場合があります。)


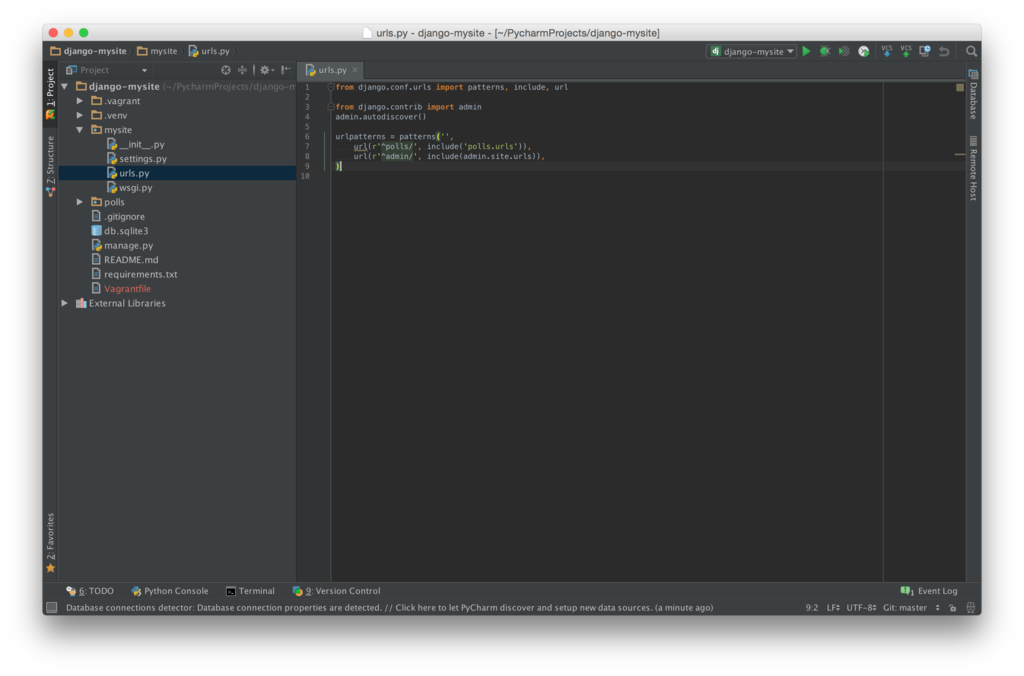
適当な Python ファイルを開き、赤いアンダーライン(参照エラー)が出ていないことを確認します。
f:id:akiyoko:20151122040424p:plain


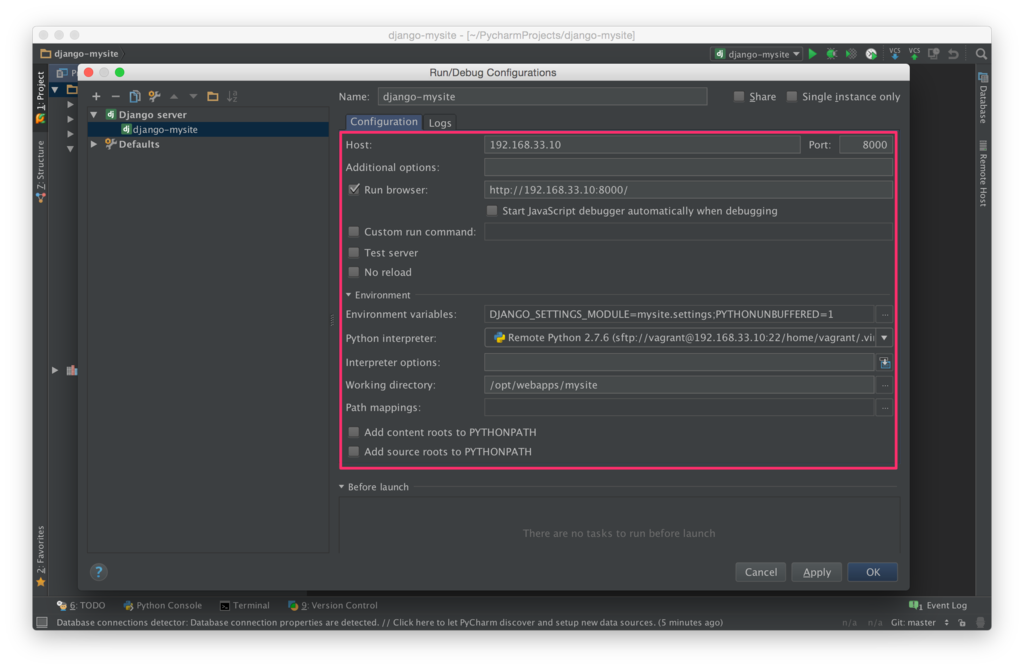
10. Run/Debug 設定

10.1.

[Run] > [Edit Configurations] から設定画面を開き、[Configuration] タブで以下を設定します。

f:id:akiyoko:20151210021803p:plain

「OK」をクリックします。


10.2.

[Run] > [Run 'django-mysite'](あるいは右上の ▶アイコン)をクリックし、サーバが起動されることを確認します。


f:id:akiyoko:20151122043222p:plain


10.3.

[Run] > [Debug 'django-mysite'](あるいは右上の虫アイコン)をクリックし、デバッガが起動されることを確認します。


f:id:akiyoko:20151122043233p:plain


PyCharm上で作成したブレークポイントで止めたプロセスは、

  • 一行ずつ進める ・・・ F8
  • 終了する ・・・ ctl + F9

などの操作ができます。


Djangoプロジェクトの基本的な開発環境設定は、以上で終了です。


11. 便利なショートカットなど

11.1. ショートカット

検索
ショートカット説明
shift + cmd + fgrep検索
opt + cmd + ↓ (↑)grep検索結果の前後を表示
cmd + fファイル内検索
(shift +) cmd + gファイル内検索結果の前後を表示
cmd + b関数・メソッドの宣言にジャンプ
opt + cmd + F7関数・メソッドを使用している箇所を検索
opt + cmd + ← (→)履歴の前後を表示


ファイルを開く
ショートカット説明
shift x 2 (素早く2回)クイック検索
cmd + e最近開いたファイルを開く
shift + cmd + oファイル名でファイルを開く


差分表示
ショートカット説明
(Project ビューで) cmd + d別ファイルとの Diff


その他
ショートカット説明
cmd + ↑ナビゲーションバーを操作
opt + F12Terminal を開閉
shift + cmd + a利用できるアクションを検索


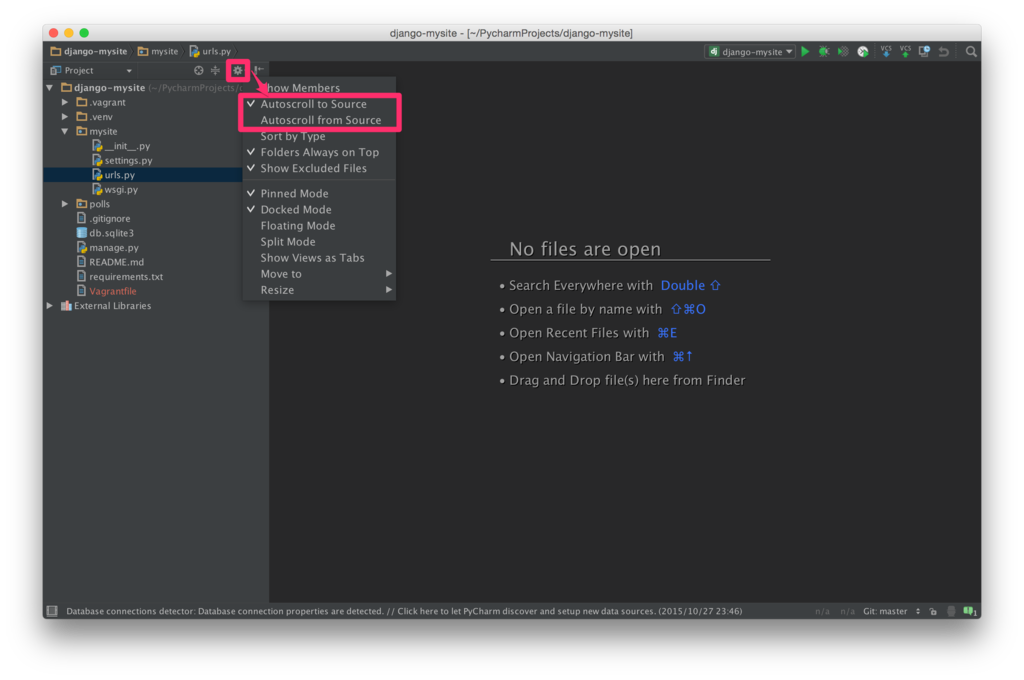
11.2. 開いているファイルを Project ビューで表示する

Projectビューの [Scroll from Source] アイコンをクリック

f:id:akiyoko:20151102105407p:plain

あるいは、Projectビューの歯車アイコンから、

  • [Autoscroll to Source] (Projectビューからシングルクリックでソースビューを開く)
  • [Autoscroll from Source] (ソースビューを開くとProjectビューに該当モジュールがフォーカスする)

にチェックを入れておくと便利です。
(私の場合は、[Autoscroll to Source] だけにチェックを入れています。)

f:id:akiyoko:20151102105436p:plain


Mezzanine プロジェクトの開発環境を PyCharm で設定する

$
0
0

はじめに

以前に「見よ!これが Python製の WordPress風フルスタックCMSフレームワーク「Mezzanine(メザニン)」だ!」という記事で、Python製の WordPress風フルスタックCMSフレームワーク「Mezzanine」を紹介しましたが、今回は、その Mezzanine プロジェクトの開発環境を、Mac版 PyCharm Professional Edition で設定するための手順を書いてみます。


PyCharm Professional Edition は Homebrew-Cask でインストールしています。

<過去記事>
akiyoko.hatenablog.jp

PyCharm の初期設定は済んでいるという前提で進めます。

<過去記事>
akiyoko.hatenablog.jp

やりたいこと

  • 最新版の Mezzanine プロジェクトを Vagrant サーバにインストール
  • Vagrant サーバと Mac上の PyCharm とのソースコード同期設定
  • リモートデバッグ設定
  • Mezzanine テーマを変更

環境

<クライアント>

  • Mac OS X 10.10.5
  • PyCharm (Professional Edition) 5.0.4

<サーバ>

  • Ubuntu 14.04 LTS(on Vagrant)
    • IPアドレス:192.168.33.103
    • ログインユーザ:vagrant

<Mezzanineプロジェクト>

  • Django 1.9.4
  • Mezzanine 4.1.0
  • Cartridge 0.11.0


1. PyCharm の設定(1)

1.1. Pure Python Project を作成

PyCharm を起動し、 [Create New Project] をクリックします。

[Pure Python] を選択し、

Location/Users/akiyoko/PycharmProjects/mezzanine_project
Interpreter(適当)

を設定します。Interpreter は、後でリモート側の virtualenv のものに変更するので、ここでは適当なものを選択しておきます。

f:id:akiyoko:20160313142425p:plain

ここで、[Django] プロジェクトではなく [Pure Python] を選択した理由は、[Pure Python] プロジェクトにしておかないとリモートデバッグ機能が使えない(はずだ)からです。


1.2. Vagrant連携

[Tools] > [Vagrant] > [Init in Project Root] を選択します。


PyCharm 上で、Vagrantfile を開いて編集します。

<変更後>

  config.vm.network "private_network", ip: "192.168.33.103"

[Tools] > [Vagrant] > [Up] でインスタンスを起動します。


2. Vagrantサーバの初期設定

Vagrant サーバに ssh で乗り込みます。

$ ssh vagrant@192.168.33.103


2.1. 最低限のインストール

$ sudo apt-get update
$ sudo apt-get -y install python-dev git tree


2.2. MySQL をインストール

Ubuntu サーバに MySQL をインストールします。

sudo apt-get -y install mysql-server
(root/rootpass)
sudo apt-get -y install mysql-client libmysqlclient-dev python-mysqldb

$ mysql --version
mysql  Ver 14.14 Distrib 5.5.47, for debian-linux-gnu (x86_64) using readline 6.3

sudo mysql_install_db

### 文字化け対策(セクションの最後に以下の設定を追加)
### http://blog.snowcait.info/2014/06/04/mariadb-utf8/
$ sudo vi /etc/mysql/my.cnf
---
[mysqld]
  ・
  ・
# ssl-ca=/etc/mysql/cacert.pem
# ssl-cert=/etc/mysql/server-cert.pem
# ssl-key=/etc/mysql/server-key.pem

# Character set settings
character-set-server = utf8

[mysqldump]
  ・
  ・
---

$ sudo service mysql restart

$ sudo mysql_secure_installation
Enter current password for root (enter for none):
Change the root password? [Y/n] n
Remove anonymous users? [Y/n] Y
Disallow root login remotely? [Y/n] Y
Remove test database and access to it? [Y/n] Y
Reload privilege tables now? [Y/n] Y
参考


データベース、データベースユーザを作成します。
なお、データベース名は Djangoプロジェクト名と合わせて myproject とします。

データベース名myproject
データベースユーザmyprojectuser
データベースユーザパスワードmyprojectuserpass
$ mysql -u root -p
mysql> create database myproject character set utf8;
mysql> create user myprojectuser@localhost identified by "myprojectuserpass";
mysql> grant all privileges on myproject.* to myprojectuser@localhost;
mysql> flush privileges;
mysql> exit


2.3. pip をインストール

Python 2.7.9 以降であれば pip がバンドルされているが、Ubuntu 14.04LTS では Python 2.7.6 が標準なので、手動でインストールします。

「sudo apt-get -y install python-pip」でインストールすると pip のバージョンが古いので、get-pip.py で最新版を入れることにします。

$ wget https://bootstrap.pypa.io/get-pip.py
$ sudo -H python get-pip.py
$ pip --version
pip 8.1.0 from /usr/local/lib/python2.7/dist-packages (python 2.7)

2.4. virtualenv, virtualenvwrapper をインストール

### virtualenv, virtualenvwrapper をインストール
$ sudo -H pip install virtualenv virtualenvwrapper

### virtualenvwrapper の設定
$ cat << EOF >> ~/.bash_profile

if [ -f ~/.bashrc ]; then
    . ~/.bashrc
fi
EOF
$ cat << EOF >> ~/.bashrc

source /usr/local/bin/virtualenvwrapper.sh
export WORKON_HOME=~/.virtualenvs
EOF
$ source ~/.bashrc


2.5. Mezzanineプロジェクトを作成

Overview — Mezzanine 4.0.1 documentation
に従って、Mezzanineプロジェクトのインストールをします。

### Djangoプロジェクトの virtualenv 環境を設定して activate
$ mkvirtualenv myproject

### /opt/webapps 配下にプロジェクトの外箱を作成
$ sudo mkdir -p /opt/webapps/myproject
$ sudo chown -R `whoami`. /opt/webapps

### イメージライブラリのインストール
### http://mezzanine.jupo.org/docs/overview.html#dependencies
$ sudo apt-get -y install libjpeg8 libjpeg8-dev
$ sudo apt-get -y build-dep python-imaging

### MySQLライブラリのインストール
$ pip install MySQL-python

### Mezzanine プロジェクトを作成
$ cd /opt/webapps/myproject/
### Cartridge のインストール
$ pip install -U cartridge

$ pip list |grep Django
Django (1.9.4)
$ pip list |grep Mezzanine
Mezzanine (4.1.0)
$ pip list |grep Cartridge
Cartridge (0.11.0)

### プロジェクトのディレクトリ構造は
### myproject/ as <repository_root> also as <django_project_root>
### └─ config/ as <configuration_root>
$ mezzanine-project -a cartridge config .

$ tree -a /opt/webapps/myproject/
/opt/webapps/myproject/
├── config
│   ├── dev.db
│   ├── __init__.py
│   ├── local_settings.py
│   ├── settings.py
│   ├── urls.py
│   └── wsgi.py
├── deploy
│   ├── crontab.template
│   ├── gunicorn.conf.py.template
│   ├── local_settings.py.template
│   ├── nginx.conf.template
│   └── supervisor.conf.template
├── .DS_Store
├── fabfile.py
├── .gitignore
├── .hgignore
├── __init__.py
├── manage.py
└── requirements.txt


2.6. Django のデータベース設定を変更

### デフォルトで用意されている config/dev.db は不要なので削除
$ rm config/dev.db

### MySQL用の設定変更
$ vi config/local_settings.py

<変更前>
---
DATABASES = {
    "default": {
        "ENGINE": "django.db.backends.sqlite3",
        "NAME": "dev.db",
        "USER": "",
        "PASSWORD": "",
        "HOST": "",
        "PORT": "",
    }
}
---

<変更後>
---
DATABASES = {
    "default": {
        "ENGINE": "django.db.backends.mysql",
        "NAME": "myproject",
        "USER": "myprojectuser",
        "PASSWORD": "myprojectuserpass",
        "HOST": "localhost",
        "PORT": "",
    }
}


2.7. デモ用のレコードを投入

createdb でデモ用のレコードを投入することができます。

### migrate実行
### --noinput オプションを付けると、デモ用の初期データ(site, superuser, 画像などのコンテンツ, etc)を自動登録
### --nodata オプションを付けると、デモ用画像やギャラリーなどのコンテンツを static 配下に自動作成しない
$ python manage.py createdb --noinput

### とりあえずデータベースをバックアップ
### http://weblabo.oscasierra.net/mysql-mysqldump-01/
### ちなみに、リストアするときは mysql -u root -p myproject < ~/myproject_init.dump
$ mysqldump --single-transaction -u root -p myproject > ~/myproject_init.dump


2.8. runserver で起動

$ python manage.py runserver 0.0.0.0:8000

http://192.168.33.103:8000/admin/
にブラウザからアクセスします。
(admin/default)


疎通がOKなら、runserver を一旦停止します。


3. PyCharm の設定(2)

3.1. デプロイ先サーバ設定

[Tools] > [Deployment] > [Options] の [Exclude items by name] に以下を設定します。

.svn;.cvs;.idea;.DS_Store;.git;.hg;.vagrant;Vagrantfile;*.pyc;*.swp

f:id:akiyoko:20160313155118p:plain

[Tools] > [Deployment] > [Configuration] で設定画面を開き、「+」ボタンをクリックしてサーバの設定を追加します。

Namemezzanine_project
TypeSFTP

f:id:akiyoko:20160313155825p:plain

各種設定をします。

[Connection]

[Visible only for this project] にチェックを入れます。

SFTP host192.168.33.103
Port22
Root path/([Autodetect] はクリックしない。「/home/vagrant」だとファイルを同期ダウンロードできなくなる)
User namevagrant
Passwordvagant([Save password] にチェックを入れる)

f:id:akiyoko:20160313155856p:plain

[Mappings]

[Use this server as default] をクリックします。

Local path/Users/akiyoko/PycharmProjects/mezzanine_project(デフォルトのまま)
Deployment path/opt/webapps/myproject

f:id:akiyoko:20160313155920p:plain


3.2. ソースコードの同期

プロジェクトで右クリック > [Deployment] > [Download from mezzanine_project] を選択して、Vagrantサーバから PyCharm にプロジェクトをダウンロードします。


ここで、[Tools] > [Deployment] > [Automatic Upload] にチェックを入れます。


3.3. ローカル側でソースコードを Git管理

まず、不要なファイルを削除します。
Mercurialは使わないので .hgignore を Projectペイン上で削除します。


次に、PyCharm の Terminal を開きます。

まだ git config -l の設定をしていなければ、PyCharm の Terminal で以下を設定します。

$ cd /Users/akiyoko/PycharmProjects/mezzanine_project/
$ git config --global user.name akiyoko
$ git config --global user.email akiyoko@users.noreply.github.com
$ git config --global color.ui auto

git init する前に、.gitignore に PyCharm 用の設定を追加しておきます。

.gitignore

*.pyc
*.pyo
*.db
.DS_Store
.coverage
local_settings.py
/static

# PyCharm
.idea/
.vagrant/
Vagrantfile


一旦コミットします。

$ git init
$ git add .
$ git commit -m "Initial commit"


3.4. Project Interpreter の設定

[Preferences] > [Project: mezzanine_project] > [Project Interpreter] から、[Python Interpreter] の右側の歯車アイコンをクリックし、[Add Remote] を選択します。


[Vagrant] を選択し、

Vagrant Instance Folder/Users/akiyoko/PycharmProjects/mezzanine_project(デフォルトのまま)
Vagrant Host URLssh://vagrant@127.0.0.1:2222(デフォルトのまま)
Python interpreter path/home/vagrant/.virtualenvs/myproject/bin/python

を入力して、OK をクリックします。

f:id:akiyoko:20160313160715p:plain

作成した Remote Interpreter が選択されていることを確認して、[OK] をクリックします。


ここで、Python モジュールに参照エラーが出ないようにするために、[File] > [Invalidate Caches / Restart] を選択し、[Invalidate and Restart] をクリックして、PyCharm を再起動しておきます。


3.5. Run/Debug設定

Project ペインの manage.py ファイルで右クリック > [Create "manage"] を選択します。

Namemanage
Scriptmanage.py
Script parametersrunserver 0.0.0.0:8000
Environment variablesPYTHONUNBUFFERED=1(デフォルトのまま)
Python interpreterProject Default (Remote Python 2.7.6 Vagrant VM at ~/PycharmProjects/mezzanine_project (/home/vagrant/.virtualenvs/myproject/bin/python))
Working directory/opt/webapps/myproject
Path mappings - Local path/Users/akiyoko/PycharmProjects/mezzanine_project
Path mappings - Remote path/opt/webapps/myproject

ここで、「Add content roots to PYTHONPATH」と「Add source roots to PYTHONPATH」のチェックを外します。

f:id:akiyoko:20160314074038p:plain

デバッグ実行できるか確認できれば、OKです。


3.6. テンプレート設定

ここで、Mezzanine本体の templates をコピーしておきます。

Vagrant サーバ側で、

$ cp -a ~/.virtualenvs/myproject/lib/python2.7/site-packages/mezzanine/core/templates .

を実行した後、PyCharm 上でファイルを同期(ダウンロード)します。


テンプレート(htmlファイル)が参照エラーで真っ赤にに染まってしまっている場合は、[Preferences] > [Languages & Frameworks] > [Python Template Languages] から、「Template language」を「Django」に設定すれば解消するはずです。

f:id:akiyoko:20160313161637p:plain


4. テーマ変更

参考


試しに、
https://github.com/thecodinghouse/mezzanine-themes.git
の moderna テーマを入れてみます。


Vagrantサーバ側で、以下を実行します。

cd ~
git clone https://github.com/thecodinghouse/mezzanine-themes.git
cd /opt/webapps/myproject/
cp -a ~/mezzanine-themes/moderna moderna


コピーしたテーマを Djangoアプリケーションとして設定するために、config/settings.py の INSTALLED_APPS の最後、および TEMPLATES/DIRS の先頭に追加します。

config/settings.py

TEMPLATES = [
    {
        "BACKEND": "django.template.backends.django.DjangoTemplates",
        "DIRS": [
            os.path.join(PROJECT_ROOT, "moderna/templates"),
            os.path.join(PROJECT_ROOT, "templates")
        ],
        "APP_DIRS": True,
        ・
        ・
]

INSTALLED_APPS = (
    ・
    ・
    "mezzanine.twitter",
    # "mezzanine.accounts",
    # "mezzanine.mobile",
    "moderna",
)

まとめ

Mezzanine は普通の Django プロジェクトなので、インストールやテンプレートの設定自体は Django のものと何ら変わりません。


あとはドキュメントを読むだけですね。

Mezzanine — Mezzanine 4.0.1 documentation


ゼロからはじめる Django で ECサイト構築(その1:ECパッケージの選定)

$
0
0

はじめに

とあるニーズがあって、Python(ほぼ Django 一択)ベースの ECパッケージを使った ECサイトを構築しようかと、昨年の10月頃から細々と調査をしていたのですが、EC-CUBE や osCommerce、Zen Cart、Magento、WordPress + WelCart など PHPベースの ECパッケージについて書かれた記事は数多く存在するのですが、Pythonベースの ECパッケージについての記事があまり無いように思ったので、勉強がてらメモを残していきたいと思います。


ECサイトのタイプ

まず第一に、ECサイトには、以下に示したような構築方式および出店方式の違いがありますが、導入実績や信頼性、初期・月額費用、構築期間、カスタマイズ性、専門知識の必要性、集客・販促の必要性などの特徴を考慮しつつ、目的に合ったものを採用する必要があります。

以下の表では、構築・出店方式のタイプ別に、構築や運用の手間がかかりそうな順に並べてみました。

構築・出店方式概要代表例
フルスクラッチ型フルスクラッチで構築
無料パッケージ型オープンソースの ECパッケージをサーバに導入EC-CUBEZen CartLive Commerceなど
有料パッケージ型有料の ECパッケージをサーバに導入ecbeingコマース21など
ASP型ECサービスをレンタルえびすマートエレコマなど
インスタントEC型簡単にネットショップ開設Stores.jpBASEなど
オンラインモール型Web上の仮想商店街楽天市場、Amazon、ポンパレモールなど
C2Cモール型消費者間取引ヤフオク、メルカリLINE MALLなど


参考


私の場合は、カスタマイズ性と構築費用(ECパッケージのコストゼロ)を最優先させかったので、オープンソースの ECパッケージを利用する「無料パッケージ型」を採用することとしました。


ECパッケージの特徴

そもそも ECパッケージとは、ECサイト(電子商取引をするためのネットショップ)を構築するために必要な数々の機能を一つにまとめたソフトウェアを指します。


一般に、ECパッケージに求められる機能としては、

  • ショップフロント機能
    • 商品紹介
      • 商品カテゴリ別表示
      • 商品一覧
      • 商品詳細
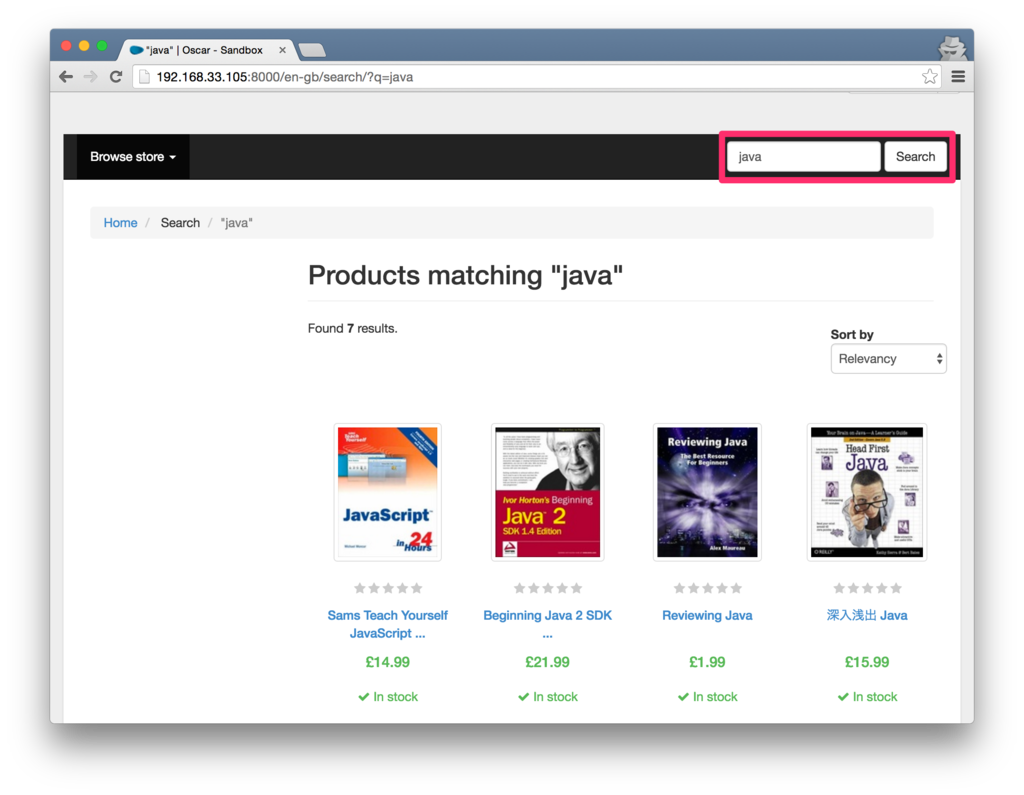
      • 商品検索(キーワード / 価格帯)
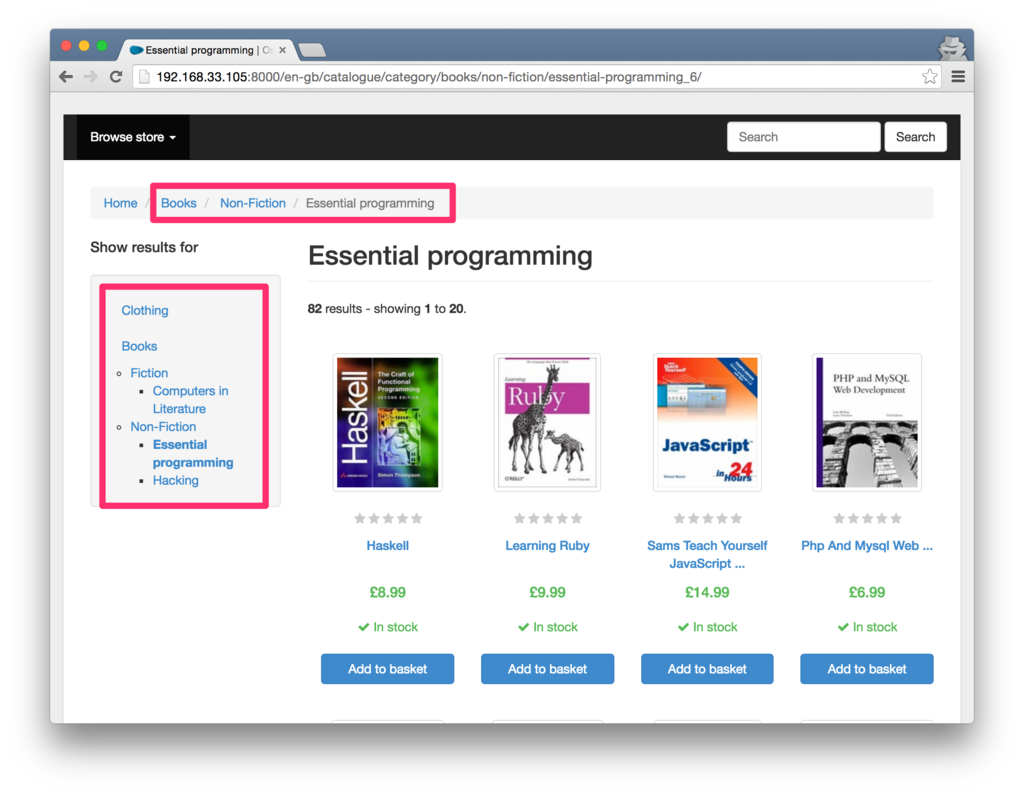
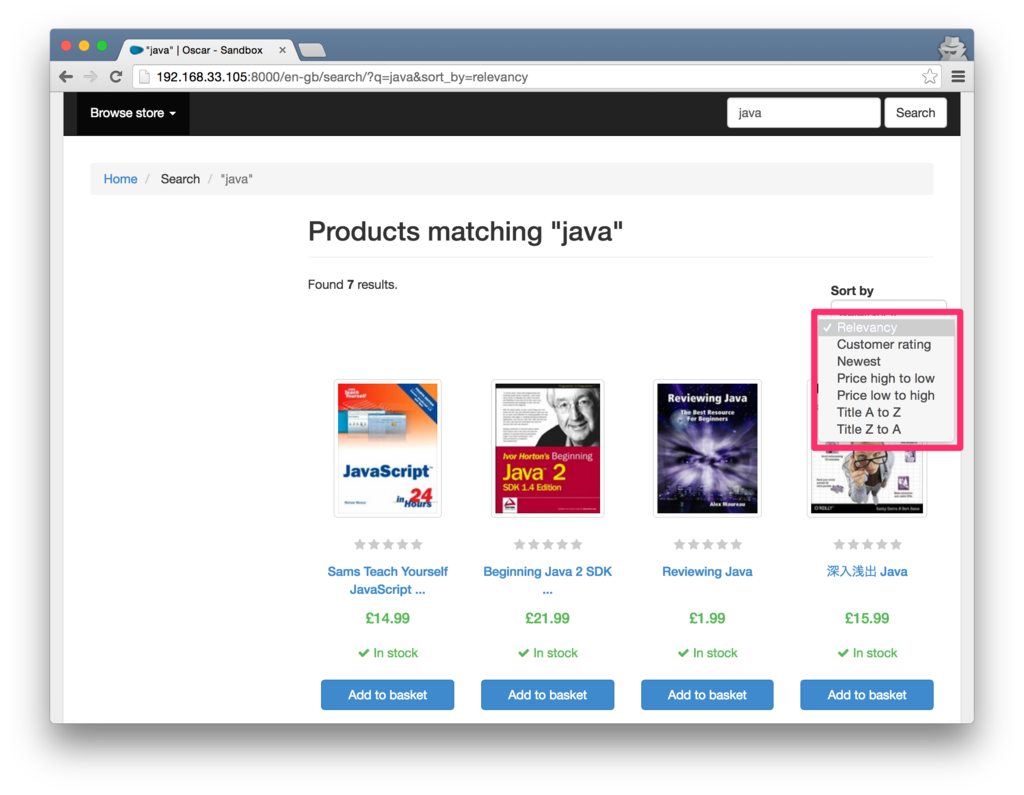
      • 商品の並び替え(注文数 / 価格 / 新着 / ユーザー評価)
      • 最近閲覧した商品紹介
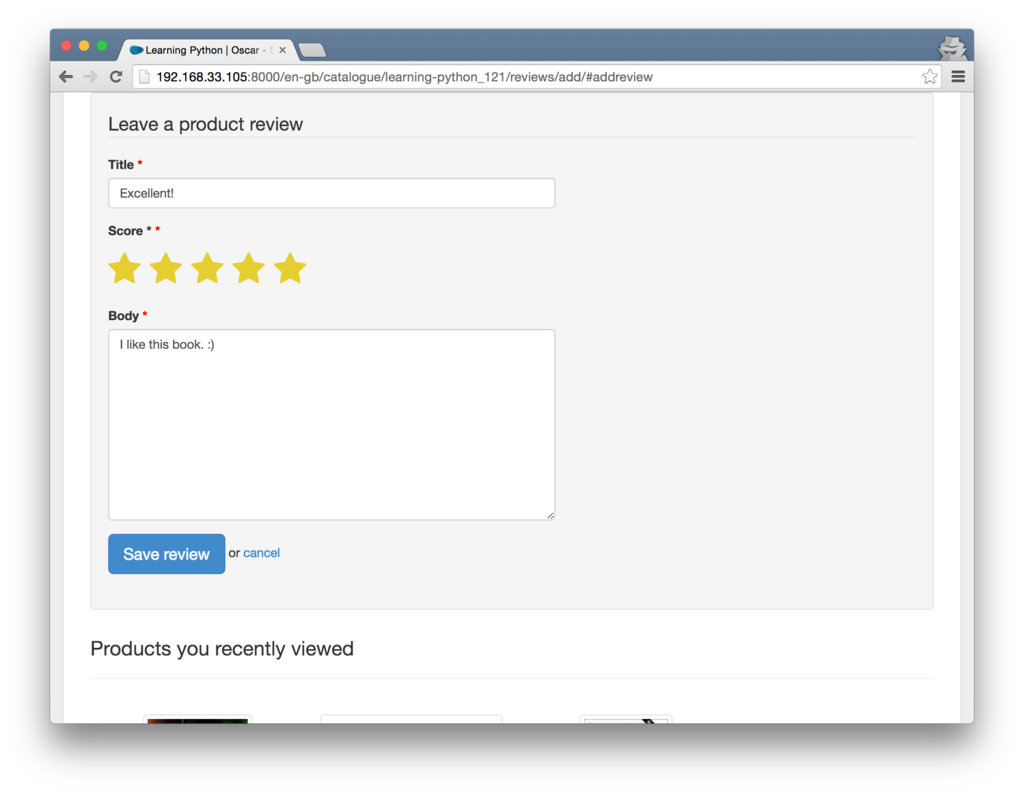
      • ユーザー評価(レビュー)
    • 商品注文
      • ショッピングカート
      • 決済手続き
        • クレジットカード決済
        • 振込決済(コンビニ / 銀行 / 郵便局)
        • 代引決済
        • 携帯キャリア決済
      • タイムセール
      • クーポン
      • ディスカウント(ボリュームディスカウント / 配送料無料)
      • ゲスト注文
      • 予約注文
      • 関連商品・レコメンド(この商品を買った人はこんな商品も買っています)
    • メンバーシップ
      • アカウント登録
      • 退会
      • パスワード変更
      • ログイン
      • ログアウト
    • マイページ
      • 注文履歴
      • 配送先登録
      • お気に入り登録(ほしい物リスト)
    • 問い合わせ
  • バックオフィス機能
    • 商品管理
      • 商品カテゴリ登録
      • 商品登録
      • タイムセール登録
      • クーポン登録
      • ディスカウント条件設定
    • 受注管理
      • 消し込み(返品処理)
    • 顧客管理
    • 問い合わせ管理
    • 売上集計
    • 販売分析
    • 各種メール送信
    • システム設定
      • システムメンテナンス
      • デザインテーマ設定
      • 多言語化

などが挙げられます。


無料パッケージにせよ有料パッケージにせよ、ECパッケージの選定においては、上記の機能がどれだけ実現できるかが一つの重要な選定基準となります。


ECパッケージの選定

ここで、ECパッケージを選定するために、Djangoベースの ECパッケージの中から人気のあるものをリストアップしてみます。


Djangoベースのパッケージの評価するには、Django Packages : E-Commerceを参照するのが手っ取り早いです。

Django Packages で比較

スター数の上位 4つをリストアップしてみました。
(「SATCHLESS」は最近開発が活発でなくなって来ているようなので、除外しました。)


PACKAGEDJANGO-OSCARDJANGO SHOPSALEORCARTRIDGE
DescriptionDomain-driven e-commerce for DjangoA Django based shop systemAn e-commerce storefront for Python and DjangoEcommerce for Mezzanine
CategoryFrameworkFrameworkFrameworkApp
Development StatusProduction/StableUnknownn/aBeta
Last updatedApril 3, 2016, 5:30 a.m.May 16, 2016, 9:40 a.m.May 11, 2016, 10:38 a.m.April 4, 2016, 2:54 a.m.
Version1.2rc10.9.1n/a0.11.0
Stars19971044501464
Repo Forks814438199222
Payment MethodsGateways: DataCash, PayPal, PaymentExpress. There is also an accounts extension that provides support for giftcards, loyalty schemes and customer budgets.cash-on-delivery paypal (ext), postfinance (ext) Easily extensibleAll supported by django-payments: Authorize.net, Braintree, Coinbase, Cybersource, Dotpay, Google Wallet, PayPal, Sage Pay, Sofort, StripeAuthorize.net, eGate, PayPal, Stripe, Braintree, PIN
Shipping optionsExtremely flexible. Any part of the shipping calculation can be customised to suit your domain.Flat rate, easy api for extensibilityPer-country shipping rules provided out of the box, custom options are easy to implement. Split deliveries for a single orderFlat rate provided plus hooks for implementing your own rules
Configurable Checkout StepsYes - The checkout can be easily customised to add, remove, alter or combine steps. It's not controlled by a single setting though.Saleor is meant to be forked so you can just edit the code

Django Packages : E-Commerceより抜粋。2016年5月22日時点のもの)


DJANGO-OSCAR」と「DJANGO SHOP」が二大人気となっているようですが、「DJANGO-OSCAR」のスター数・フォーク数はほぼダブルスコアになっています。

なお、CARTRIDGEのカテゴリが「App」となっていますが、このパッケージはショッピングカート機能のみを提供するもので、「Mezzanine」という CMSパッケージ向けに作られています。


ちなみに、「Django Packages : E-Commerce」の全パッケージ中でステータスが「Production/Stable」になっていたのは、

の 4つだったのですが、スターやフォーク数では「DJANGO-OSCAR」が圧倒的人気です。


ECパッケージの機能の中でも特に重要な機能の一つが「決済処理」ですが、多くの ECパッケージが、Pluggable なモジュール形式の「決済モジュール」を提供しています。PayPal や Stripe などの決済代行サービスに合わせた決済モジュールが個別に用意されているケースが多いのですが、ECパッケージ本体に組み込まれている場合や、別パッケージとしてソースコードが管理されている場合もあります。


決済モジュールの特徴

決済処理に特化したモジュールは「決済モジュール」と呼ばれ、Pluggable に差し替え可能な仕組みになっている場合が多く、決済代行サービスに合わせたものをチョイスして取り込むことができます。ECパッケージ本体やサードパーティ(コミュニティ)の決済モジュールで対応できない決済代行サービスを利用したい場合は、決済モジュール自体を自作する必要も出てきます。

決済処理の仕組み

ECサイトの決済処理の仕組みを簡単に図解すると、以下のようになります。

f:id:akiyoko:20160515172525p:plain
10 Safe and Popular Gateways for Online Payment Processing | InstantShiftを参考に作成)


ECサイトから見れば、決済代行サービスを窓口(ゲートウェイ)として利用することで、Visa や MasterCard のようなカード会社と直接やり取りすることなしに、決済処理ができるようになっています。


決済モジュールは以下の位置に配置され、API を通じて決済代行サービスとやり取りを行います。

f:id:akiyoko:20160522231309p:plain


決済モジュールは、ECパッケージのチェックアウト機能に合わせた決済モジュールが複数用意されている場合が多いので、使用する決済代行サービスに合わせてチョイスするのがベストです。


例えば、ECパッケージに「DJANGO-OSCAR」を使うのであれば、

django-oscar-datacashIntegration with the DataCash payment gateway
django-oscar-paypalIntegration with PayPal. This currently supports both Express Checkout and PayFlow Pro.
django-oscar-paymentexpressIntegration with the Payment Express payment gateway
django-oscar-accountsManaged accounts (can be used for giftcard functionality and loyalty schemes)
django-oscar-storesPhysical stores integration (opening hours, store locator etc)
django-oscar-ewayIntegration with the eWay payment gateway.
django-oscar-sagepay-directIntegration with "DIRECT" part of Sagepay's API

https://github.com/django-oscar/django-oscar#extensionsより)

が本家(django-oscar)から提供されており、これらは比較的信頼性も高いものと推測されます。その他にも、コミュニティが製作した決済モジュールも多々用意されているようですが、こちらの信頼性については個別に検証が必要です。


以上から、例えば、決済代行サービスに PayPal を利用する予定であれば「django-oscar-paypal」をまずは検討するのがよい、ということになります。しかしながら、PayPal を利用するにしても、使用する API の種類によっては(例えば日本国内では)対応できないという可能性もあるため、実際に検証が必要となります。


決済モジュールの選定

ECパッケージに依存しない決済モジュールも存在します。ECパッケージで用意された決済モジュールが決済代行サービスに対応していない場合などは、それらを使用すれば(カスタマイズは必要になると思いますが)、イチから自作しなくてもよくなるケースもあるでしょう。


こちらについても、Django Packages で比較検討してみることにしました。

Django Packages で比較

スター数の上位 5つをリストアップしました。
(「LFS - LIGHTNING FAST SHOP」は ECパッケージなので除外。加えて、「DJANGO-ZEBRA」は長年メンテされていなさそうなので除外しました。)


PACKAGEDJANGO-MERCHANTDJANGO-PAYPALDJ-STRIPEDJANGO-GETPAIDDJANGO-PAYMENTS
DescriptionA Django app to accept payments from various payment processors via Pluggable backends.A pluggable Django application for integrating PayPal Payments Standard or Payments ProDjango + Stripe Made EasyDjango payments processor.Universal payment handling for Django
Development StatusAlphaUnknownBetaProduction/Stablen/a
Last updatedJuly 8, 2015, 1:29 a.m.May 9, 2016, 1:51 p.m.May 11, 2016, 12:01 p.m.Jan. 25, 2016, 4:58 p.m.April 20, 2016, 12:05 p.m.
Version0.20.3.20.8.01.7.3n/a
Stars825307285167142
Repo Forks142831416357

Django Packages : Payment Processingより抜粋。2016年5月22日時点)


全体的に「Production/Stable」ステータスのものが少ない印象です。
また、Stripe や Braintree など、日本ではまだ使えない決済サービス向けに作られたものが多いようにも思いました。


まとめ

「ゼロからはじめる Django で ECサイト構築」の第一回として、ECパッケージの選定を行いました。

「DJANGO-OSCAR」が圧倒的人気で機能も充実しているようです。まずは、「DJANGO-OSCAR」の機能を実際に見ていきたいと思います。
また、Mezzanine 向けのショッピングカート機能を提供する「CARTRIDGE」も気になるところです。

今後は、この二つを中心に調査を続けていきます。

ゼロからはじめる Django で ECサイト構築(その2:Django Oscar の Sandbox サイト構築)

$
0
0

前回の記事「ゼロからはじめる Django で ECサイト構築(その1:ECパッケージの選定)」では、Django ベースの ECパッケージを選定し、「Django Oscar」が圧倒的人気で最有力候補であることが確認できました。


<過去記事>
akiyoko.hatenablog.jp


今回、「ゼロからはじめる Django で ECサイト構築」シリーズの第二回では、実際に、Django Oscar の Sandbox サイトを構築していくことにします。


f:id:akiyoko:20160531080056j:plain


Django Oscar について

概要

Django Oscar は、ECサイトを構築・運営するために必要な多くの機能が盛り込まれた、オープンソースで Django 製の ECパッケージです。ライセンスは修正BSDライセンス(New BSD license)で、商用利用も可能です。

github.com


機能の詳細については、次回以降にまとめていく予定です。


Sandbox とは

Sandbox とは、動作確認をするための開発者用のテスト環境のことを指します。
いわゆる「デモ環境」のことですね。

Django Oscar には、いろんな機能が組み込まれたデモサイトを簡単に立ち上げられるような仕組みが備わっていて、これを使うことで、Django Oscar の機能をお試しで検証することができます。


ECサイト構築に必要な三要素

さて、ECサイトを構築するためには、

  • 決済代行サービスのマーチャントアカウント
  • ECパッケージ
  • サーバ

の三つが必要最低限の要素として挙げられるでしょう。


まず一つ目の「決済代行サービスのマーチャントアカウント」は、PayPalWebPayなどの決済代行サービスのビジネスアカウント(売り手アカウント)を指します。Sandbox 環境においては、Sandbox(ややこしいですが、決済代行サービス側が用意してくれるテスト環境を指します)用のマーチャントアカウントを使用することで、実際に支払いをすることなく決済処理の流れをシミュレートすることができます。


今回の検証では、決済代行サービスとして PayPal を利用するのですが、Sandbox については次のように説明されています。

ペイパルでは、決済サービスの動作確認ができるテスト環境として、Sandboxを公開しています。
テスト用の「Buyer(買い手)」アカウントと、「Seller(売り手)」アカウントを作成し、サービスの導入から、決済の流れまで、詳細にシミュレーションすることができます。


PayPal(日本語) - ペイパル|サポート|導入・ご利用方法|Sandbox


二つ目の ECパッケージについては、前回の選定で最有力候補となった「Django Oscar」を使用します。なお、決済モジュールには「django-oscar-paypal」を使用することとします。


三つ目のサーバについては、今回の Sandbox サイトでは仮想環境(Vagrant 上の Ubuntu 仮想マシン)を利用します。


Sandbox サイトの構築手順

ここから実際に、Django Oscar の Sandbox サイトを構築していきます(2016/5/28 バージョン)。


構築する環境は以下となります。

  • サーバ:Ubuntu 14.04TLS(on Vagrant)
  • Python 2.7.6
  • Django 1.9.6(現時点の最新バージョン)
  • ECパッケージ:Django Oscar 1.2+(現時点の最新バージョン)
  • 決済モジュール:django-oscar-paypal 0.9.7(現時点の最新バージョン)

 
以降、次のような手順で進めていきます。


1. サーバの初期設定

私は通常、PyCharm Professional Edition の

  • Vagrant 連携機能
  • サーバとのソースコード同期機能
  • リモートデバッグ機能

などの機能を利用するために、PyCharm を使っています。なので、いつもなら

  • PyCharm の設定
    • Pure Python Project を作成(空っぽのプロジェクトを作成)
    • Vagrant連携

という流れで、PyCharm から Ubuntu サーバを立ち上げています。


<過去記事>
akiyoko.hatenablog.jp


手動でやるなら、以下のコマンドを実行します。

$ cd ~/PycharmProjects/oscar_sandbox/
$ vagrant init ubuntu/trusty64

仮想マシンに固定 IPアドレスを付けるために、Vagrantfile を書き換えます。

  config.vm.network "private_network", ip: "192.168.33.105"

仮想マシンを起動します。

$ vagrant up


Vagrant サーバに ssh で乗り込みます。

$ ssh vagrant@192.168.33.105


1.1. 最低限のライブラリをインストール
$ sudo apt-get update
$ sudo apt-get -y install python-dev git tree


1.2. MySQL をインストール

Ubuntu サーバに MySQL をインストールします。

$ sudo apt-get -y install mysql-server
(root/rootpass)
$ sudo apt-get -y install mysql-client libmysqlclient-dev python-mysqldb

$ mysql --version
mysql  Ver 14.14 Distrib 5.5.49, for debian-linux-gnu (x86_64) using readline 6.3

$ sudo mysql_install_db

### 文字化け対策(セクションの最後に以下の設定を追加)
### http://blog.snowcait.info/2014/06/04/mariadb-utf8/
$ sudo vi /etc/mysql/my.cnf
---
[mysqld]
  ・
  ・
# ssl-ca=/etc/mysql/cacert.pem
# ssl-cert=/etc/mysql/server-cert.pem
# ssl-key=/etc/mysql/server-key.pem

# Character set settings
character-set-server = utf8

[mysqldump]
  ・
  ・
---

$ sudo service mysql restart

$ sudo mysql_secure_installation
Enter current password for root (enter for none):
Change the root password? [Y/n] n
Remove anonymous users? [Y/n] Y
Disallow root login remotely? [Y/n] Y
Remove test database and access to it? [Y/n] Y
Reload privilege tables now? [Y/n] Y


1.3. データベースを作成

データベース、データベースユーザを作成します。
なお、データベース名は Djangoプロジェクト名と合わせて myproject とします。

データベース名myproject
データベースユーザmyprojectuser
データベースユーザパスワードmyprojectuserpass
$ mysql -u root -p
mysql> create database myproject character set utf8;
mysql> create user myprojectuser@localhost identified by "myprojectuserpass";
mysql> grant all privileges on myproject.* to myprojectuser@localhost;
mysql> flush privileges;
mysql> exit


1.4. pip をインストール

Python 2.7.9 以降であれば pip がバンドルされているのですが、Ubuntu 14.04LTS では Python 2.7.6 が標準なので、手動でインストールします。

「sudo apt-get -y install python-pip」でインストールすると pip のバージョンが古いので、get-pip.py で最新版を入れることにします。

$ wget https://bootstrap.pypa.io/get-pip.py
$ sudo -H python get-pip.py
$ pip --version
pip 8.1.2 from /usr/local/lib/python2.7/dist-packages (python 2.7)


参考


1.5. virtualenv, virtualenvwrapper をインストール
### virtualenv, virtualenvwrapper をインストール
$ sudo -H pip install virtualenv virtualenvwrapper

### virtualenvwrapper の設定
$ cat << EOF >> ~/.bash_profile

if [ -f ~/.bashrc ]; then
    . ~/.bashrc
fi
EOF
$ cat << EOF >> ~/.bashrc

source /usr/local/bin/virtualenvwrapper.sh
export WORKON_HOME=~/.virtualenvs
EOF
$ source ~/.bashrc


2. Sandbox サイト(Django Oscar)の作成

2.1. Django Oscar プロジェクトを構築

Setting up the development environment — django-oscar 1.3 documentation
に従って、Oscar プロジェクトのインストールをします。

### Djangoプロジェクトの virtualenv 環境を設定して activate
$ mkvirtualenv myproject

### /opt/webapps 配下にプロジェクトの外箱を作成
$ sudo mkdir -p /opt/webapps/myproject
$ sudo chown -R `whoami`. /opt/webapps

### JPEG Support
### http://django-oscar.readthedocs.org/en/latest/internals/contributing/development-environment.html#jpeg-support
$ sudo apt-get -y install libjpeg-dev libfreetype6-dev zlib1g-dev
### make sandbox をした後であれば ↓ を実行して Pillow を再インストール
### pip install --no-cache-dir -I pillow
### http://qiita.com/tototoshi/items/7b74fe26eb7bf39be7b5

### MySQLライブラリのインストール
###($ pip install MySQL-python でも OK)
$ pip install mysqlclient

### Oscar プロジェクトを作成
$ cd /opt/webapps/myproject/

### 通常であれば、django-admin.py startproject . とするところを、今回は clone -> make sandbox として Sanbox サイトを作成
### http://django-oscar.readthedocs.org/en/latest/internals/getting_started.html
$ git clone https://github.com/django-oscar/django-oscar.git .


ここで、

###$ git checkout 1.2

として、最新の stable バージョン (1.2) に合わせようとしましたが、make sandbox 実行時に、

django.db.utils.OperationalError: (2013, 'Lost connection to MySQL server during query')

というエラーになってしまったので、master のままで試すことにしました(2016/5/28 時点)。


ちなみに、現時点の最新コミットは以下の通りです。

commit 156a4b814d540bb1c6216b757cfa4441b36f8077
Merge: e1a8ea7 de633f8
Author: Michael van Tellingen
Date: Wed Apr 13 09:03:37 2016 +0200

Merge pull request #2030 from crgwbr/fix_broken_py3_migrations

Fix makemigrations in Python 3


### MySQL用の設定変更
$ vi sites/sandbox/settings.py
<変更前>
---
DATABASES = {
    'default': {
        'ENGINE': 'django.db.backends.sqlite3',
        'NAME': location('db.sqlite'),
        'USER': '',
        'PASSWORD': '',
        'HOST': '',
        'PORT': '',
        'ATOMIC_REQUESTS': True
    }
}
---
  ↓
<変更後>
---
DATABASES = {
    'default': {
        'ENGINE': 'django.db.backends.mysql',
        'NAME': 'myproject',
        'USER': 'myprojectuser',
        'PASSWORD': 'myprojectuserpass',
        'HOST': 'localhost',
        'PORT': '',
        'ATOMIC_REQUESTS': True
    }
}
---

### Sandbox プロジェクトを作成
### プロジェクトのディレクトリ構造は
### myproject/ (as <repository_root>)
### └─ sites/sandbox/ (as <django_project_root> also as <configuration_root>)
$ make sandbox


ちなみに、make sandbox の処理はこのようになっています。

Makefile(抜粋)

install:
    pip install -e . -r requirements.txt

build_sandbox:
    # Remove media
    -rm -rf sites/sandbox/public/media/images
    -rm -rf sites/sandbox/public/media/cache
    -rm -rf sites/sandbox/public/static
    -rm -f sites/sandbox/db.sqlite
    # Create database
    sites/sandbox/manage.py migrate
    # Import some fixtures. Order is important as JSON fixtures include primary keys
    sites/sandbox/manage.py loaddata sites/sandbox/fixtures/child_products.json
    sites/sandbox/manage.py oscar_import_catalogue sites/sandbox/fixtures/*.csv
    sites/sandbox/manage.py oscar_import_catalogue_images sites/sandbox/fixtures/images.tar.gz
    sites/sandbox/manage.py oscar_populate_countries
    sites/sandbox/manage.py loaddata sites/_fixtures/pages.json sites/_fixtures/auth.json sites/_fixtures/ranges.json sites/_fixtures/offers.json
    sites/sandbox/manage.py loaddata sites/sandbox/fixtures/orders.json
    sites/sandbox/manage.py clear_index --noinput
    sites/sandbox/manage.py update_index catalogue

sandbox: install build_sandbox

 
Sandbox の作成が完了したら、作成状況を確認してみます。

$ pip list | grep Django
Django (1.9.6)

$ pip list | grep django-oscar
django-oscar (1.3.dev0, /opt/webapps/myproject/src)

$ pip freeze
alabaster==0.7.8
apipkg==1.4
Babel==2.3.4
beautifulsoup4==4.4.1
coverage==3.7.1
coveralls==0.4.4
decorator==4.0.9
Django==1.9.6
django-debug-toolbar==1.4
django-extensions==1.6.1
django-extra-views==0.6.4
django-haystack==2.4.1
-e git+https://github.com/django-oscar/django-oscar.git@156a4b814d540bb1c6216b757cfa4441b36f8077#egg=django_oscar
django-tables2==1.0.7
django-treebeard==4.0.1
django-webtest==1.7.8
django-widget-tweaks==1.4.1
docopt==0.6.2
docutils==0.12
execnet==1.4.1
factory-boy==2.6.1
fake-factory==0.5.7
flake8==2.5.1
flake8-blind-except==0.1.0
flake8-debugger==1.4.0
funcsigs==1.0.2
ipaddress==1.0.16
ipdb==0.8.1
ipython==4.0.1
ipython-genutils==0.1.0
isort==4.2.2
Jinja2==2.8
MarkupSafe==0.23
mccabe==0.3.1
mock==1.3.0
mysqlclient==1.3.7
nose==1.3.7
pathlib2==2.1.0
pbr==1.10.0
pep8==1.7.0
pexpect==4.1.0
phonenumbers==7.4.1
pickleshare==0.7.2
Pillow==2.7.0
pockets==0.3
ptyprocess==0.5.1
purl==1.3
py==1.4.31
pycountry==1.8
pyflakes==1.0.0
Pygments==2.1.3
pyprof2calltree==1.3.2
pysolr==3.2.0
pytest==2.8.5
pytest-cache==1.0
pytest-cov==2.2.0
pytest-django==2.9.1
pytest-xdist==1.13.1
python-dateutil==2.5.3
pytz==2016.4
PyYAML==3.11
requests==2.7.0
simplegeneric==0.8.1
six==1.10.0
snowballstemmer==1.2.1
sorl-thumbnail==12.4a1
spec==0.11.1
Sphinx==1.3.3
sphinx-rtd-theme==0.1.9
sphinxcontrib-napoleon==0.4.3
sqlparse==0.1.19
tox==1.8.1
traitlets==4.2.1
Unidecode==0.4.19
uWSGI==2.0.12
virtualenv==15.0.1
waitress==0.9.0
WebOb==1.6.1
WebTest==2.0.17
Werkzeug==0.9.6
whitenoise==2.0.6
Whoosh==2.6.0
$ find . -name "*.pyc" -exec rm -rf {} \;
$ tree -a /opt/webapps/myproject/ -I ".git|docs|tests" -L 3
/opt/webapps/myproject/
├── AUTHORS
├── CHANGELOG.rst
├── CONTRIBUTING.rst
├── .coveragerc
├── Dockerfile
├── .dockerignore
├── .gitignore
├── gulpfile.js
│   ├── index.js
│   └── tasks
│       ├── default.js
│       ├── less.js
│       └── watch.js
├── LICENSE
├── lint.sh
├── .mailmap
├── Makefile
├── MANIFEST.in
├── package.json
├── README.rst
├── requirements_migrations.txt
├── requirements.txt
├── runtests.py
├── sandbox.yml
├── setup.cfg
├── setup.py
├── sites
│   ├── _fixtures
│   │   ├── auth.json
│   │   ├── comms.json
│   │   ├── offers.json
│   │   ├── order-events.json
│   │   ├── pages.json
│   │   ├── promotions.json
│   │   ├── range-products.csv
│   │   └── ranges.json
│   ├── README.rst
│   └── sandbox
│       ├── apps
│       ├── deploy
│       ├── fixtures
│       ├── __init__.py
│       ├── logs
│       ├── manage.py
│       ├── public
│       ├── README.rst
│       ├── settings_mysql.py
│       ├── settings_postgres.py
│       ├── settings.py
│       ├── settings_sphinx.py
│       ├── static
│       ├── templates
│       ├── test_migrations.sh
│       ├── update_latest.sh
│       ├── urls.py
│       ├── whoosh_index
│       └── wsgi.py
├── src
│   ├── django_oscar.egg-info
│   │   ├── dependency_links.txt
│   │   ├── PKG-INFO
│   │   ├── requires.txt
│   │   ├── SOURCES.txt
│   │   └── top_level.txt
│   └── oscar
│       ├── app.py
│       ├── apps
│       ├── core
│       ├── defaults.py
│       ├── forms
│       ├── __init__.py
│       ├── locale
│       ├── management
│       ├── models
│       ├── profiling
│       ├── static
│       ├── templates
│       ├── templatetags
│       ├── test
│       └── views
├── tox.ini
├── transifex.sh
├── .travis.yml
└── .tx
    └── config

29 directories, 56 files

ここで一旦、データベースをバックアップしておきます。

### http://weblabo.oscasierra.net/mysql-mysqldump-01/
### ちなみに、リストアするときは mysql -u root -p myproject < ~/myproject_init.dump
$ mysqldump --single-transaction -u root -p myproject > ~/myproject_init.dump


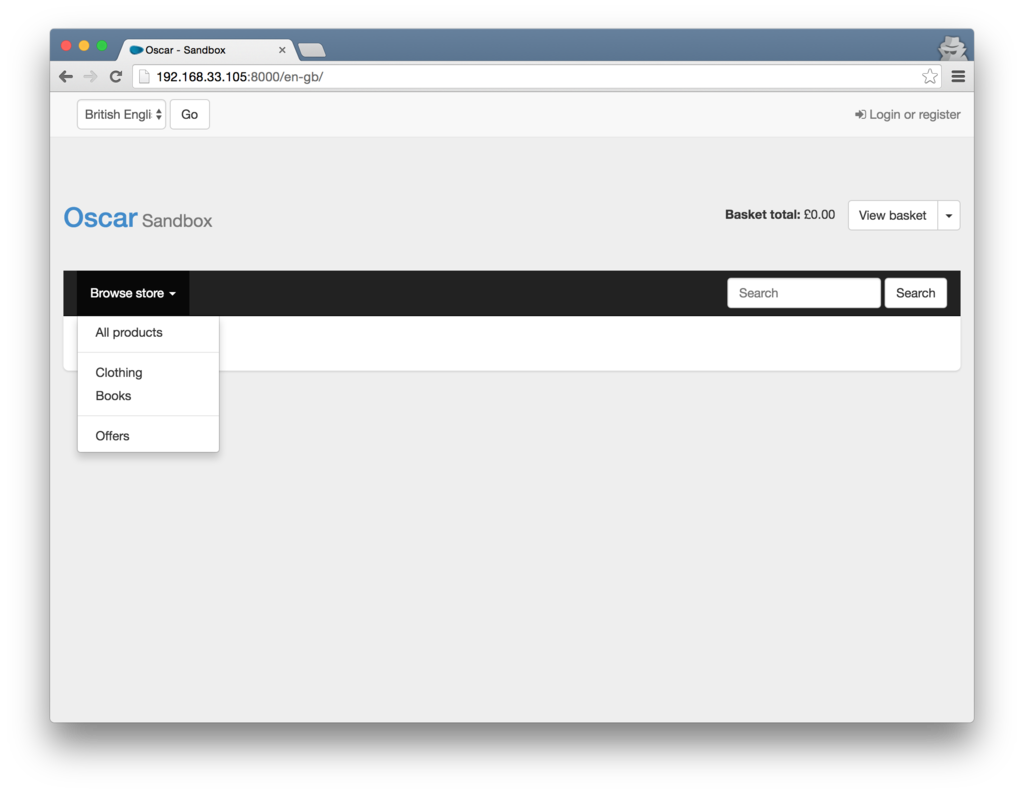
2.2. Runserver で起動
$ python sites/sandbox/manage.py runserver 0.0.0.0:8000

でサーバを起動して、
http://192.168.33.105:8000/
にブラウザからアクセスします。

f:id:akiyoko:20160529121316p:plain


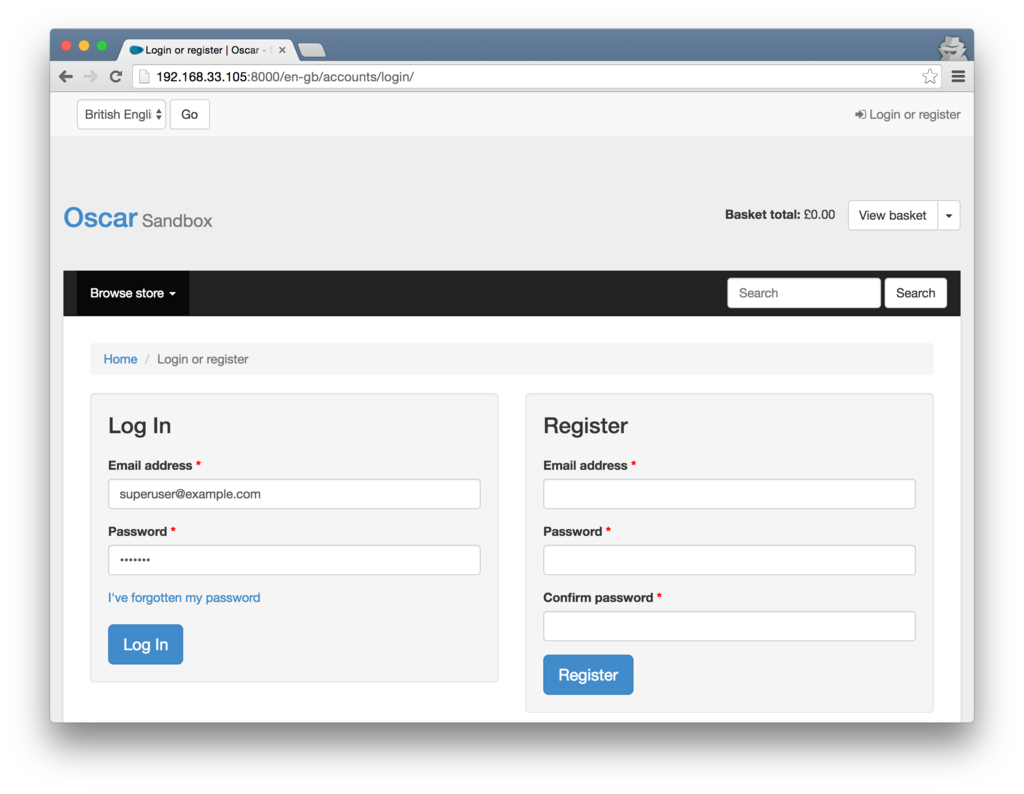
ログインユーザ

username: superuser
email: superuser@example.com
password: testing

username: staff
email: staff@example.com
password: testing

f:id:akiyoko:20160529121332p:plain

f:id:akiyoko:20160529121348p:plain


疎通ができたら、Runserver を一旦停止します。


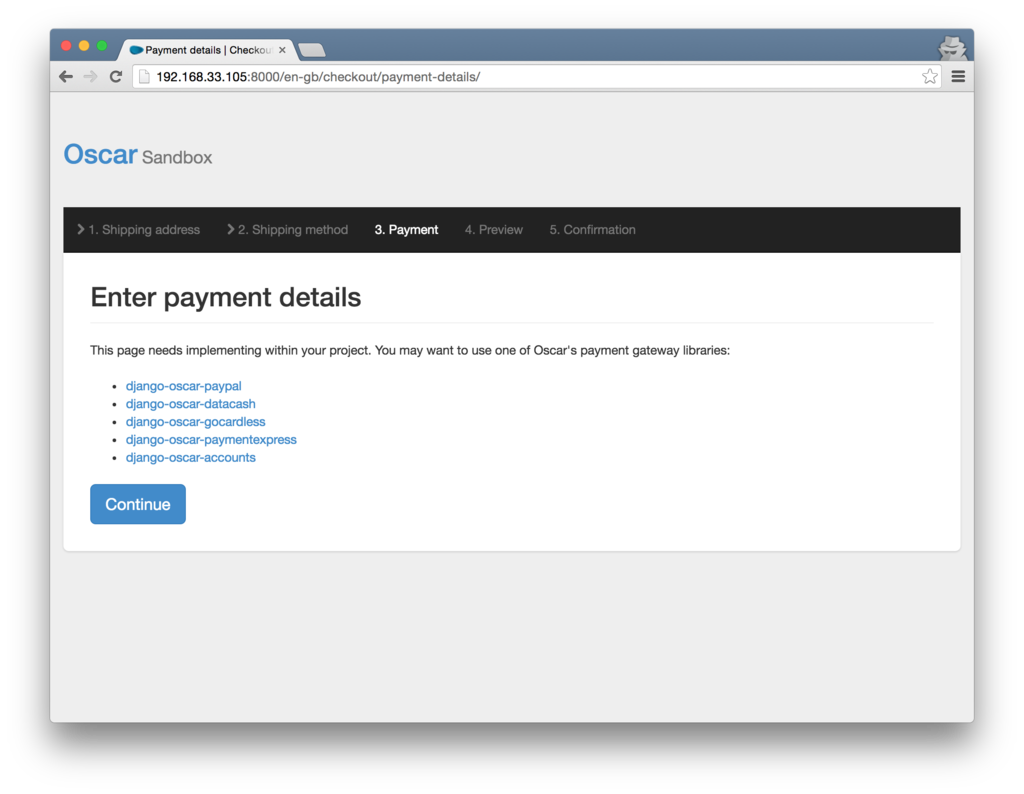
ちなみにここまでの設定では、決済モジュールの設定をしていないので、決済処理を完了することができなくなっています。

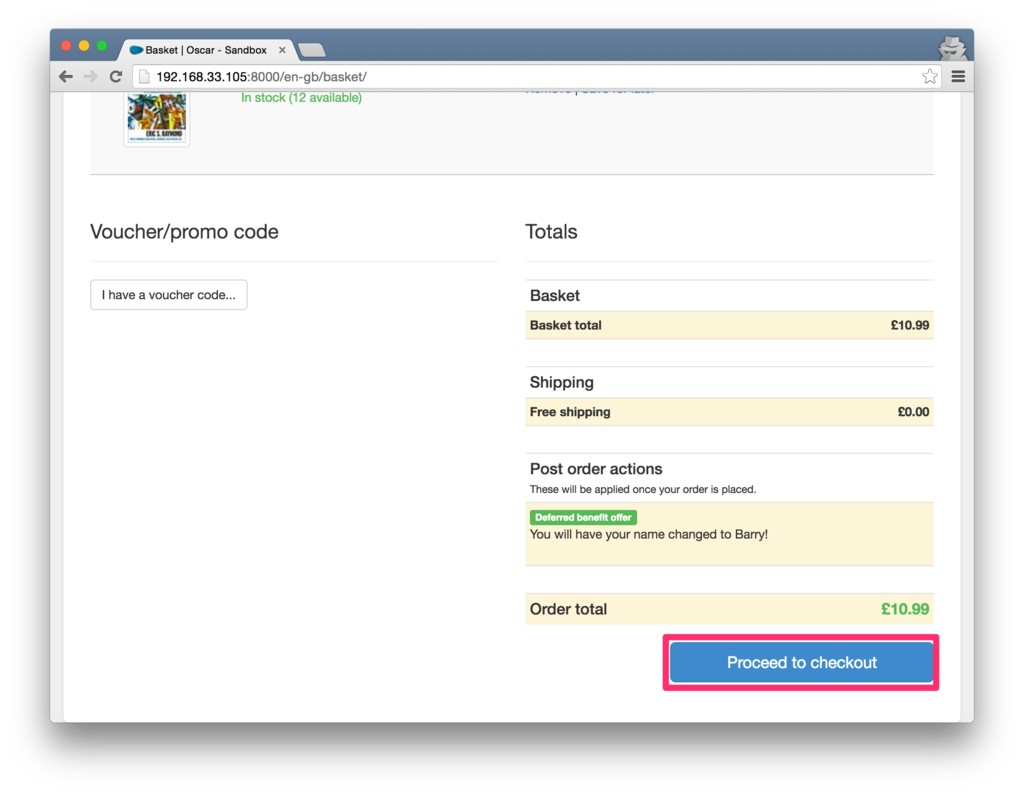
f:id:akiyoko:20160529122316p:plain

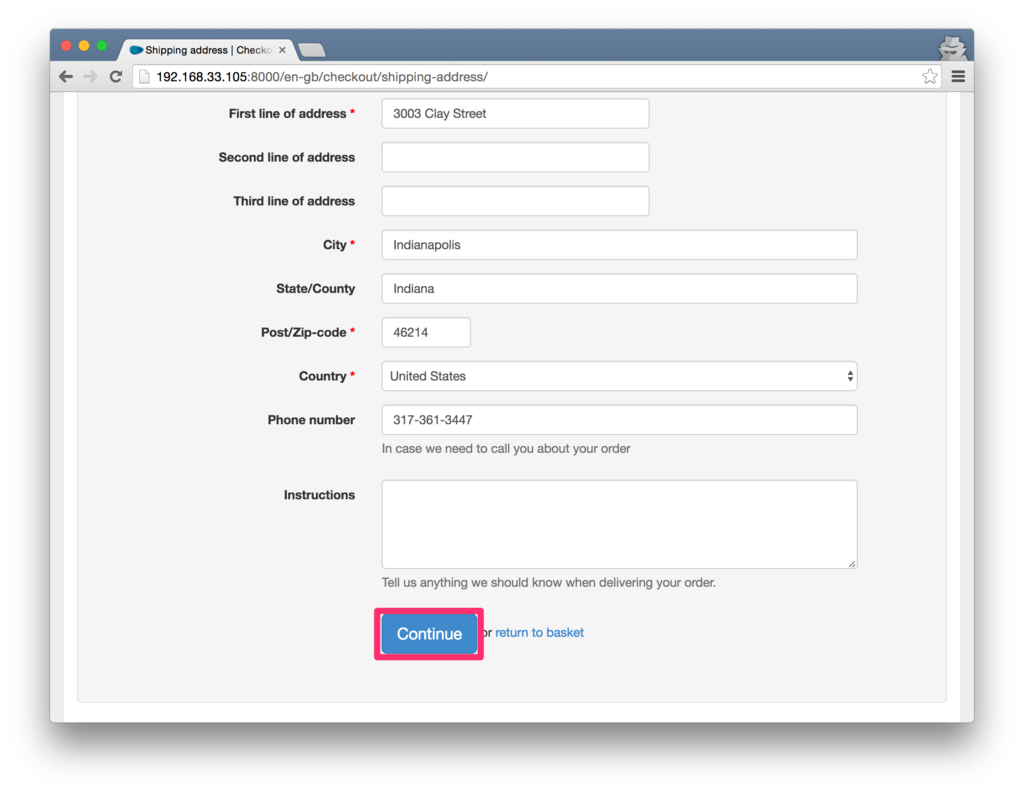
(住所や電話番号などのダミー情報は、US Address Generator - Fake Address, Random Address Generatorで生成したものを入力しました。)
f:id:akiyoko:20160529122334p:plain

f:id:akiyoko:20160529122349p:plain

このように、決済モジュール(payment gateway libraries)を設定してね、って怒られます。


以下、PyCharm を使う場合のメモです。PyCharm を使ってない方はすっ飛ばしてください。

  • PyCharm の設定
    • デプロイ先サーバ設定
    • ソースコードの同期
    • ローカル側でソースコードを Git管理
    • Project Interpreter の設定
    • Run/Debug設定(以下に詳細を記載)


Project ペインの manage.py ファイルで右クリック > [Create "manage"] を選択します。

Namemanage
Scriptsites/sandbox/manage.py
Script parametersrunserver 0.0.0.0:8000
Environment variablesPYTHONUNBUFFERED=1(デフォルトのまま)
Python interpreterProject Default (Remote Python 2.7.6 Vagrant VM at ~/PycharmProjects/oscar_sandbox (/home/vagrant/.virtualenvs/myproject/bin/python))
Working directory/opt/webapps/myproject
Path mappings - Local path/Users/akiyoko/PycharmProjects/oscar_sandbox
Path mappings - Remote path/opt/webapps/myproject


ここで、「Add content roots to PYTHONPATH」と「Add source roots to PYTHONPATH」のチェックを外します。

f:id:akiyoko:20160529125100p:plain

要するに、Script のパスに気をつけてね、ってことです。


各種設定を確認

Sandbox サイトの settings.py を確認すると、以下のドキュメントに書かれている、既存サイトに追加する場合に追加する必要のある設定が全て追加されています。
http://django-oscar.readthedocs.org/en/latest/internals/getting_started.html


sites/sandbox/settings.py(抜粋)

・
    ・
SITE_ID = 1・
    ・
TEMPLATE_CONTEXT_PROCESSORS = (
    "django.contrib.auth.context_processors.auth",
    "django.core.context_processors.request",
    "django.core.context_processors.debug",
    "django.core.context_processors.i18n",
    "django.core.context_processors.media",
    "django.core.context_processors.static",
    "django.contrib.messages.context_processors.messages",
    # Oscar specific'oscar.apps.search.context_processors.search_form',
    'oscar.apps.promotions.context_processors.promotions',
    'oscar.apps.checkout.context_processors.checkout',
    'oscar.core.context_processors.metadata',
    'oscar.apps.customer.notifications.context_processors.notifications',
)

MIDDLEWARE_CLASSES = (
    'debug_toolbar.middleware.DebugToolbarMiddleware',
    'django.contrib.sessions.middleware.SessionMiddleware',
    'django.middleware.csrf.CsrfViewMiddleware',
    'django.contrib.auth.middleware.AuthenticationMiddleware',
    'django.contrib.messages.middleware.MessageMiddleware',
    'django.contrib.flatpages.middleware.FlatpageFallbackMiddleware',
    # Allow languages to be selected'django.middleware.locale.LocaleMiddleware',
    'django.middleware.common.CommonMiddleware',
    # Ensure a valid basket is added to the request instance for every request'oscar.apps.basket.middleware.BasketMiddleware',
    # Enable the ProfileMiddleware, then add ?cprofile to any# URL path to print out profile details#'oscar.profiling.middleware.ProfileMiddleware',
)
    ・
    ・
# Add another path to Oscar's templates.  This allows templates to be# customised easily.from oscar import OSCAR_MAIN_TEMPLATE_DIR
TEMPLATE_DIRS = (
    location('templates'),
    OSCAR_MAIN_TEMPLATE_DIR,
)
    ・
    ・
INSTALLED_APPS = [
    'django.contrib.auth',
    'django.contrib.contenttypes',
    'django.contrib.sessions',
    'django.contrib.sites',
    'django.contrib.messages',
    'django.contrib.admin',
    'django.contrib.flatpages',
    'django.contrib.staticfiles',
    'django.contrib.sitemaps',
    'django_extensions',
    # Debug toolbar + extensions'debug_toolbar',
    'apps.gateway',     # For allowing dashboard access'widget_tweaks',
]
from oscar import get_core_apps
INSTALLED_APPS = INSTALLED_APPS + get_core_apps()

# Add Oscar's custom auth backend so users can sign in using their email# address.
AUTHENTICATION_BACKENDS = (
    'oscar.apps.customer.auth_backends.EmailBackend',
    'django.contrib.auth.backends.ModelBackend',
)
    ・
    ・


INSTALLLED_APPS に

  • django.contrib.sites
  • django.contrib.flatpages

が追加されていて、MIDDLEWARE_CLASSES に

  • oscar.apps.basket.middleware.BasketMiddleware
  • django.contrib.flatpages.middleware.FlatpageFallbackMiddleware

が追加されていることが確認できます。


ちなみに、「TEMPLATE_CONTEXT_PROCESSORS」と「TEMPLATE_DIRS」を分けて記述している Sandbox の setteings.py の書き方は、Django 1.9 の書き方としては少し古いようですね。

Before Django 1.8 this setting was split between TEMPLATE_CONTEXT_PROCESSORS and TEMPLATE_DIRS.


http://django-oscar.readthedocs.org/en/latest/internals/getting_started.html


決済モジュールの導入手順

続けて、Django Oscar の Sandbox サイトに決済モジュールを組み込んでいきます。

決済代行サービスに「PayPal」を利用することを想定して、決済モジュールには「django-oscar-paypal」を選択することにします。


手順は以下の通りです。


参考
http://django-oscar-paypal.readthedocs.org/en/latest/


1. PayPal の Test API Credentials を取得

PayPal の決済モジュールを利用するには、「Test API Credentials」という PayPal の決済API を利用するための認証情報が必要となります。

「Test API Credentials」は、以下の 3セットのキー・バリューとなっています。

  • PAYPAL_API_USERNAME
  • PAYPAL_API_PASSWORD
  • PAYPAL_API_SIGNATURE


Test API Credentials を取得する前に、まずは PayPal のアカウントを取得します。本番ではビジネスアカウントが必要ですが、Sandbox では個人アカウントでも大丈夫です。


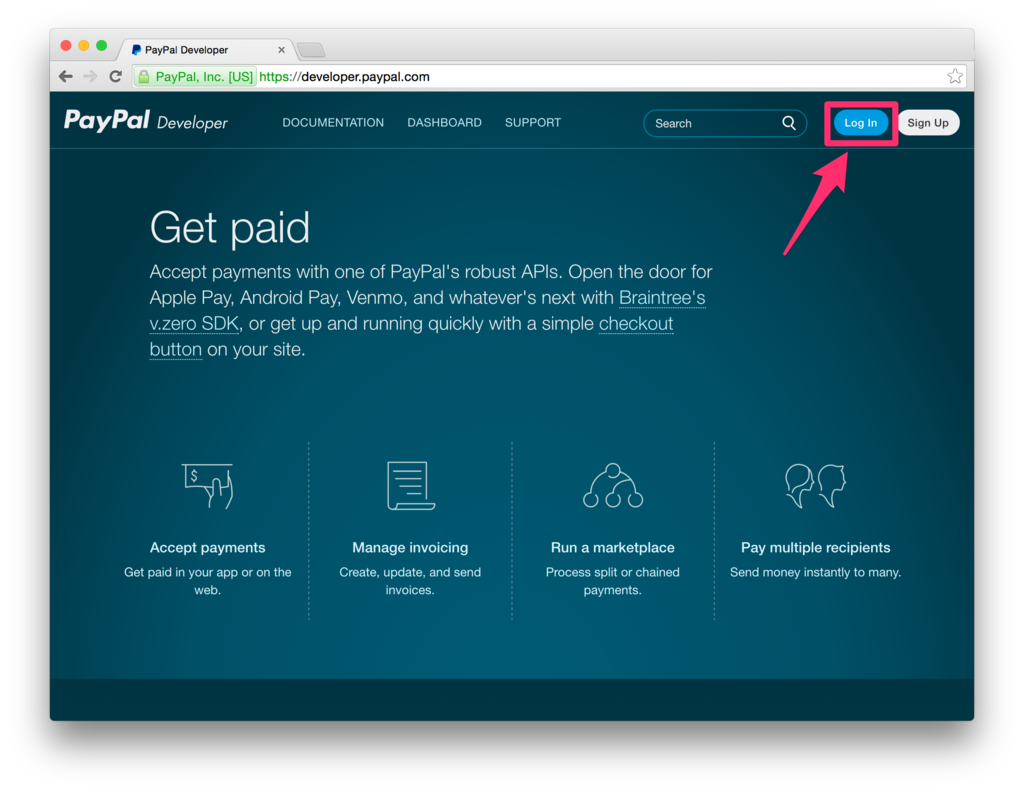
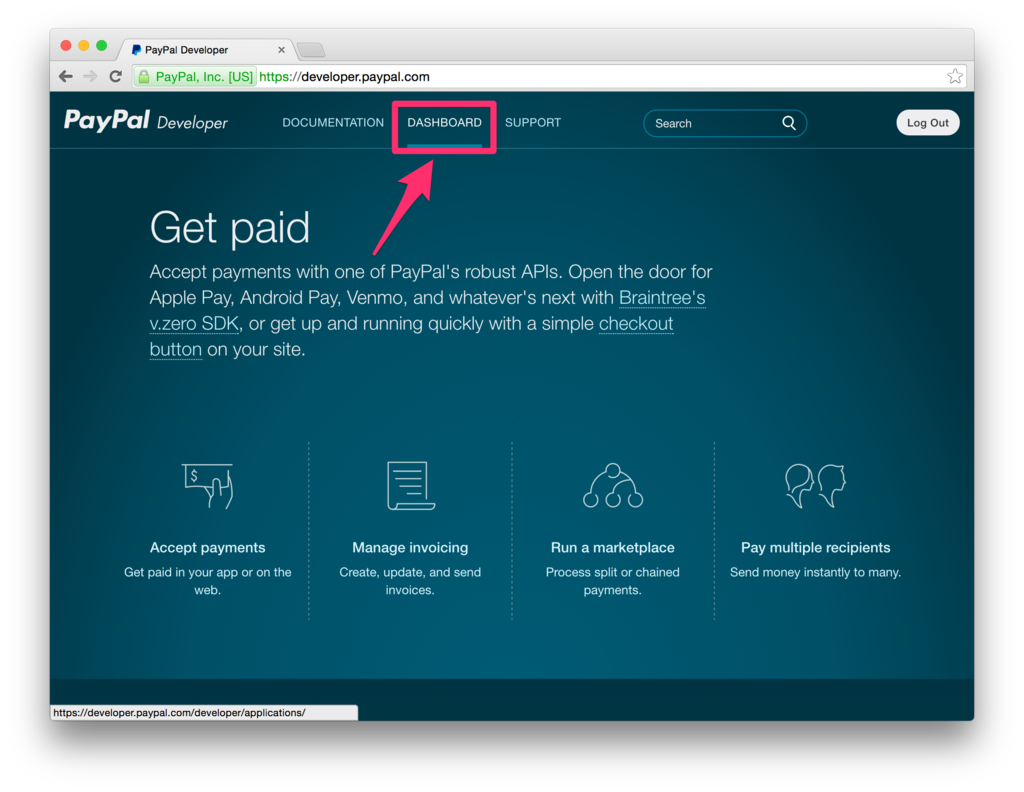
PayPal アカウントを取得した後に、「PayPal Developer」ページからログインします。
https://developer.paypal.com/
f:id:akiyoko:20160531003041p:plain

Sandbox アカウントではなく、通常の PayPal アカウントでログインします。
f:id:akiyoko:20160531003105p:plain

「DASHBOARD」をクリックします。
f:id:akiyoko:20160531003128p:plain

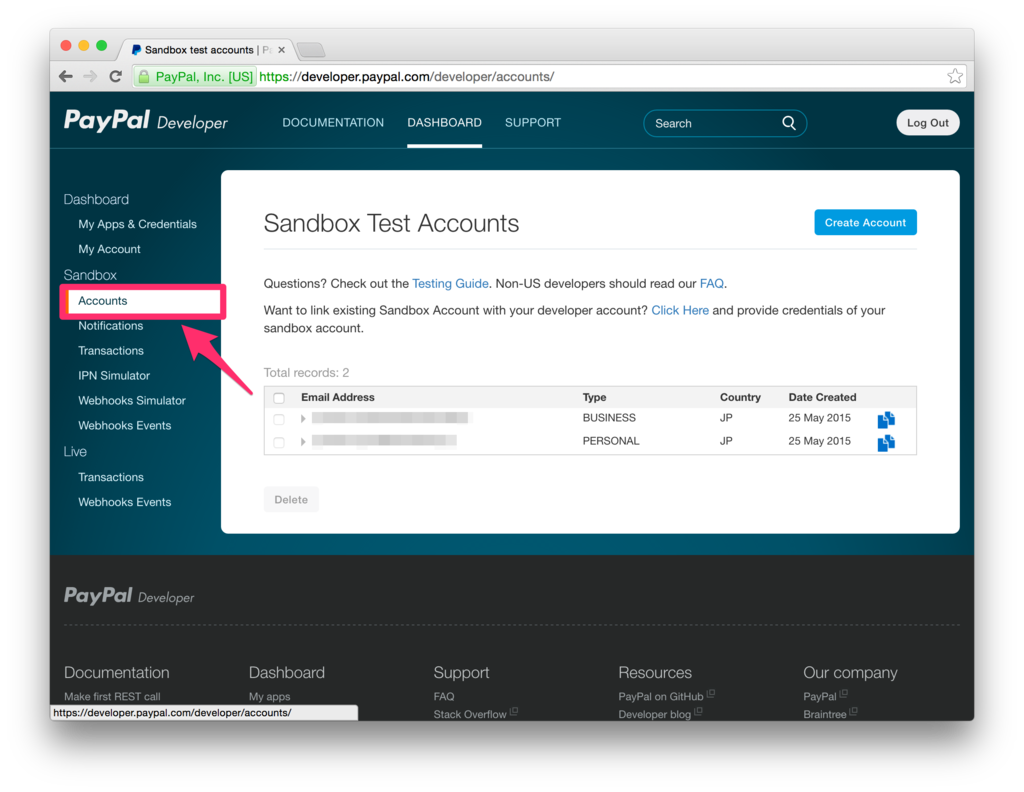
「Accounts」を選択します。
f:id:akiyoko:20160531003200p:plain

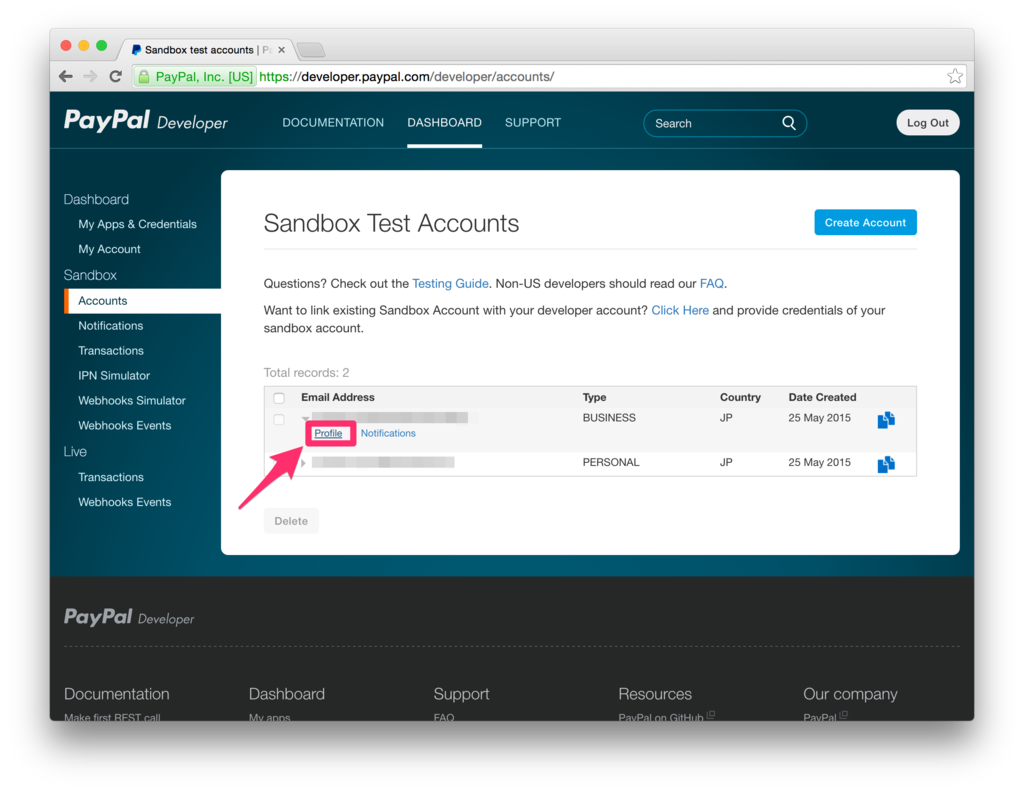
Sandbox 用の「Buyer アカウント(マーチャントアカウント)」と「Seller アカウント(買い手アカウント)」がデフォルトで用意されている(はずな)ので、Type が「BUSINESS」となっている方の Buyer アカウントの「Profile」をクリックします。
f:id:akiyoko:20160531003227p:plain

「API Credentials」タブから Test API Credentials を確認することができます。
f:id:akiyoko:20160531003251p:plain


参考(PayPal 公式)


参考(Test API Credentials)


参考(ビジネスアカウント)


2. django-oscar-paypal のインストール

Ubuntu サーバ側で、django-oscar-paypal をインストールします。

$ workon myproject
$ pip install django-oscar-paypal
  • django-localflavor==1.3
  • django-oscar-paypal==0.9.7

が追加されました。


3. INSTALLED_APPS に追加

sites/sandbox/settings.py に「paypal」を加えます。

INSTALLED_APPS = [
    'django.contrib.auth',
    'django.contrib.contenttypes',
    'django.contrib.sessions',
    'django.contrib.sites',
    'django.contrib.messages',
    'django.contrib.admin',
    'django.contrib.flatpages',
    'django.contrib.staticfiles',
    'django.contrib.sitemaps',
    'django_extensions',
    # Debug toolbar + extensions'debug_toolbar',
    'paypal',
    'apps.gateway',     # For allowing dashboard access'widget_tweaks',
]


4. マイグレーション

以下のコマンドを実行して、django-oscar-paypal 系のテーブルを作成します。

$ python sites/sandbox/manage.py migrate --run-syncdb

Operations to perform:
  Synchronize unmigrated apps: reports_dashboard, messages, django_extensions, treebeard, gateway, communications_dashboard, reviews_dashboard, offers_dashboard, pages_dashboard, shipping_dashboard, haystack, promotions_dashboard, checkout, vouchers_dashboard, django_tables2, partners_dashboard, staticfiles, oscar, paypal, sitemaps, catalogue_dashboard, users_dashboard, search, debug_toolbar, widget_tweaks, dashboard, ranges_dashboard, orders_dashboard
  Apply all migrations: customer, promotions, shipping, wishlists, offer, admin, sessions, thumbnail, contenttypes, auth, payment, reviews, analytics, catalogue, flatpages, sites, address, basket, partner, order, voucher
Synchronizing apps without migrations:
  Creating tables...
    Creating table paypal_expresstransaction
    Creating table paypal_payflowtransaction
    Running deferred SQL...
Running migrations:
  No migrations to apply.
  Your models have changes that are not yet reflected in a migration, and so won't be applied.
  Run 'manage.py makemigrations' to make new migrations, and then re-run 'manage.py migrate' to apply them.

Django 1.9 の場合は、「run-syncdb」オプションを付けないとテーブルが作成されないので要注意です。(最後の警告は無視して OK。対応したいのであれば、makemigrations を実行すればよい。)

参考
http://stackoverflow.com/a/34635951


ここで、

  • paypal_expresstransaction
  • paypal_payflowtransaction

というテーブルが追加されました。


ここでもう一度、データベースをバックアップしておきます。

$ mysqldump --single-transaction -u root -p myproject > ~/myproject_migrate_paypal.dump


5. settings を修正

ここからは、
http://django-oscar-paypal.readthedocs.org/en/latest/express.html#getting-started
を参考にして進めていきます。


https://github.com/django-oscar/django-oscar-paypal/blob/master/sandbox/settings.py
を参考に、settings.py を修正します。


sites/sandbox/settings.py の最後の方に、以下の設定を追加します。

・
    ・
# django-oscar-paypal# ===================

PAYPAL_SANDBOX_MODE = True
PAYPAL_CALLBACK_HTTPS = False
PAYPAL_API_VERSION = '119'

PAYPAL_API_USERNAME = ''
PAYPAL_API_PASSWORD = ''
PAYPAL_API_SIGNATURE = ''from django.utils.translation import ugettext_lazy as _
OSCAR_DASHBOARD_NAVIGATION.append(
    {
        'label': _('PayPal'),
        'icon': 'icon-globe',
        'children': [
            {
                'label': _('Express transactions'),
                'url_name': 'paypal-express-list',
            },
        ]
    })

# Try and import local settings which can be used to override any of the above.try:
    from settings_local import *
exceptImportError:
    pass


次に、sites/sandbox/settings_local.py に、「1. PayPal の Test API Credentials を取得」で取得したマーチャントアカウントの APIキーを設定します。

PAYPAL_API_USERNAME = 'xxxxxx-facilitator_api1.xxxxxx.xxx'
PAYPAL_API_PASSWORD = 'xxxxxxxxxxxxxxxx'
PAYPAL_API_SIGNATURE = 'xxxxxxxxxxxxxxxxxxxxxxxxxxxxxxxxxxxxxxxxxxxxxxxxxxxxxxxx'


6. urls.py を修正

https://github.com/django-oscar/django-oscar-paypal/blob/master/sandbox/urls.py
を参考に、sites/sandbox/urls.py を修正します。

<修正前>

・
    ・
from oscar.app import application
from oscar.views import handler500, handler404, handler403
    ・
    ・
# Prefix Oscar URLs with language codes
urlpatterns += i18n_patterns('',
    # Custom functionality to allow dashboard users to be created
    url(r'gateway/', include('apps.gateway.urls')),
    # Oscar's normal URLs
    url(r'', include(application.urls)),
)
    ・
    ・

  ↓
<修正後>

・
    ・
from oscar.app import application
from oscar.views import handler500, handler404, handler403
from paypal.express.dashboard.app import application as express_dashboard
    ・
    ・
# Prefix Oscar URLs with language codes
urlpatterns += i18n_patterns('',
    # PayPal Express integration
    url(r'checkout/paypal/', include('paypal.express.urls')),
    # Dashboard views for Express
    url(r'dashboard/paypal/express/', include(express_dashboard.urls)),
    # Custom functionality to allow dashboard users to be created
    url(r'gateway/', include('apps.gateway.urls')),
    # Oscar's normal URLs
    url(r'', include(application.urls)),
)
    ・
    ・


7. django-oscar-paypal のテンプレートファイルを修正

Django Oscar の basket(ショッピングカート)機能、および checkout(チェックアウト)機能で使われている各種テンプレートファイルに対して、以下の修正を行います。

  • Django 1.9 対応(django-oscar-paypal が Django 1.9 に対応していないため)
  • 体裁修正(django-oscar-paypal が Django Oscar のスタイルに対応していないため)


ここで、settings.py の設定が以下のようになっており、Sandbox プロジェクトの仕組み上、「sites/sandbox/templates/」 ->「src/oscar/templates/oscar/」の順にテンプレートファイルをルックアップし、それでも無ければ、INSTALLED_APPS でインストールしたアプリケーションのテンプレートファイルを参照するようになっています。

from oscar import OSCAR_MAIN_TEMPLATE_DIR
TEMPLATE_DIRS = (
    location('templates'),
    OSCAR_MAIN_TEMPLATE_DIR,
)

Sandbox プロジェクトでは、「src/oscar/templates/oscar/」配下に実ファイルを配置しているため、ライブラリが持っているテンプレートファイルによるオーバーライドが出来ないので注意が必要です。


1) ショッピングカート画面

django-oscar-paypal の Sandbox用に用意されているファイル
https://github.com/django-oscar/django-oscar-paypal/blob/master/sandbox/templates/basket/partials/basket_content.html
を sites/sandbox/templates/ 配下にコピーします。

$ cd /tmp/
$ git clone https://github.com/django-oscar/django-oscar-paypal.git
$ cd django-oscar-paypal/
$ git checkout 0.9.7
$ mkdir -p /opt/webapps/myproject/sites/sandbox/templates/basket/partials
$ cp -a sandbox/templates/basket/partials/basket_content.html /opt/webapps/myproject/sites/sandbox/templates/basket/partials/basket_content.html

2016/5/28 現時点の django-oscar-paypal のソースコードのままでは、以下のようにエラーが出てしまいます。

f:id:akiyoko:20160529145830p:plain

テンプレート内で、

{% load url from future %}

と書くと、Django 1.9 で動かした場合に、

'url' is not a valid tag or filter in tag library 'future'

というエラーが発生します。これは、Django1.9 以降では、future タグの url がなくなって、ビルトインのものを使うようになったからです。なので、Django1.9 以降では、url を load する必要は無く、

{% url 'checkout:preview' %}

とそのまま使えばよいです。


参考
https://www.bountysource.com/issues/29762758-django-1-9-compatibility-url-tag


要するに、django-oscar-paypal のテンプレートが Django 1.9 対応されていないのが原因なので、以下のように修正していきます。


sites/sandbox/templates/basket/partials/basket_content.html
<修正前>

{% extends 'oscar/basket/partials/basket_content.html' %}
{% load url from future %}
{% load i18n %}

{% block formactions %}
<divclass="form-actions">
	{% if anon_checkout_allowed or request.user.is_authenticated %}
        {% if basket.total_excl_tax > 0 %}
            <ahref="{% url 'paypal-redirect' %}"><imgsrc="https://www.paypal.com/en_US/i/btn/btn_xpressCheckout.gif"align="left"style="margin-right:7px;"></a>
        {% endif %}
	{% endif %}
	<ahref="{% url 'checkout:index' %}"class="pull-right btn btn-large btn-primary">{% trans "Proceed to checkout" %}</a></div>
{% endblock formactions %}

  ↓
<修正後>

{% extends 'oscar/basket/partials/basket_content.html' %}
{#{% load url from future %}#}
{% load i18n %}

{% block formactions %}
<divclass="form-actions">
	{% if anon_checkout_allowed or request.user.is_authenticated %}
        {% if basket.total_excl_tax > 0 %}
            <ahref="{% url 'paypal-redirect' %}"><imgsrc="https://www.paypal.com/en_US/i/btn/btn_xpressCheckout.gif"align="left"style="margin-right:7px;"></a>
        {% endif %}
	{% endif %}
	<ahref="{% url 'checkout:index' %}"class="pull-right btn btn-large btn-primary">{% trans "Proceed to checkout" %}</a></div>
{% endblock formactions %}

上記の対応後、ショッピングカート画面を確認すると、以下のように表示が少し崩れてしまっています。

f:id:akiyoko:20160529150928p:plain


こちらは、Django Oscar 側のテンプレートのスタイルの当て方が変わったのに、django-oscar-paypal の Sandbox 用のテンプレート側がまだ対応できていないことが原因のようです。

そこで、src/oscar/templates/oscar/basket/partials/basket_content.html を参考にして、以下のようにテンプレートファイルを修正します。

<再修正後>

{% extends 'oscar/basket/partials/basket_content.html' %}
{#{% load url from future %}#}
{% load i18n %}

{% block formactions %}
    <divclass="form-actions"><divclass="row"><divclass="col-sm-8">
                {% if anon_checkout_allowed or request.user.is_authenticated %}
                {% if basket.total_excl_tax > 0 %}
                <ahref="{% url 'paypal-redirect' %}"><imgsrc="https://www.paypal.com/en_US/i/btn/btn_xpressCheckout.gif"align="left"style="margin-right:7px;"></a>
                {% endif %}
                {% endif %}
            </div><divclass="col-sm-4"><ahref="{% url 'checkout:index' %}"class="btn btn-lg btn-primary btn-block">{% trans "Proceed to checkout" %}</a></div></div></div>
{% endblock formactions %}

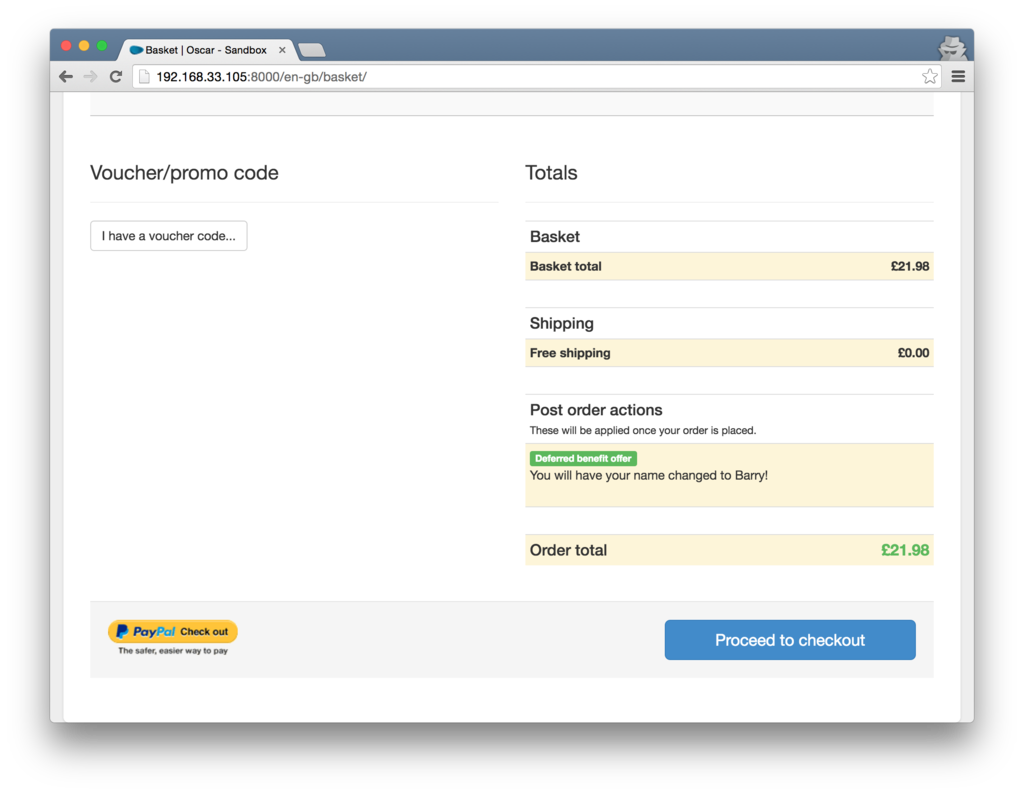
これで、きちんと表示されるようになりました。
f:id:akiyoko:20160529151517p:plain


2) チェックアウト画面

同じように、
https://github.com/django-oscar/django-oscar-paypal/blob/master/sandbox/templates/checkout/payment_details.html
を sites/sandbox/templates/ 配下にコピーします。

$ cd /tmp/django-oscar-paypal/
$ mkdir -p /opt/webapps/myproject/sites/sandbox/templates/checkout
$ cp -a sandbox/templates/checkout/payment_details.html /opt/webapps/myproject/sites/sandbox/templates/checkout/payment_details.html

こちらも、同様のエラーが出るので、
f:id:akiyoko:20160529152118p:plain


以下のように修正を加えます。

sites/sandbox/templates/checkout/payment_details.html
<修正前>

{% extends 'oscar/checkout/payment_details.html' %}
{% load url from future %}
{% load i18n %}

{% block payment_details %}
    <divclass="well"><divclass="sub-header"><h3>{% trans "PayPal Express" %}</h3></div><p>{% trans "Click on the below icon to use Express Checkout but where the shipping address and method is already chosen on the merchant site." %}</p><divstyle="overflow:auto"><ahref="{% url 'paypal-direct-payment' %}"title="{% trans "Pay with PayPal" %}"><imgsrc="https://www.paypal.com/en_US/i/logo/PayPal_mark_37x23.gif"align="left"style="margin-right:7px;"></a>&nbsp;</div></div><divclass="well"><divclass="sub-header"><h3>{% trans "PayPal PayFlow Pro" %}</h3></div><formmethod="post"action="{% url 'checkout:preview' %}"class="form-stacked">
            {% csrf_token %}
            <h4>{% trans "Bankcard" %}</h4>
            {% include "partials/form_fields.html" with form=bankcard_form %}
            <h4>{% trans "Billing address" %}</h4>
            {% include "partials/form_fields.html" with form=billing_address_form %}
            <divclass="form-actions"><buttontype="submit"class="btn btn-large btn-primary">{% trans "Continue" %}</button></div></form></div>

{% endblock %}

  ↓
<修正後>

{% extends 'oscar/checkout/payment_details.html' %}
{#{% load url from future %}#}
{% load i18n %}

{% block payment_details %}
    <divclass="well"><divclass="sub-header"><h3>{% trans "PayPal Express" %}</h3></div><p>{% trans "Click on the below icon to use Express Checkout but where the shipping address and method is already chosen on the merchant site." %}</p><divstyle="overflow:auto"><ahref="{% url 'paypal-direct-payment' %}"title="{% trans "Pay with PayPal" %}"><imgsrc="https://www.paypal.com/en_US/i/logo/PayPal_mark_37x23.gif"align="left"style="margin-right:7px;"></a>&nbsp;</div></div><divclass="well"><divclass="sub-header"><h3>{% trans "PayPal PayFlow Pro" %}</h3></div><formmethod="post"action="{% url 'checkout:preview' %}"class="form-stacked">
            {% csrf_token %}
            <h4>{% trans "Bankcard" %}</h4>
            {% include "partials/form_fields.html" with form=bankcard_form %}
            <h4>{% trans "Billing address" %}</h4>
            {% include "partials/form_fields.html" with form=billing_address_form %}
            <divclass="form-actions"><buttontype="submit"class="btn btn-large btn-primary">{% trans "Continue" %}</button></div></form></div>

{% endblock %}

f:id:akiyoko:20160529152616p:plain

ここでは詳しく触れませんが、日本では「PayPal PayFlow Pro」は使えないので、最終的なテンプレートファイルは以下のようにしておきます。

<再修正後>

{% extends 'oscar/checkout/payment_details.html' %}
{#{% load url from future %}#}
{% load i18n %}

{% block payment_details %}
    <divclass="well"><divclass="sub-header"><h3>{% trans "PayPal Express" %}</h3></div><p>{% trans "Click on the below icon to use Express Checkout but where the shipping address and method is already chosen on the merchant site." %}</p><divstyle="overflow:auto"><ahref="{% url 'paypal-direct-payment' %}"title="{% trans "Pay with PayPal" %}"><imgsrc="https://www.paypal.com/en_US/i/logo/PayPal_mark_37x23.gif"align="left"style="margin-right:7px;"></a>&nbsp;</div></div>
{% endblock %}

f:id:akiyoko:20160529152636p:plain


3) PayPal からのリダイレクト画面

続いて、PayPal での処理処理が終わったときにリダイレクトされてくる画面のテンプレートファイルを修正します。これまで同様に、

  • Django 1.9 対応
  • 体裁修正

の対応を行います。

$ cp -r /home/vagrant/.virtualenvs/myproject/lib/python2.7/site-packages/paypal/templates/* /opt/webapps/myproject/sites/sandbox/templates/
$ rm -rf /opt/webapps/myproject/sites/sandbox/templates/paypal/payflow

$ tree sites/sandbox/templates/paypal/
sites/sandbox/templates/paypal/
└── express
    ├── dashboard
    │   ├── transaction_detail.html
    │   └── transaction_list.html
    └── preview.html

sites/sandbox/templates/paypal/express/preview.html
<修正前>

{% extends "checkout/preview.html" %}
{% load currency_filters %}
{% load i18n %}
{% load url from future %}
{% load thumbnail %}

{# Null out the actions as they can't be used here #}
{% block shipping_address_actions %}{% endblock %}
{% block shipping_method_actions %}{% endblock %}
{% block order_contents_actions %}{% endblock %}

{% block payment_method %}
    <divclass="span6"><divclass="sub-header"><h2>{% trans "Payment" %}</h2></div><divclass="well well-success"><h4>{% trans "PayPal" %}</h4><p>
                {% blocktrans with amt=paypal_amount|currency email=paypal_user_email %}
                    {{ amt }} will be deducted from your PayPal account, registered 
                    to email: {{ email }}.
                {% endblocktrans %}
            </p></div></div>
{% endblock %}
    ・
    ・

  ↓
<修正後>

{% extends "checkout/preview.html" %}
{% load currency_filters %}
{% load i18n %}
{#{% load url from future %}#}
{% load thumbnail %}

{# Null out the actions as they can't be used here #}
{% block shipping_address_actions %}{% endblock %}
{% block shipping_method_actions %}{% endblock %}
{% block order_contents_actions %}{% endblock %}

{% block payment_method %}
    <divclass="col-sm-6"><divclass="sub-header"><h2>{% trans "Payment" %}</h2></div><divclass="well well-success"><p>{% blocktrans with amount=order_total.incl_tax|currency %}<strong>{{ amount }}</strong> will be debited from your bankcard.{% endblocktrans %}</p><divclass="alert-actions"><ahref="{% url 'checkout:payment-details' %}"class="btn">{% trans "Change payment details" %}</a></div></div></div>
{% endblock payment_method %}
    ・
    ・


4) ダッシュボード画面

Django Oscar のダッシュボード画面を使う場合は、以下の 2ファイルに Django 1.9 対応の修正を加える必要があります。


sites/sandbox/templates/paypal/express/dashboard/transaction_list.html

{% extends 'dashboard/layout.html' %}
{% load currency_filters %}
{% load i18n %}
{#{% load url from future %}#}
    ・
    ・


f:id:akiyoko:20160529154701p:plain


sites/sandbox/templates/paypal/express/dashboard/transaction_detail.html

{% extends 'dashboard/layout.html' %}
{% load currency_filters %}
{% load i18n %}
{#{% load url from future %}#}
    ・
    ・

f:id:akiyoko:20160529154718p:plain


以上で、Django Oscar の Sandbox サイトを構築するまでの作業は終了です。


GitHub にも修正内容をアップしたので、こちらも参照してください。
GitHub - akiyoko/oscar_sandbox


まとめ

やや細かな修正内容まで言及してしまいましたが、Django Oscar の Sandbox サイトを構築して、決済モジュールを導入するまでの手順を紹介しました。

これで、Django Oscar のいろいろな機能を試すことができるようになりました。次回は、この Sandbox サイトを使って、Django Oscar の ECサイトとしての機能を検証していきます。

ゼロからはじめる Django で ECサイト構築(その3:Django Oscar の機能を調べる)

$
0
0

Django 製の ECパッケージの決定版とも言える Django Oscarは、公式ドキュメントによると、以下の 16 個の機能(Django App)から構成されています。
Oscar Core Apps explained — django-oscar 1.3 documentation


機能
概要
備考
Address住所登録配送先住所や請求先住所を管理する
Analyticsアナリティクス商品およびユーザーについてのアナリティクスが利用できる
Basketバスケットショッピングカート機能が利用できる
Catalogueカタログ商品カテゴリを管理する
Checkout決済手続き特定のフローに沿って決済手続きができる
Customer顧客管理在庫切れアラートやメール送信など、顧客とのやり取りを行う。他にも、メンバーシップやマイページのほとんどの機能がここに含まれる
Dashboardダッシュボード商品カタログ管理、商品注文管理、在庫・出庫管理、オファー管理などのバックオフィス機能のためのダッシュボード。Django admin サイトの代わりとして利用する
Offersオファー柔軟な条件のディスカウントを設定することができる
Order商品注文在庫数のチェックロジック、ディスカウントや配送料を含めた料金計算ロジックを提供する。画面は無い
Partnerパートナー商品の仕入先パートナー(Supplier)を登録したり、在庫・出庫パートナー(Fulfilment Partner)が利用する情報を提供したりする機能。SKU、在庫数、価格などが記録された在庫元帳(Stockrecord)、税率ポリシーや在庫ポリシーを持つストラテジー(Strategy)を管理することもできる。なお、在庫元帳とストラテジーから、商品を購入するのに必要な情報(PurchaseInfo)を取得する
Payment購入情報特定の決済代行サービスのための機能を利用することができる
Promotions広告広告のためのコンテンツブロックを作成し、特定の位置(トップページ、検索結果ページなど)に表示することができる
Search商品検索商品検索機能が利用できる
Shipping配送料計算配送先住所やショッピングカートの合計重量、その他いろいろな条件に応じて、自動的に配送料の計算をすることができる(ように設計されている) *1
Voucherバウチャーいろいろなタイプのクーポンコードを設定することができる
Wishlistsウィッシュリストほしい物リストが利用できる


今回は、前回構築した Django Oscar の Sandbox サイトを実際に動かしながら、Django Oscar の機能の一覧を調べていくことにします。


f:id:akiyoko:20160611012326j:plain


メンバーシップ

アカウント登録、退会、パスワード変更、ログイン、ログアウトの機能はひと通り揃っています。


アカウント登録

メールアドレスをベースにしたアカウント登録をすることができます。基本的なバリデーションはデフォルトで実装されています。

f:id:akiyoko:20160611113759p:plain

退会

少しわかりにくいですが、退会は、プロフィールページ(右上の[Account]>[Profile]で遷移)から[Delete Profile]を押下することでアカウントを削除することができます。

f:id:akiyoko:20160608011151p:plain
f:id:akiyoko:20160608004823p:plain

パスワード変更

パスワード変更もプロフィールページから操作することができます。

f:id:akiyoko:20160608011011p:plain
f:id:akiyoko:20160608071145p:plain

上記の方法とは別に、ログインページからもパスワードの変更(リセット)が可能です。

f:id:akiyoko:20160608004522p:plain

パスワードリセットのためのメールを送信することができます。
f:id:akiyoko:20160608071816p:plain

You're receiving this e-mail because you requested a password reset for your user account at example.com.


Please go to the following page and choose a new password:

http://example.com/en-gb/password-reset/confirm/Mw/4ck-c1f54b78fdaa9e31e057/

メール本文のリンクをクリックすると、パスワード変更ページに遷移します。

f:id:akiyoko:20160608071558p:plain

ログイン

Sandbox では、ログインとアカウント登録は、同一画面で行うように実装されています。

f:id:akiyoko:20160608011309p:plain

ログインせずに、ゲストとして商品を検索したり商品を注文したり *2することも可能です。

ログアウト

任意でログアウトも可能です。

f:id:akiyoko:20160608072131p:plain


マイページ

右上の[Account]からアカウントごとのページ(いわゆるマイページ)に遷移することができ、そこでは以下の機能を利用することができます。


f:id:akiyoko:20160608013201p:plain

プロフィール(Profile)

プロフィールページでは、氏名やメールアドレス、アカウント登録日時を表示できるほか、パスワード変更や退会を行うことができます。

f:id:akiyoko:20160608213427p:plain

注文履歴(Order History)

商品注文の履歴一覧、および詳細を確認することができます。
また、注文履歴の詳細画面から再注文をすることもできます。

f:id:akiyoko:20160609074548p:plain


登録済み住所一覧(Address Book)

登録した住所は、デフォルトの配送先住所(shipping address)、デフォルトの請求先住所(billing address)として設定しておき、商品注文時に再利用することができます。

f:id:akiyoko:20160611165642p:plain

メール一覧(Email History)

システムから送信されるメールの一覧を確認することができます。

f:id:akiyoko:20160610004545p:plain

在庫切れアラート(Product Alerts)

在庫切れになっている商品の詳細画面から[Notify me]ボタンを押下することで、サイト管理者にアラートを通知することができます。
f:id:akiyoko:20160610030515p:plain

マイページの[Product Alerts]から、通知した在庫切れアラートの一覧とそのステータス(サイト管理者が変更する)を確認したり、アラートを自らキャンセルしたりすることができます。
f:id:akiyoko:20160610030538p:plain

再入荷通知(Notifications)

在庫切れアラートに対するサイト管理者からのレスポンスとして、再入荷通知が行われます。
f:id:akiyoko:20160609074655p:plain

ウィッシュリスト(Wish Lists)

商品検索時にウィッシュリスト(ほしい物リスト)に入れていた商品を確認することができます。

リストは複数作成でき、それぞれのリストに名前を付けることができます。

f:id:akiyoko:20160608214516p:plain
f:id:akiyoko:20160608214545p:plain


商品紹介

商品紹介機能には、以下のようなサブ機能があります。


商品カテゴリ別表示

Sandbox サイト構築時に、ダミーの商品が 200点ほど自動的に登録されます。それぞれの商品にはカテゴリが付けられていて、商品カテゴリ別の一覧表示をすることができます。

f:id:akiyoko:20160608215231p:plain

商品検索

右上の検索窓から、商品のキーワード検索をすることができます。ちなみに、検索のバックエンドはプラガブルに入れ替え可能で、デフォルトで Haystackの各種検索エンジンを利用することができます。

f:id:akiyoko:20160608204907p:plain


商品の並び替え

商品検索をした後、以下の条件で並べ替えをすることができます。

  • キーワードへの関連性(Relevancy)
  • ユーザー評価の高い順(Customer rating)
  • 価格の高い順(Price high to low)
  • 価格の低い順(Price low to high)
  • タイトルの昇順(Title A to Z)
  • タイトルの降順(Title Z to A)

f:id:akiyoko:20160608204132p:plain


レビュー(ユーザー評価)

商品詳細ページで、レビュー(ユーザー評価)を書き込むことができます。
レビューの公開設定は、サイトの設定で承認制にすることも可能です。

f:id:akiyoko:20160608082137p:plain


レコメンド(おすすめ商品)

商品詳細ページの下の方に、おすすめ商品一覧(Recommended items)が表示されます。なお、Sandbox では、おすすめ商品はダッシュボード上でサイト管理者が手動で設定する仕組みになっています。

f:id:akiyoko:20160610103746p:plain


最近チェックした商品一覧

商品詳細ページの下の方に、最近チェックした商品一覧(Recommended items)が自動的に表示されます。

f:id:akiyoko:20160610103851p:plain


商品注文

商品注文としては、次の機能が含まれています。


ショッピングカート(Basket)

Amazon での「カート」、楽天市場での「買い物カゴ」と同等の機能が使えます。

商品詳細ページの[Add to basket]ボタンを押下することで、ショッピングカートに商品を追加することができます。

f:id:akiyoko:20160609073056p:plain

右上の[View basket]ボタンから、カートの中身をチェックすることができます。

f:id:akiyoko:20160609073117p:plain

ショッピングカートはこのように表示されます。

f:id:akiyoko:20160609073312p:plain

ショッピングカートの状態(アイテムの中身)は Cookie に保存され、Sandbox のデフォルト設定では一週間保持されることになります。


商品注文(Order)

ショッピングカートの状態に応じて、適切なディスカウントが自動的に適用されます。また、ユーザーに入力されたクーポンコードによるディスカウントについてもここで合わせて計算されます。

f:id:akiyoko:20160609073312p:plain

なお、通常の商品注文だけではなく、プレオーダー(予約注文)やバックオーダー(在庫切れ商品の取り寄せ注文)も可能です。また設定次第で、ゲスト注文(アカウント登録せずに商品注文すること)を許可することもできます。


決済手続き(Checkout)

Oscar の決済手続きは通常、以下のステップに沿って進められます。

1.ゲスト注文不可ならアカウント登録へ(ログイン済みの場合はスキップ)
   ↓
2.配送先入力
   ↓
3.配送方法選択(配送方法が一つのみの場合はスキップ)
   ↓
4.決済方法選択
   ↓
(PayPal ページにリダイレクト)
   ↓
(PayPal 買い手アカウントで認証して、決済内容を承認)
   ↓
5〜7.プレビュー & 決済内容詳細表示 & 注文確定(支払い)
   ↓
8.「ご注文ありがとうございます」

Checkout — django-oscar 1.3 documentationを参考に改編)


商品の決済手続きをする場合は、ショッピングカートページから「決済手続きに進む(Proceed to checkout)」ボタンを押下します。
f:id:akiyoko:20160609073349p:plain

(ログイン済みなので自動的に)配送先入力ステップに進みます。ここではデフォルトの配送先を選択します。
f:id:akiyoko:20160609073426p:plain

配送方法選択ステップはスキップされ、決済方法選択に進みます。
ちなみに今回は、Sandbox 構築時に決済モジュールとして PayPal しか設定していないため、ここでは PayPal 以外の選択肢がありません。
f:id:akiyoko:20160609073446p:plain

PayPal のログインページにリダイレクトされます。ここで PayPal の買い手アカウントでログインして、
f:id:akiyoko:20160609073647p:plain

決済内容を承認すると、
f:id:akiyoko:20160609073709p:plain

ECサイトのプレビューページに戻ってきます(決済はまだ確定していません)。

プレビューページの「注文確定(Place order)」ボタンを押下すると、支払いが完了します。
f:id:akiyoko:20160609073732p:plain

最後に確認ページが表示されます。
f:id:akiyoko:20160609073807p:plain


ダッシュボード(Dashboard)

ダッシュボードでは、商品カタログ管理、商品注文管理、在庫・出庫管理、オファー管理などのバックオフィス機能を利用することができます。

ダッシュボードのホーム画面には、指標となるデータがまとめて一覧表示されています。

f:id:akiyoko:20160610022412p:plain


ダッシュボードで利用できる機能としては、主に以下のようなものがあります。


商品カタログ管理(Catalogue)

商品カタログ管理機能では、単に商品を登録するだけでなく、様々な付加情報を設定することができます。

商品カテゴリ登録(Categories)

カテゴリとサブカテゴリを親子関係で紐付けることで、ツリー構造の商品カテゴリを実現することができます。Structure には、親カテゴリ、子カテゴリのほか、スタンドアロンの 3種類のいずれかを指定することができます。

なお、商品カテゴリは、主にナビゲーションのためだけに使用されます。


最上位の商品カテゴリは、[Catalogue]>[Categories]から管理します。

f:id:akiyoko:20160609071117p:plain

[Number of child categories]のリンクか、[Actions]>[Edit children]から辿ってサブカテゴリを編集することができます。


商品登録(Products)

[Catalogue]>[Products]で移動できる商品一覧ページから、商品を登録・編集することが可能です。

ちなみに、商品一覧ページには在庫数が表示されておらず、少し不便です。私個人的にはデフォルトで表示させてほしいところです。

f:id:akiyoko:20160609071138p:plain

商品は、事前に作成した「商品タイプ(Product type)」に紐付ける必要があります。


商品を選択後、[Stock and pricing]タブから仕入先パートナーや在庫数、通貨、価格を設定したり、[Upselling]タブからレコメンド(おすすめ商品)を設定したりすることができます。

f:id:akiyoko:20160611142403p:plain
f:id:akiyoko:20160610030319p:plain


在庫・出庫管理(Fulfilment)

在庫・出庫のために必要な情報を提供します。

商品注文管理(Orders)

[Fulfilment]>[Orders]から、商品注文の一覧を確認することができます。

ユーザー側で決済まで完了した商品注文は「Pending」ステータスになっているため、例えば、出庫の受付が済んだら「Being processed」に、配送が完了したら「Complete」に、というふうにステータスを切り替えることができます(手動で切り替えます)。
f:id:akiyoko:20160609081752p:plain

パートナー登録(Partners)

[Fulfilment]>[Partners]から、パートナーを作成したりパートナー一覧を確認したりすることができます。

パートナーには、ユーザーを任意で紐付けることができます。
f:id:akiyoko:20160609081831p:plain

顧客管理(Customers)

ユーザー管理(Customers)

[Customers]>[Customers]から、ユーザーごとの注文履歴や登録済みの住所、商品レビューの一覧などの情報を確認できるほか、パスワードリセットのためのメールを送信するボタンも用意されています。
f:id:akiyoko:20160609082251p:plain


在庫切れアラート管理(Stock alert requests)

[Customers]>[Stock alert requests]から、ユーザーからリクエストされた在庫切れアラートの一覧を確認することができます。
f:id:akiyoko:20160610031030p:plain


オファー管理(Offers)

オファー管理では、ディスカウントとバウチャーの管理をすることができます。


ディスカウント登録(Offers)

[Offers]>[Offers]から、ディスカウントを登録・編集できます。
f:id:akiyoko:20160609071005p:plain

Sandbox にデフォルトで登録されている以下の三種類のディスカウントのほか、ボリュームディスカウントなど柔軟な条件のディスカウントを設定することができます。

  • 1)規定個数以上買えば 1つ無料
    • ショッピングカートに 規定個数以上の商品を入れれば、その中で最も価格が安い商品が 1つ無料になるというタイプのディスカウントです。デフォルトの「Normal site offer」は、3個以上で 1つ無料という設定になっています。
  • 2)購入後特典(deferred benefit)
    • 購入後にポイントがもらえる的なディスカウントも設定可能です。Sandbox の「Deferred benefit offer」の説明には「商品を買ったら名前が Barry になるよ」というのが書かれているのですが、イギリスのギャグ(?)なのでしょうか。。(ちなみに、本当に購入後にユーザー名が Barry になってしまいます 笑)
  • 3)配送料無料

f:id:akiyoko:20160609071038p:plain


クーポンコード登録(Vouchers)

[Offers]>[Vouchers]から、クーポンコードを登録・編集することができます。ディスカウントは条件に応じて自動的に適用されるのに対し、クーポンコードは、ユーザーがコードを適宜入力する必要があります。


クーポンコードの登録にあたってはいろいろ柔軟な指定ができるようになっていて、例えば、それぞれのクーポンコードの使用制限について、以下の中から選択することができます。

  • 誰でも一回だけ使用可
  • 誰でも何回でも使用可
  • 先着一名のみ一回だけ使用可

また、割引きの種類については以下の中から選択可能です。

  • パーセント指定で割引
  • 金額指定で割引
  • 配送料のパーセント指定で割引
  • 配送料の金額指定で割引
  • 配送料が固定金額に

f:id:akiyoko:20160609071209p:plain
f:id:akiyoko:20160609071242p:plain


コンテンツ管理(Content)

アバウトページなどの固定ページを編集できるほか、[Content]>[Reviews]からユーザーレビューを確認することもできます。

f:id:akiyoko:20160609082027p:plain


レポート出力(Reports)

レポート出力機能では、様々なレポートを出力することができます。

f:id:akiyoko:20160611151345p:plain


決済状況管理(PayPal)

こちらは決済モジュールに django-paypalを利用した場合に使えるようになる機能ですが、[PayPal]>[Express transactions]から、ユーザーが PayPal 決済のトランザクションで使用した決済API のレスポンスの一覧および詳細を確認することができます。

これにより、決済処理中のエラーをトラッキングして解決に役立てることができるようになります。

f:id:akiyoko:20160609082133p:plain
f:id:akiyoko:20160609082200p:plain


まとめ

もちろん今回調査した機能以外にも、様々な機能が Django Oscar にはデフォルトで備わっています。しかしながら、今回の調査結果で分かるように、Django Oscar には、ECサイトを運営する上で必要となる基本機能はだいたい揃っていると考えてよいでしょう。


あとは、日本で Django Oscar を利用して ECサイトを構築したときに、日本の商習慣に合わせたカスタマイズ、ローカライズが必要になってくると考えられます。そこは追々やっていくとして、今後は、Oscar の機能をもう少し深追いしてみたいと思います。

*1:How to configure shipping — django-oscar 1.3 documentation

*2:ゲスト注文を許容するかどうかは設定次第

Django ORM の select_related, prefetch_related の挙動を詳しく調べてみた

$
0
0

Django ORM の QuerySet には、select_related および prefetch_related というメソッドがありますが、イマイチ使い勝手がよく分からなかったりします。


公式ドキュメントにはこう書いてありますが、

select_related works by creating an SQL join and including the fields of the related object in the SELECT statement. For this reason, select_related gets the related objects in the same database query. However, to avoid the much larger result set that would result from joining across a ‘many’ relationship, select_related is limited to single-valued relationships - foreign key and one-to-one.

prefetch_related, on the other hand, does a separate lookup for each relationship, and does the ‘joining’ in Python. This allows it to prefetch many-to-many and many-to-one objects, which cannot be done using select_related, in addition to the foreign key and one-to-one relationships that are supported by select_related.


select_related は、JOIN 句を作って、SELECT 句に関連するオブジェクトのフィールドを含めることによって動作する。これにより、select_related は 1本のデータベースクエリで関連オブジェクトを取得することができる。しかしながら、多くのリレーション先を辿って JOIN することで大規模な結果セットを取得してしまうことを避けるために、select_related は、foreign key や one-to-one といった「対一」リレーションのみを JOIN する。

一方、prefetch_related は、それぞれのリレーションに対して別々の参照を行い、Python コードで JOIN(相当の処理)を行う。これによって、select_related によって取得できる foreign key や one-to-one リレーションのオブジェクトだけではなく、select_related では取得不可能な many-to-many や many-to-one リレーションのオブジェクトの先取り(prefetch)をすることができる。


(akiyoko 訳)

https://docs.djangoproject.com/ja/1.9/ref/models/querysets/#select-related
https://docs.djangoproject.com/ja/1.9/ref/models/querysets/#prefetch-related


よく分からないですよね。


そこで今回は、select_related, prefetch_related を使うことでどのようなメリットがあるのかを確認するためにその挙動を詳しく調べてみたので、その結果をまとめてみたいと思います。


少し長いので、結論(分かったこと)から先に書きます。


分かったこと

Django ORM について

  • 1)多対一、一対一のリレーション先のオブジェクトはフィールドにアクセスした時点でクエリが発行される
    • クエリ発行後は取得したオブジェクトがキャッシュされるため、それ以降のクエリは発行されない
    • リレーション先のレコードが存在しなくても NotFound は発生しない
  • 2)一対多、多対多のリレーション先のオブジェクト群は、(all や filter で)アクセスする度にクエリが発行される
    • リレーション先のレコードが存在しなくても NotFound は発生しない

select_related について

  • 3)select_related を使うことで、一度のクエリで多対一、一対一のリレーション先のオブジェクトを取得してキャッシュしてくれる
    • null=False(デフォルト) の ForeignKey の場合は INNER JOIN で結合
    • null=True の ForeignKey の場合は LEFT OUTER JOIN で結合
  • 4)select_related の引数を指定しない場合は、多対一、一対一になっているリレーション先を全て取得してくれるのではなく、null=False の ForeignKey のみが取得対象

prefetch_related について

  • 5)prefetch_related を使うことで、先行してクエリを発行して、一対一、多対一、一対多、多対多のリレーション先のオブジェクト(群)を取得してキャッシュしてくれる
    • ただし、クエリの総数は減らない

注意点

  • select_related, prefetch_related の引数は明示的に指定しよう!


検証内容

今回は、一対一のリレーションの検証はしていません。 *1

検証環境

  • Ubuntu 14.04.4 LTS
  • Python 2.7.6
  • Django 1.9.8
  • MySQL 5.5.50

サンプルテーブル

ブログの投稿を想定したいくつかのテーブル群を検証に使用します。
ブログ投稿(blogpost)とブログ画像(blogimage)が多対一、ブログ投稿と投稿者(auth_user)が多対一、ブログ投稿とブログカテゴリが多対多のリレーションを持っていると仮定します。

以下は、論理モデルを ER図にしたものです。

f:id:akiyoko:20160803233339p:plain


参考までに、実際に作成したテーブルから、物理モデルの ER図を自動出力したものが以下になります。 *2

f:id:akiyoko:20160803071330p:plain


事前準備

Mezzanine プロジェクトの開発環境を PyCharm で設定する - akiyoko blog
を参考に、Ubuntu に Django アプリを作成します。

$ sudo apt-get update
$ sudo apt-get -y install python-dev git tree
$ sudo apt-get -y install mysql-server
$ sudo apt-get -y install mysql-client libmysqlclient-dev python-mysqldb
$ sudo mysql_install_db
$ sudo vi /etc/mysql/my.cnf
$ sudo service mysql restart
$ sudo mysql_secure_installation
$ mysql -u root -p
mysql> create database myproject character set utf8;
mysql> create user myprojectuser@localhost identified by "myprojectuserpass";
mysql> grant all privileges on myproject.* to myprojectuser@localhost;
mysql> flush privileges;
mysql> exit

$ wget https://bootstrap.pypa.io/get-pip.py
$ sudo -H python get-pip.py
$ sudo -H pip install virtualenv virtualenvwrapper
$ cat << EOF >> ~/.bash_profile

if [ -f ~/.bashrc ]; then
    . ~/.bashrc
fi
EOF
$ cat << EOF >> ~/.bashrc

source /usr/local/bin/virtualenvwrapper.sh
export WORKON_HOME=~/.virtualenvs
EOF
$ source ~/.bashrc
$ mkvirtualenv myproject
$ sudo mkdir -p /opt/webapps/myproject
$ sudo chown -R `whoami`. /opt/webapps
$ pip install MySQL-python
$ cd /opt/webapps/myproject/
$ pip install Django
$ django-admin startproject config .
$ python manage.py startapp blog
$ vi config/settings.py
(INSTALLED_APPS に blog を追加、DATABASES の設定を MySQL に変更)

config/settings.py

INSTALLED_APPS = [
    'django.contrib.admin',
    'django.contrib.auth',
    'django.contrib.contenttypes',
    'django.contrib.sessions',
    'django.contrib.messages',
    'django.contrib.staticfiles',
    'blog',
]
    ・
    ・
DATABASES = {
    'default': {
        'ENGINE': 'django.db.backends.mysql',
        'NAME': 'myproject',
        'USER': 'myprojectuser',
        'PASSWORD': 'myprojectuserpass',
        'HOST': '',
        'POST': '',
    }
}
$ vi blog/models.py
from __future__ import unicode_literals

from django.db import models
from django.utils.translation import ugettext_lazy as _


classBlogPost(models.Model):
    """    A blog post."""classMeta:
        verbose_name = _("Blog post")
        verbose_name_plural = _("Blog posts")

    categories = models.ManyToManyField("BlogCategory", verbose_name=_("Categories"),
                                        blank=True, related_name="blogposts")
    image = models.ForeignKey("BlogImage", verbose_name=_("Featured Image"),
                              related_name="blogposts", blank=True, null=True)
    user = models.ForeignKey("auth.User", verbose_name=_("Author"), related_name="blogposts")
    title = models.CharField(_("Title"), max_length=255)
    content = models.TextField(_("Content"), blank=True)


classBlogCategory(models.Model):
    """    A category for grouping blog posts into a series."""classMeta:
        verbose_name = _("Blog Category")
        verbose_name_plural = _("Blog Categories")

    title = models.CharField(_("Title"), max_length=255)


classBlogImage(models.Model):
    """    A featured image."""classMeta:
        verbose_name = _("Blog Image")
        verbose_name_plural = _("Blog Images")

    caption = models.CharField(_("Caption"), max_length=255)
    image_url = models.FileField(verbose_name=_("Image URL"), max_length=255, blank=True, null=True)
$ python manage.py makemigrations
$ python manage.py migrate


検証

まずは事前準備として、初期データを投入します。

$ python manage.py shell
>>> import logging
>>> l = logging.getLogger('django.db.backends')
>>> l.setLevel(logging.DEBUG)
>>> l.addHandler(logging.StreamHandler())

>>> from blog.models import BlogPost, BlogCategory, BlogImage
>>> from django.contrib.auth.models import User

>>> User(username='user-1').save()
>>> BlogCategory(title='cat-1').save()
>>> BlogCategory(title='cat-2').save()
>>> BlogImage(caption='image-1', image_url='blog/image1.jpg').save()
>>> user1 = User.objects.get(pk=1)
>>> cat1 = BlogCategory.objects.get(pk=1)
>>> cat2 = BlogCategory.objects.get(pk=2)
>>> image1 = BlogImage.objects.get(pk=1)
>>> BlogPost(image=image1, user=user1, content='post-1').save()
>>> post1 = BlogPost.objects.get(pk=1)
>>> post1.categories = [cat1, cat2]
>>> BlogPost(user=user1, content='post-2').save()
>>> post2 = BlogPost.objects.get(pk=2)


ここからが、本番です。


1)多対一、一対一のリレーション先のオブジェクトはフィールドにアクセスした時点でクエリが発行される
>>> post1 = BlogPost.objects.filter(pk=1)[0]
(0.002) SELECT `blog_blogpost`.`id`, `blog_blogpost`.`image_id`, `blog_blogpost`.`user_id`, `blog_blogpost`.`title`, `blog_blogpost`.`content` FROM `blog_blogpost` WHERE `blog_blogpost`.`id` = 1 LIMIT 1; args=(1,)
>>> post1.user
(0.000) SELECT `auth_user`.`id`, `auth_user`.`password`, `auth_user`.`last_login`, `auth_user`.`is_superuser`, `auth_user`.`username`, `auth_user`.`first_name`, `auth_user`.`last_name`, `auth_user`.`email`, `auth_user`.`is_staff`, `auth_user`.`is_active`, `auth_user`.`date_joined` FROM `auth_user` WHERE `auth_user`.`id` = 1; args=(1,)
<User: user-1>
>>> post1.image
(0.001) SELECT `blog_blogimage`.`id`, `blog_blogimage`.`caption`, `blog_blogimage`.`image_url` FROM `blog_blogimage` WHERE `blog_blogimage`.`id` = 1; args=(1,)
<BlogImage: BlogImage object>
1−1)クエリ発行後は取得したオブジェクトがキャッシュされるため、それ以降のクエリは発行されない
>>> post1 = BlogPost.objects.filter(pk=1)[0]
(0.002) SELECT `blog_blogpost`.`id`, `blog_blogpost`.`image_id`, `blog_blogpost`.`user_id`, `blog_blogpost`.`title`, `blog_blogpost`.`content` FROM `blog_blogpost` WHERE `blog_blogpost`.`id` = 1 LIMIT 1; args=(1,)
>>> post1.user
(0.000) SELECT `auth_user`.`id`, `auth_user`.`password`, `auth_user`.`last_login`, `auth_user`.`is_superuser`, `auth_user`.`username`, `auth_user`.`first_name`, `auth_user`.`last_name`, `auth_user`.`email`, `auth_user`.`is_staff`, `auth_user`.`is_active`, `auth_user`.`date_joined` FROM `auth_user` WHERE `auth_user`.`id` = 1; args=(1,)
<User: user-1>
>>> post1.user
<User: user-1>
>>> post1.image
(0.001) SELECT `blog_blogimage`.`id`, `blog_blogimage`.`caption`, `blog_blogimage`.`image_url` FROM `blog_blogimage` WHERE `blog_blogimage`.`id` = 1; args=(1,)
<BlogImage: BlogImage object>
>>> post1.image
<BlogImage: BlogImage object>
1−2)リレーション先のレコードが存在しなくても NotFound は発生しない
>>> post2 = BlogPost.objects.filter(pk=2)[0]
(0.001) SELECT `blog_blogpost`.`id`, `blog_blogpost`.`image_id`, `blog_blogpost`.`user_id`, `blog_blogpost`.`title`, `blog_blogpost`.`content` FROM `blog_blogpost` WHERE `blog_blogpost`.`id` = 2 LIMIT 1; args=(2,)
>>> post2.image
>>> post2.image isNoneTrue


2)一対多、多対多のリレーション先のオブジェクト群は、all や filter でアクセスする度にクエリが発行される
>>> post1 = BlogPost.objects.filter(pk=1)[0]
>>> post1.categories
<django.db.models.fields.related_descriptors.ManyRelatedManager object at 0x7f2509080a10>
>>> post1.categories.all()
(0.001) SELECT `blog_blogcategory`.`id`, `blog_blogcategory`.`title` FROM `blog_blogcategory` INNER JOIN `blog_blogpost_categories` ON (`blog_blogcategory`.`id` = `blog_blogpost_categories`.`blogcategory_id`) WHERE `blog_blogpost_categories`.`blogpost_id` = 1 LIMIT 21; args=(1,)
[<BlogCategory: BlogCategory object>, <BlogCategory: BlogCategory object>]
>>> post1.categories.all()
(0.000) SELECT `blog_blogcategory`.`id`, `blog_blogcategory`.`title` FROM `blog_blogcategory` INNER JOIN `blog_blogpost_categories` ON (`blog_blogcategory`.`id` = `blog_blogpost_categories`.`blogcategory_id`) WHERE `blog_blogpost_categories`.`blogpost_id` = 1 LIMIT 21; args=(1,)
[<BlogCategory: BlogCategory object>, <BlogCategory: BlogCategory object>]
2−1)リレーション先のレコードが存在しなくても NotFound は発生しない
>>> post2 = BlogPost.objects.filter(pk=2)[0]
(0.001) SELECT `blog_blogpost`.`id`, `blog_blogpost`.`image_id`, `blog_blogpost`.`user_id`, `blog_blogpost`.`title`, `blog_blogpost`.`content` FROM `blog_blogpost` WHERE `blog_blogpost`.`id` = 2 LIMIT 1; args=(2,)
>>> post2.categories.all()
(0.001) SELECT `blog_blogcategory`.`id`, `blog_blogcategory`.`title` FROM `blog_blogcategory` INNER JOIN `blog_blogpost_categories` ON (`blog_blogcategory`.`id` = `blog_blogpost_categories`.`blogcategory_id`) WHERE `blog_blogpost_categories`.`blogpost_id` = 2 LIMIT 21; args=(2,)
[]


3)select_related を使うことで、一度のクエリで多対一、一対一のリレーション先のオブジェクトを取得してキャッシュしてくれる

なお、

  • null=False(デフォルト) の ForeignKey の場合は INNER JOIN で結合
  • null=True の ForeignKey の場合は LEFT OUTER JOIN で結合

となる。

>>> post1 = BlogPost.objects.filter(pk=1).select_related('user', 'image')[0]
(0.001) SELECT `blog_blogpost`.`id`, `blog_blogpost`.`image_id`, `blog_blogpost`.`user_id`, `blog_blogpost`.`title`, `blog_blogpost`.`content`, `blog_blogimage`.`id`, `blog_blogimage`.`caption`, `blog_blogimage`.`image_url`, `auth_user`.`id`, `auth_user`.`password`, `auth_user`.`last_login`, `auth_user`.`is_superuser`, `auth_user`.`username`, `auth_user`.`first_name`, `auth_user`.`last_name`, `auth_user`.`email`, `auth_user`.`is_staff`, `auth_user`.`is_active`, `auth_user`.`date_joined` FROM `blog_blogpost` LEFT OUTER JOIN `blog_blogimage` ON (`blog_blogpost`.`image_id` = `blog_blogimage`.`id`) INNER JOIN `auth_user` ON (`blog_blogpost`.`user_id` = `auth_user`.`id`) WHERE `blog_blogpost`.`id` = 1 LIMIT 1; args=(1,)
>>> post1.user
<User: user-1>
>>> post1.image
<BlogImage: BlogImage object>


4)select_related の引数を指定しない場合は、多対一、一対一になっているリレーション先を全て取得してくれるのではなく、null=False の ForeignKey のみが取得対象

なので、select_related の引数は明示的に指定しましょう。

>>> post1 = BlogPost.objects.filter(pk=1).select_related()[0]
(0.001) SELECT `blog_blogpost`.`id`, `blog_blogpost`.`image_id`, `blog_blogpost`.`user_id`, `blog_blogpost`.`title`, `blog_blogpost`.`content`, `auth_user`.`id`, `auth_user`.`password`, `auth_user`.`last_login`, `auth_user`.`is_superuser`, `auth_user`.`username`, `auth_user`.`first_name`, `auth_user`.`last_name`, `auth_user`.`email`, `auth_user`.`is_staff`, `auth_user`.`is_active`, `auth_user`.`date_joined` FROM `blog_blogpost` INNER JOIN `auth_user` ON (`blog_blogpost`.`user_id` = `auth_user`.`id`) WHERE `blog_blogpost`.`id` = 1 LIMIT 1; args=(1,)
>>> post1.user
<User: user-1>
>>> post1.image
(0.000) SELECT `blog_blogimage`.`id`, `blog_blogimage`.`caption`, `blog_blogimage`.`image_url` FROM `blog_blogimage` WHERE `blog_blogimage`.`id` = 1; args=(1,)
<BlogImage: BlogImage object>


5)prefetch_related を使うことで、先行してクエリを発行して、一対一、多対一、一対多、多対多のリレーション先のオブジェクト(群)を取得してキャッシュしてくれる

prefetch_related の場合は、JOIN 句を使うのではなく、クエリを別々に発行して、プログラム的にオブジェクト内に結合してくれます。クエリの総数が減ることはありませんので、クエリの発行数を減らすという目的で prefetch_related を使用することはできません。


(多対一の場合)

>>> post1 = BlogPost.objects.filter(pk=1).prefetch_related('user')[0]
(0.001) SELECT `blog_blogpost`.`id`, `blog_blogpost`.`image_id`, `blog_blogpost`.`user_id`, `blog_blogpost`.`title`, `blog_blogpost`.`content` FROM `blog_blogpost` WHERE `blog_blogpost`.`id` = 1 LIMIT 1; args=(1,)
(0.000) SELECT `auth_user`.`id`, `auth_user`.`password`, `auth_user`.`last_login`, `auth_user`.`is_superuser`, `auth_user`.`username`, `auth_user`.`first_name`, `auth_user`.`last_name`, `auth_user`.`email`, `auth_user`.`is_staff`, `auth_user`.`is_active`, `auth_user`.`date_joined` FROM `auth_user` WHERE `auth_user`.`id` IN (1); args=(1,)
>>> post1.user
<User: user-1>
>>> post1.__dict__
{'user_id': 1L, 'title': u'', '_user_cache': <User: user-1>, '_state': <django.db.models.base.ModelState object at 0x7f2509033310>, 'content': u'post-1', 'image_id': 1L, '_prefetched_objects_cache': {}, 'id': 1L}


(一対多の場合)

>>> user1 = User.objects.filter(pk=1).prefetch_related('blogposts')[0]
(0.001) SELECT `auth_user`.`id`, `auth_user`.`password`, `auth_user`.`last_login`, `auth_user`.`is_superuser`, `auth_user`.`username`, `auth_user`.`first_name`, `auth_user`.`last_name`, `auth_user`.`email`, `auth_user`.`is_staff`, `auth_user`.`is_active`, `auth_user`.`date_joined` FROM `auth_user` WHERE `auth_user`.`id` = 1 LIMIT 1; args=(1,)
(0.000) SELECT `blog_blogpost`.`id`, `blog_blogpost`.`image_id`, `blog_blogpost`.`user_id`, `blog_blogpost`.`title`, `blog_blogpost`.`content` FROM `blog_blogpost` WHERE `blog_blogpost`.`user_id` IN (1); args=(1,)
>>> user1.blogposts.all()
[<BlogPost: BlogPost object>, <BlogPost: BlogPost object>]


(多対多の場合)

>>> post1 = BlogPost.objects.filter(pk=1).prefetch_related('categories')[0]
(0.000) SELECT `blog_blogpost`.`id`, `blog_blogpost`.`image_id`, `blog_blogpost`.`user_id`, `blog_blogpost`.`title`, `blog_blogpost`.`content` FROM `blog_blogpost` WHERE `blog_blogpost`.`id` = 1 LIMIT 1; args=(1,)
(0.000) SELECT (`blog_blogpost_categories`.`blogpost_id`) AS `_prefetch_related_val_blogpost_id`, `blog_blogcategory`.`id`, `blog_blogcategory`.`title` FROM `blog_blogcategory` INNER JOIN `blog_blogpost_categories` ON (`blog_blogcategory`.`id` = `blog_blogpost_categories`.`blogcategory_id`) WHERE `blog_blogpost_categories`.`blogpost_id` IN (1); args=(1,)
>>> post1.categories.all()
[<BlogCategory: BlogCategory object>, <BlogCategory: BlogCategory object>]
>>> post1.categories.__dict__
{'source_field': <django.db.models.fields.related.ForeignKey: blogpost>, 'reverse': False, 'source_field_name': 'blogpost', '_constructor_args': ((<BlogPost: BlogPost object>,), {}), 'creation_counter': 32, 'target_field_name': u'blogcategory', '_inherited': False, '_db': None, 'query_field_name': u'blogposts', '_hints': {}, 'prefetch_cache_name': 'categories', 'instance': <BlogPost: BlogPost object>, 'through': <class'blog.models.BlogPost_categories'>, 'core_filters': {u'blogposts__id': 1L}, 'symmetrical': False, 'model': <class'blog.models.BlogCategory'>, 'related_val': (1L,), 'target_field': <django.db.models.fields.related.ForeignKey: blogcategory>, 'name': None}


なお、filter() ではクエリが再発行されてしまうようです。all() を先取りしてキャッシュしているのかな。。

>>> post1 = BlogPost.objects.filter(pk=1).prefetch_related('categories')[0]
>>> post1.categories.filter()
(0.000) SELECT `blog_blogcategory`.`id`, `blog_blogcategory`.`title` FROM `blog_blogcategory` INNER JOIN `blog_blogpost_categories` ON (`blog_blogcategory`.`id` = `blog_blogpost_categories`.`blogcategory_id`) WHERE `blog_blogpost_categories`.`blogpost_id` = 1 LIMIT 21; args=(1,)
[<BlogCategory: BlogCategory object>, <BlogCategory: BlogCategory object>]


あと、prefetch_related の引数を指定しないと、リレーション先を取得してくれないように見えます。どこまでリレーション先を取ってくるか分からないから、明示的に指定しないと取得しないという仕様なのかもしれません。

なので、prefetch_related の引数は明示的に指定しましょう。

>>> post1 = BlogPost.objects.filter(pk=1).prefetch_related()[0]
(0.000) SELECT `blog_blogpost`.`id`, `blog_blogpost`.`image_id`, `blog_blogpost`.`user_id`, `blog_blogpost`.`title`, `blog_blogpost`.`content` FROM `blog_blogpost` WHERE `blog_blogpost`.`id` = 1 LIMIT 1; args=(1,)


まとめ

select_related や prefetch_related の使い道としては主に、後続の処理で何度もアクセスされるオブジェクトを先に取得しておきたいときに使うのがよいと思います。特に、一側のオブジェクトを取得する場合でクエリの本数を減らしたいなら select_related を、多側のオブジェクト群を取得したいなら prefetch_related を検討すればよいでしょう。


Django ORM は、クエリ(SQL)をあまり意識せずに使えて便利な半面、何も分からずに使っていると、クエリの本数や実行速度がボトルネックになって、応答速度の遅い処理を作ってしまいがちです。

クエリの実行を含む処理の応答速度が遅い場合は、まずはクエリを確認し、select_related や prefetch_related を使って実行速度を改善することも検討すべきです。

*1:一対一リレーションの挙動は、多対一リレーションの場合とほぼ同じでした。双方から ForeignKey が付与されていると考えればよいのかも。

*2:PyCharm Professional のデータベース機能を使いました。http://akiyoko.hatenablog.jp/entry/2016/03/13/141600を参照

Django ORM の SQL を出力する方法まとめ

$
0
0

Django ORM を使っていると、どういった SQL が発行されているか、クエリの内容を出力したいときが多々あります。

SQL を出力する方法についてはいくつか方法がありますが、今回はその方法を思いつく限りピックアップしてみようと思います。


1)QuerySet の query を print する

個人的に一番よく使う方法。
実際に SQL を発行せずに、発行予定の SELECT文を出力することができます。

Django shell だろうが、pdb デバッグ中だろうが、PyCharm のデバッグ中だろうが、いつでも利用することができます。

例えば、Django shell で使う場合はこんな感じ。

$ python manage.py shell
>>> from django.contrib.auth.models import User
>>> print User.objects.filter(pk=1).query
SELECT `auth_user`.`id`, `auth_user`.`password`, `auth_user`.`last_login`, `auth_user`.`is_superuser`, `auth_user`.`username`, `auth_user`.`first_name`, `auth_user`.`last_name`, `auth_user`.`email`, `auth_user`.`is_staff`, `auth_user`.`is_active`, `auth_user`.`date_joined` FROM `auth_user` WHERE `auth_user`.`id` = 1


事前に何も設定しなくても、デバッグ中に手っ取り早く発行された SQL が確認できるのが特徴です。しかしながら、発行された SQL をリアルタイムに確認することはできません。


(参考)Show the sql Django is running? - Stack Overflow


2)DefaultConnectionProxy の queries を出力する

直前に発行された SQL を確認することができます。
1)とセットで使うことが多いでしょうか。

$ python manage.py shell
>>> from django.contrib.auth.models import User
>>> User.objects.filter(pk=1)
[<User: user-1>]
>>> User.objects.filter(pk=2)
[<User: admin>]

>>> from django.db import connection
>>> connection.queries
[{u'time': u'0.000', u'sql': u'SET SQL_AUTO_IS_NULL = 0'}, {u'time': u'0.000', u'sql': u'SET SQL_AUTO_IS_NULL = 0'}, {u'time': u'0.000', u'sql': u'SELECT `auth_user`.`id`, `auth_user`.`password`, `auth_user`.`last_login`, `auth_user`.`is_superuser`, `auth_user`.`username`, `auth_user`.`first_name`, `auth_user`.`last_name`, `auth_user`.`email`, `auth_user`.`is_staff`, `auth_user`.`is_active`, `auth_user`.`date_joined` FROM `auth_user` WHERE `auth_user`.`id` = 1 LIMIT 21'}, {u'time': u'0.001', u'sql': u'SELECT `auth_user`.`id`, `auth_user`.`password`, `auth_user`.`last_login`, `auth_user`.`is_superuser`, `auth_user`.`username`, `auth_user`.`first_name`, `auth_user`.`last_name`, `auth_user`.`email`, `auth_user`.`is_staff`, `auth_user`.`is_active`, `auth_user`.`date_joined` FROM `auth_user` WHERE `auth_user`.`id` = 2 LIMIT 21'}]
>>> connection.queries[-1]
{u'time': u'0.001', u'sql': u'SELECT `auth_user`.`id`, `auth_user`.`password`, `auth_user`.`last_login`, `auth_user`.`is_superuser`, `auth_user`.`username`, `auth_user`.`first_name`, `auth_user`.`last_name`, `auth_user`.`email`, `auth_user`.`is_staff`, `auth_user`.`is_active`, `auth_user`.`date_joined` FROM `auth_user` WHERE `auth_user`.`id` = 2 LIMIT 21'}

発行したクエリは、'time'(実行時間)と 'sql'の dict として、発行された順に後ろに追加されていきます。慣れるまで、出力内容が少し読みにくいのが難点でしょうか。

またこちらの方法でも、発行された SQL をリアルタイムに確認することはできません。


(参考)Show the sql Django is running? - Stack Overflow


3)django-debug-toolbar の SQL Panel を使う

プラグインのインストールが必要な物の、一番楽チンな方法。

Django を runserver で起動して、実際に画面を操作してから、右側に表示される SQL Panel を開いて確認するだけです。


django-debug-toolbar の SQL Panel を使うには、条件がいくつかあります。

  • DEBUG = True
  • 'django.contrib.staticfiles'が INSTALLED_APPS に設定済み *1

他にも、settings.py に以下の設定が必要です。 *2

INSTALLED_APPS += ('debug_toolbar',)

defalways_show_toolbar(request):
    returnTrue

DEBUG_TOOLBAR_CONFIG = {
    'SHOW_TOOLBAR_CALLBACK': '%s.always_show_toolbar' % __name__,
}


このように、画面からサクサクっと操作が可能です。楽チンですね。

f:id:akiyoko:20160804221039p:plain

f:id:akiyoko:20160804221058p:plain


インストール方法

$ pip install django-debug-toolbar

ちなみに、検証時の環境は以下の通りでした。

  • Python 2.7.6
  • Django (1.9.8)
  • django-debug-toolbar (1.5)


django-debug-toolbar のさらに詳しい説明については、以下の書籍が非常に有用です。「14-04 Django Debug Toolbar」の章に詳しい説明が載っています。
Django 以外にも、Python での開発手法についてのノウハウがいろいろ詰まっていてオススメです。

Pythonプロフェッショナルプログラミング第2版

Pythonプロフェッショナルプログラミング第2版


(参考)


4)django-debug-toolbar の debugsqlshell を使う

3)の django-debug-toolbar をインストールしているのであれば、通常の Django shell ではなく debugsqlshell を起動することで、発行される SQL を随時確認することができます。

$ python manage.py debugsqlshell
>>> from django.contrib.auth.models import User
>>> User.objects.filter()

SET SQL_AUTO_IS_NULL = 0 [0.80ms]
SELECT `auth_user`.`id`,
       `auth_user`.`password`,
       `auth_user`.`last_login`,
       `auth_user`.`is_superuser`,
       `auth_user`.`username`,
       `auth_user`.`first_name`,
       `auth_user`.`last_name`,
       `auth_user`.`email`,
       `auth_user`.`is_staff`,
       `auth_user`.`is_active`,
       `auth_user`.`date_joined`
FROM `auth_user` LIMIT 21 [0.19ms]
[<User: admin>]


5)django-extensions の shell_plus を --print-sql オプションで起動する

「django-extensions」は、「Django フレームワークの機能を便利に拡張する、管理コマンドやデータベースフィールドなどの詰め合わせ」 *3です。

django-extensions の shell_plus を --print-sql オプションで起動すれば、4)と同じような機能を使うことができます。

$ python manage.py shell_plus --print-sql
>>> from django.contrib.auth.models import User
>>> User.objects.filter()

SET SQL_AUTO_IS_NULL = 0

Execution time: 0.000056s [Database: default]

SELECT `auth_user`.`id`,
       `auth_user`.`password`,
       `auth_user`.`last_login`,
       `auth_user`.`is_superuser`,
       `auth_user`.`username`,
       `auth_user`.`first_name`,
       `auth_user`.`last_name`,
       `auth_user`.`email`,
       `auth_user`.`is_staff`,
       `auth_user`.`is_active`,
       `auth_user`.`date_joined`
FROM `auth_user` LIMIT 21

Execution time: 0.000391s [Database: default]

[<User: admin>]

この shell_plus には autoloading という機能があるらしいのですが、正直なところ使ったことはありません。


インストール方法

$ pip install django-extensions

settings.py に「django_extensions」を追加。

INSTALLED_APPS = [
    'django.contrib.admin',
    'django.contrib.auth',
    'django.contrib.contenttypes',
    'django.contrib.sessions',
    'django.contrib.messages',
    'django.contrib.staticfiles',
    'django_extensions',
]

(参考)


6)django.db.backends のログレベルを動的に変更

事前の準備がほとんど必要なく、1)や 2)のように明示的に SQL を出力する必要がないので、お手軽に使えます。

Django shell で使うケースが多いかもしれません。

$ python manage.py shell
>>>import logging
>>>l = logging.getLogger('django.db.backends')
>>>l.setLevel(logging.DEBUG)
>>>l.addHandler(logging.StreamHandler())

>>> from django.contrib.auth.models import User
>>> User.objects.filter(pk=1)
(0.000) SET SQL_AUTO_IS_NULL = 0; args=None
(0.000) SELECT `auth_user`.`id`, `auth_user`.`password`, `auth_user`.`last_login`, `auth_user`.`is_superuser`, `auth_user`.`username`, `auth_user`.`first_name`, `auth_user`.`last_name`, `auth_user`.`email`, `auth_user`.`is_staff`, `auth_user`.`is_active`, `auth_user`.`date_joined` FROM `auth_user` WHERE `auth_user`.`id` = 1 LIMIT 21; args=(1,)
[<User: user-1>]


7)settings.py の LOGGING を設定

ログに出力したり、コンソールに出力したりと、いろいろ柔軟に設定可能です。リアルタイムに発行される SQL が確認できるのも、この方法の特徴です。

なお、「DEBUG = True」でないと使えないので注意が必要です。


settings.py の設定例

DEBUG = True
LOGGING = {
    'disable_existing_loggers': False,
    'version': 1,
    'handlers': {
        'console': {
            # logging handler that outputs log messages to terminal'class': 'logging.StreamHandler',
            'level': 'DEBUG', # message level to be written to console
        },
    },
    'loggers': {
        '': {
            # this sets root level logger to log debug and higher level# logs to console. All other loggers inherit settings from# root level logger.'handlers': ['console'],
            'level': 'DEBUG',
            'propagate': False, # this tells logger to send logging message# to its parent (will send if set to True)
        },
        'django.db': {
            # django also has database level logging'handlers': ['console'],
            'level': 'DEBUG',
            'propagate': False,
        },
    },
}


ただしこの方法だと、ログやコンソールが大量の SQL ですぐに埋め尽くされてしまうので、1)や 2)の方法を使って、確認したい SQL だけをピンポイントに出力するようにした方が開発中は捗るかもしれません。


(参考)django - log all sql queries - Stack Overflow


まとめ

今回は、Django ORM の SQL を出力する方法として7種類のやり方を紹介しました。
この中から、目的や状況に応じてやり方を使い分けるようにすると、開発の効率もグンとアップすると思います。

良い Django ライフを!

*1:Django 1.9 では、django-debug-toolbar はデフォルトで INSTALLED_APPS に設定済みです。

*2:ミニマムな設定です。

*3:Pythonプロフェッショナルプログラミング第2版より引用


Mezzanine の本番設定 〜AWS 環境構築から運用設定まで〜(その2:Mezzanine テーマのカスタマイズ)

$
0
0

こんにちは、akiyoko です。

Mezzanineは Python製の WordPress風フルスタックCMSフレームワークです。

akiyoko.hatenablog.jp


今年の 7月に、Mezzanine を使った某ブログサイト(将来的に ECサイトを増設予定)の本番運用を開始しました。*1 その備忘録として、AWS の初期設定から Mezzanine の本番デプロイ、ちょっとした運用設定までの記録をまとめておくことにしました。

全ての記録を一つの記事にすると長くなり過ぎるので、テーマごとに、

の 4本に記事を分割することにしました。

今回はその 2本目、「その2:Mezzanine テーマのカスタマイズ」について説明します。


Mezzanine テーマのカスタマイズとして実施した内容としては、

  • Bootstrap テンプレートの選定
  • Bootstrap テンプレートの設定
  • 各種テンプレートファイルの修正

となります。


1. Bootstrap テンプレートの選定

Mezzanine は、テンプレートのCSS が Twitter Bootstrapの Version 3 に対応しています。

Twitter Bootstrap integration


Overview — Mezzanine 4.2.2 documentation


そこで、Mezzanine テーマをカスタマイズするための第一歩として、まずは Bootstrap テンプレートの選定を行いました。


結論から書くと、いろいろ探した中で、「WrapBootstrap」というサイトから「The Project - Multipurpose Template」という有料テンプレートを購入することにしました。価格は、1サイト分の利用ライセンスで $16 でした。


The Project - Multipurpose Template
wrapbootstrap.com


f:id:akiyoko:20161018081943p:plain

デモページもあります。
htmlcoder.me


他にも、

f:id:akiyoko:20161018082028p:plain

f:id:akiyoko:20161018082054p:plain

f:id:akiyoko:20161018082121p:plain

f:id:akiyoko:20161018082153p:plain
などを候補としてチェックしていました。


最終的にこの「The Project」テンプレートを採用することにしたのは、

  • 有料テンプレート($4 〜 $49)の中でも比較的安め($16)
  • 人気がある(購入数ランキングでトップ10)
  • テンプレートが多い(コーポレートやポートフォリオ、ブログ、ECサイトなど 30種類近くのテーマで 200ページ以上)
  • ちょくちょく更新されている

といった理由からです。

特に、必須要件である「ブログ」と「ECサイト」以外にも数多くのテンプレートファイルが含まれていて、今後もいろいろな使い勝手があるんじゃないかと思ったのが大きな決め手になりました。あと、使ってる人が多そう(購入者が多い)、サポートがきちんとしてるっぽい(更新頻度が多い)というのも安心ですよね。


なお、「The Project」の現時点の最新のバージョンは Version 1.3 で、Bootstrap 3.3 系と互換性があるとのこと(Bootstrap: Compatible with 3.3.x)。


2. Bootstrap テンプレートの設定

購入した Bootstrap テンプレート「The Project」を、Mac 上に構築した PyCharm プロジェクト(あるいは Ubuntu 上に構築した Mezzanine プロジェクト)に実際に当てていきます。


<前提>

  • Mac 上に構築した PyCharm プロジェクト名は「akiyokoproject」
    • プロジェクトのパスは「~/PycharmProjects/akiyokoproject」
  • ダウンロードした「products%2FWB0F82581.zip」をダブルクリックして解凍済み


2.1. Bootstrap テンプレートの static ファイルを配置

Mac 上に構築した PyCharm プロジェクトに、Bootstrap テンプレートの static ファイルを配置します。

以下、Mac での手順です。

### Bootstrap の js, css 等の static ファイルをコピーするための前準備
$ cd ~/Downloads/the_project_v.1.3/
### HFS Plus の拡張属性(Extended Attributes)を除去
$ xattr -cr .
$ find . -type d -exec chmod 775 {} \;
$ find . -type f -exec chmod 664 {} \;

### custom ディレクトリを作成
$ cd ~/PycharmProjects/akiyokoproject/
$ mkdir -p custom/{templates,static}
$ touch custom/__init__.py

### 「The Project」テンプレートの html/template 配下のファイルをコピー
$ cp -a ~/Downloads/the_project_v.1.3/html/template/bootstrap custom/static/
$ cp -a ~/Downloads/the_project_v.1.3/html/template/css custom/static/
$ cp -a ~/Downloads/the_project_v.1.3/html/template/fonts custom/static/
$ cp -a ~/Downloads/the_project_v.1.3/html/template/images custom/static/
$ cp -a ~/Downloads/the_project_v.1.3/html/template/js custom/static/
$ cp -a ~/Downloads/the_project_v.1.3/html/template/plugins custom/static/
$ cp -a ~/Downloads/the_project_v.1.3/html/template/videos custom/static/


2.2. collecttemplates コマンドを修正

Mezzanin のデフォルトテンプレートを custom アプリケーションにコピーしてくれる便利なコマンドが、Mezzanin には用意されています。

### テンプレートを全コピーしてくれるコマンド
$ python manage.py collecttemplates

(-a オプションを付けると、admin のテンプレートも対象に入れる)

しかしながら、コマンドを実行すると、

(略)
  File "/home/webapp/.virtualenvs/akiyokoproject/local/lib/python2.7/site-packages/mezzanine/core/management/commands/collecttemplates.py", line 42, in handle
    to_dir = settings.TEMPLATE_DIRS[0]
IndexError: list index out of range

という、Django 1.9 ならではのエラーが出たので(2016年7月時点)、
python manage.py collecttemplates fails with error IndexError: list index out of range · Issue #1512 · stephenmcd/mezzanine · GitHub
に従って暫定対応しました。 *2

diff --git a/config/settings.py b/config/settings.py
index bfd3958..5371af6 100644
--- a/config/settings.py+++ b/config/settings.py@@ -220,6 +220,7 @@ TEMPLATES = [
         },
     },
 ]
+TEMPLATE_DIRS = [TEMPLATES[0]['DIRS'][0]]

 if DJANGO_VERSION < (1, 9):
     del TEMPLATES[0]["OPTIONS"]["builtins"]


2.3. デフォルトテンプレートを templates 配下にコピー

一旦、Mezzanine デフォルトテンプレートを templates/ に全コピーしておきます。

$ python manage.py collecttemplates


2.4. custom アプリケーションを INSTALLED_APPS に登録

最後に、custom アプリケーションを settings.py の INSTALLED_APPS に登録します。

$ vi config/settings.py

---
TEMPLATES = [
    {
        "BACKEND": "django.template.backends.django.DjangoTemplates",
        "DIRS": [
            os.path.join(PROJECT_ROOT, "custom/templates"),
            os.path.join(PROJECT_ROOT, "templates")
        ],
        "APP_DIRS": True,
    ・
    ・

INSTALLED_APPS = (
    ・
    ・
    # "mezzanine.accounts",
    # "mezzanine.mobile",
    "custom",
)
---

ちなみに、「INSTALLED_APPS」を修正しないと、「DEBUG = False」の場合は static ファイルをちゃんと認識してくれるものの、「DEBUG = True」の場合には認識してくれなかったので NG。つまり、「INSTALLED_APPS」への修正も必要だし、「TEMPLATES.DIRS」の修正もテンプレートファイル参照の優先度を付けるために必要となります。


またこの変更により、

$ python manage.py collecttemplates

を実行すると、Mezzanine のデフォルトテンプレートを custom 配下にコピーしてくれるようになります。

なので例えば、以下のコマンドは「cp -a ~/.virtualenvs/akiyokoproject/lib/python2.7/site-packages/mezzanine/core/templates/base.html custom/templates/」と同等になります。

$ python manage.py collecttemplates -t base.html


3. 各機能のテンプレートファイル修正

3.1. base.html のヘッダ修正

Bootstrap テンプレートの各種 static ファイルを読み込んでいるのが、base.html です。

なのでまず最初に、base.html の head 部分を
MEZZaTHEMing (creating Mezzanine themes) Part 1: base.html | Bit of Pixels
に沿って修正しました。

diff --git a/custom/templates/base.html b/custom/templates/base.html
index 122e702..9d4149e 100644
--- a/custom/templates/base.html+++ b/custom/templates/base.html@@ -15,26 +15,71 @@<link rel="alternate" type="application/atom+xml" title="Atom" href="{% url "blog_post_feed" "atom" %}">
 {% endifinstalled %}

+<!-- Web Fonts -->+<link href='//fonts.googleapis.com/css?family=Roboto:400,300,300italic,400italic,500,500italic,700,700italic' rel='stylesheet' type='text/css'>+<link href='//fonts.googleapis.com/css?family=Raleway:700,400,300' rel='stylesheet' type='text/css'>+<link href='//fonts.googleapis.com/css?family=Pacifico' rel='stylesheet' type='text/css'>+<link href='//fonts.googleapis.com/css?family=PT+Serif' rel='stylesheet' type='text/css'>+
 {% compress css %}
-<link rel="stylesheet" href="{% static "css/bootstrap.css" %}">-<link rel="stylesheet" href="{% static "css/mezzanine.css" %}">-<link rel="stylesheet" href="{% static "css/bootstrap-theme.css" %}">-{% if LANGUAGE_BIDI %}-<link rel="stylesheet" href="{% static "css/bootstrap-rtl.css" %}">-{% endif %}-{% ifinstalled cartridge.shop %}-<link rel="stylesheet" href="{% static "css/cartridge.css" %}">-{% if LANGUAGE_BIDI %}-<link rel="stylesheet" href="{% static "css/cartridge.rtl.css" %}">-{% endif %}-{% endifinstalled %}+<!-- Bootstrap core CSS -->+<link href="{% static "bootstrap/css/bootstrap.css" %}" rel="stylesheet">+<!-- Font Awesome CSS -->+<link href="{% static "fonts/font-awesome/css/font-awesome.css" %}" rel="stylesheet">+<!-- Fontello CSS -->+<link href="{% static "fonts/fontello/css/fontello.css" %}" rel="stylesheet">+<!-- Plugins -->+<link href="{% static "plugins/magnific-popup/magnific-popup.css" %}" rel="stylesheet">+<link href="{% static "plugins/rs-plugin/css/settings.css" %}" rel="stylesheet">+<link href="{% static "css/animations.css" %}" rel="stylesheet">+<link href="{% static "plugins/owl-carousel/owl.carousel.css" %}" rel="stylesheet">+<link href="{% static "plugins/owl-carousel/owl.transitions.css" %}" rel="stylesheet">+<link href="{% static "plugins/hover/hover-min.css" %}" rel="stylesheet">+<!-- The Project's core CSS file -->+<link href="{% static "css/style.css" %}" rel="stylesheet" >+<!-- The Project's Typography CSS file, includes used fonts -->+<!-- Used font for body: Roboto -->+<!-- Used font for headings: Raleway -->+<link href="{% static "css/typography-default.css" %}" rel="stylesheet" >+<!-- Color Scheme (In order to change the color scheme, replace the blue.css with the color scheme that you prefer)-->+<link href="{% static "css/skins/purple.css" %}" rel="stylesheet">+<!-- Custom css -->+<link href="{% static "css/custom.css" %}" rel="stylesheet">
 {% block extra_css %}{% endblock %}
 {% endcompress %}

 {% compress js %}
-<script src="{% static "mezzanine/js/"|add:settings.JQUERY_FILENAME %}"></script>-<script src="{% static "js/bootstrap.js" %}"></script>-<script src="{% static "js/bootstrap-extras.js" %}"></script>+<!-- Jquery and Bootstap core js files -->+<script type="text/javascript" src="{% static "plugins/jquery.min.js" %}"></script>+<script type="text/javascript" src="{% static "bootstrap/js/bootstrap.min.js" %}"></script>+<!-- Modernizr javascript -->+<script type="text/javascript" src="{% static "plugins/modernizr.js" %}"></script>+<!-- jQuery Revolution Slider  -->+<script type="text/javascript" src="{% static "plugins/rs-plugin/js/jquery.themepunch.tools.min.js" %}"></script>+<script type="text/javascript" src="{% static "plugins/rs-plugin/js/jquery.themepunch.revolution.min.js" %}"></script>+<!-- Isotope javascript -->+<script type="text/javascript" src="{% static "plugins/isotope/isotope.pkgd.min.js" %}"></script>+<!-- Magnific Popup javascript -->+<script type="text/javascript" src="{% static "plugins/magnific-popup/jquery.magnific-popup.min.js" %}"></script>+<!-- Appear javascript -->+<script type="text/javascript" src="{% static "plugins/waypoints/jquery.waypoints.min.js" %}"></script>+<!-- Count To javascript -->+<script type="text/javascript" src="{% static "plugins/jquery.countTo.js" %}"></script>+<!-- Parallax javascript -->+<script src="{% static "plugins/jquery.parallax-1.1.3.js" %}"></script>+<!-- Contact form -->+<script src="{% static "plugins/jquery.validate.js" %}"></script>+<!-- Background Video -->+<script src="{% static "plugins/vide/jquery.vide.js" %}"></script>+<!-- Owl carousel javascript -->+<script type="text/javascript" src="{% static "plugins/owl-carousel/owl.carousel.js" %}"></script>+<!-- SmoothScroll javascript -->+<script type="text/javascript" src="{% static "plugins/jquery.browser.js" %}"></script>+<script type="text/javascript" src="{% static "plugins/SmoothScroll.js" %}"></script>+<!-- Initialization of Plugins -->+<script type="text/javascript" src="{% static "js/template.js" %}"></script>+<!-- Custom Scripts -->+<script type="text/javascript" src="{% static "js/custom.js" %}"></script>
 {% block extra_js %}{% endblock %}
 {% endcompress %}


なお、
MEZZaTHEMing (creating Mezzanine themes) Part 1: base.html | Bit of Pixels
の「Updating static asset locations」に記載されている通り、staticファイルのパス指定は「{% static %}」で囲まないと、ファイルアクセス時に

UncompressableFileError: 'bootstrap/css/bootstrap.css' isn't accessible via COMPRESS_URL ('/static/') and can't be compressed

というエラーが出てしまうので注意です。


3.2. 各機能のテンプレート修正

どの機能がどのテンプレートファイルに対応するかというのを理解するのが、Mezzanine のテンプレートをカスタマイズする上で非常に重要なポイントになります。

日本語の記事では、Monotalk さんのブログが分かりやすいかと思います(日本語の記事はとても少ないので貴重です!)。
mezzanineのテーマを作成してみました。 | Monotalk


以下、(他にも修正が必要なファイルがあるかもしれませんが)私が実際に修正したファイルの一覧です。


トップページ

  • custom/static/img/slide-1.jpg
  • custom/static/img/slide-2.jpg
  • custom/templates/base.html
  • custom/templates/index.html

ドロップダウンメニュー

  • custom/templates/base.html
  • custom/templates/pages/menus/dropdown.html

ブログ

  • custom/static/css/custom.css
  • custom/templates/blog/blog_post_detail.html
  • custom/templates/blog/blog_post_list.html
  • custom/templates/generic/includes/comment.html
  • custom/templates/generic/includes/comments.html

Twitter 連携

  • custom/static/css/custom.css
  • custom/templates/twitter/tweets.html


3.3. 入力フォームの form-control 問題対応

少し細かいですが、Form ページに使用されるテンプレート(custom/templates/includes/form_fields.html)内の入力フィールドタグに、Bootstrap 標準の「form-control」という CSS クラスが無いために、Bootstrap のスタイルがうまく当たらないという問題が発覚しました。


参考サイト


上記のサイトを参考にして、custom 配下に templatetags/__init__.py および templatetags/add_attributes.py を追加し、custom/templates/includes/form_fields.html を修正しました。

custom/
    static/
    templates/
    templatetags/
        __init__.py
        add_attributes.py
    __init__.py


custom/templatetags/add_attributes.py

from django import template
register = template.Library()


@register.filter(name='add_attributes')
defadd_attributes(field, css):
    attrs = {}
    definition = css.split(',')

    for d in definition:
        if':'notin d:
            attrs['class'] = d
        else:
            t, v = d.split(':')
            attrs[t] = v

    return field.as_widget(attrs=attrs)


custom/templates/includes/form_fields.html

diff --git a/custom/templates/includes/form_fields.html b/custom/templates/includes/form_fields.html
index f3d8697..f924e87 100644
--- a/custom/templates/includes/form_fields.html+++ b/custom/templates/includes/form_fields.html@@ -1,4 +1,4 @@-{% load mezzanine_tags %}+{% load mezzanine_tags add_attributes %}

 {% nevercache %}
 <input type="hidden" name="referrer" value="{{ request.META.HTTP_REFERER }}">
@@ -12,7 +12,7 @@<div class="form-group input_{{ field.id_for_label }} {{ field.field.type }}
     {% if field.errors %} has-error{% endif %}">
     {% if field.label %}<label class="control-label" for="{{ field.auto_id }}">{{ field.label }}</label>{% endif %}
-    {{ field }}+    {{ field|add_attributes:"form-control" }}
     {% if field.errors %}
     <p class="help-block">
         {% for e in field.errors %}


まとめ

今回、Mezzanine テーマのカスタマイズとして、

  • Bootstrap テンプレートの選定
  • Bootstrap テンプレートの設定
  • 各種テンプレートファイルの修正

を実施した内容を記載しました。

次回は、Mezzanine 本番設定の第三弾として、「その3:Mezzanine の本番デプロイ」について記載します。


参考本

Twitter Bootstrap 3 関連の日本語の本は、数えるほどしかありません。
もし本格的に勉強したいのであれば、是非。

UIまで手の回らないプログラマのためのBootstrap 3実用ガイド

UIまで手の回らないプログラマのためのBootstrap 3実用ガイド

Bootstrapファーストガイド―CSS設計の手間を大幅に削減!

Bootstrapファーストガイド―CSS設計の手間を大幅に削減!

*1:Mezzanine を採用したのは、個人の趣味です。

*2:Mezzanine 4.2.0 から修正されたようです。 https://github.com/stephenmcd/mezzanine/commit/a84f38c38bdaee0b21c9e9209cec5148ba0ae108

Mezzanine の本番設定 〜AWS 環境構築から運用設定まで〜(その3:Mezzanine の本番デプロイ)

$
0
0

こんにちは、akiyoko です。

Mezzanineは、知る人ぞ知る Python製の WordPress風フルスタックCMSフレームワークです。

akiyoko.hatenablog.jp


今年の 7月に、Mezzanine を使った某ブログサイト(将来的に ECサイトを増設予定)の本番運用を開始しました。*1 その備忘録として、AWS の初期設定から Mezzanine の本番デプロイ、ちょっとした運用設定までの記録をまとめておくことにしました。

全ての記録を一つの記事にすると長くなり過ぎるので、テーマごとに、

の 4本に記事を分割することにしました。

今回はその 3本目、「その3:Mezzanine の本番デプロイ」について説明します。


Mezzanine の本番デプロイとして実施した内容としては、

  • 本番サーバ(Ubuntu)を起動
  • Fabric スクリプトを実行
  • Fabric スクリプト実行後の各種設定
    • SSL の設定
    • URL の転送設定
    • BASIC認証の設定
    • MySQL のインストール
    • メールの設定
    • ログの設定
    • タイムゾーンを Asia/Tokyo に変更
    • sitemap.xml / robot.txt の設定

となります。


【目次】


1. 概要

Mezzanine には何と、コマンド一発で リバースプロキシや DB などを含めた全部入りの本番環境が構築できる Fabric スクリプトが含まれています。

Fabric

Each Mezzanine project comes bundled with utilities for deploying production Mezzanine sites, using Fabric. The provided fabfile.py contains composable commands that can be used to set up all the system-level requirements on a new Debian based system, manage each of the project-level virtual environments for initial and continuous deployments, and much more.


(akiyoko 翻訳)
それぞれの Mezzanine プロジェクトには、本番 Mezzanine サイトをデプロイするための Fabric を使った便利ツールがバンドルされています。提供されている fabfile.py には、新しい Debian ベースのシステム上のあらゆるシステムレベルの依存ライブラリをセットアップしたり、初回デプロイ・継続的デプロイのためのプロジェクトレベルの仮想環境を管理したり、他にもたくさんのことをしたりするために利用できる組み立て可能なコマンド群が含まれています。


Deployment — Mezzanine 4.2.2 documentation


Mezzanine の Fabric スクリプト (*2) を実行するには、Fabric を pip でインストールした後、

$ fab secure

してから、

$ fab all

するだけです。簡単ですよね!


一度試してみれば分かりますが、もう至れり尽くせりです。
例えば、HTTPS のためのオレオレ証明書を作成して所定の位置に配置し、Nginx の設定までしてくれるという心尽くしに「ありがとう!」と思わず声が漏れてしまいます。


Mezzanine デフォルトの Fabric スクリプトを実行して構築した本番環境は、以下のコンポーネントで構成されます。

  • NGINX - public facing web server
  • gunicorn - internal HTTP application server
  • PostgreSQL - database server
  • memcached - in-memory caching server
  • supervisord - process control and monitor
  • virtualenv - isolated Python environments for each project
  • git or mercurial - version control systems (optional)


Deployment — Mezzanine 4.2.2 documentation


データベースとして PostgreSQL がインストールされますが、PostgreSQL と MySQL はどっちがいいの?という議論(*3)は置いておいて、私の場合は単純に「操作や運用に慣れている」という理由から、今回はデータベースを PostgreSQL から MySQL に入れ替えることにしました(実際には、Fabric スクリプトを実行して PostgreSQL を一旦インストールした後に手動で削除し、Ansible で MySQL をインストールしました)。


(参考)


最終的なサーバとコンポーネント、プロジェクトの構成は以下のようになりました。

サーバ:

  • Ubuntu 14.04.4 LTS


コンポーネント:

Nginx1.4.6
Gunicorn19.6.0
MySQL5.5.49
Supervisor3.0b2
Python2.7.6
Django1.9.7
Mezzanine4.1.0 (*5

上記のバージョンは、いずれも 2016年7月時点のものです。


プロジェクト:

プロジェクト名akiyokoproject
プロジェクトの配置場所/home/webapp/mezzanine/akiyokoproject
プロジェクトのオーナ(Ubuntu ユーザ名)webapp
virtualenv の配置場所/home/webapp/.virtualenvs/akiyokoproject
デプロイ先のドメイン名akiyoko.com (*6


以降、Fabric スクリプトの実行を含めた、Mezzanine の本番デプロイの手順について説明します。


2. Ubuntu インスタンスを起動

Fabric スクリプトを実行する前に、スクリプトを流し込むサーバを立ち上げる必要があります。サーバには、AWS EC2 で起動した Ubuntu インスタンスを利用します。

また初期設定として、Fabric スクリプトを流し込むための SSHユーザの設定などを行います。


2.1. EC2インスタンスを起動

AWS EC2インスタンスを立ち上げます。その際、IAMロール「ec2-prod」(*7)を付けておきます。

具体的な起動方法については、以下の過去記事を参照してください。

<過去記事>
akiyoko.hatenablog.jp


以下、インスタンスの IPアドレスを「52.xxx.xxx.xxx」とします。

2.2. webapp ユーザを作成

以下のコマンドで Ubuntu にアクセスします。
(サーバにアクセスするための SSH秘密鍵が「~/.ssh/aws_p1.pem」に配置されているという前提です。)

$ ssh -i ~/.ssh/aws_p1.pem ubuntu@52.xxx.xxx.xxx

Fabric スクリプトの各コマンドを実行する SSHユーザ「webapp」を作成します。

$ sudo adduser --gecos '' webapp

(ここでは、パスワードは「pass」など簡単なもので OK。)

(参考)What do the `--disabled-login` and `--gecos` options of `adduser` command stand for? - Ask Ubuntu


次に、webapp ユーザがパスワード無しでログインできるように設定します。

$ sudo visudo -f /etc/sudoers.d/90-cloud-init-users

を実行して、以下の一行を末尾に追加します(control + option + x で保存)。

webapp ALL=(ALL) NOPASSWD:ALL

Ubuntu サーバを再起動後、ubuntu ユーザのものと同じ SSH鍵でログインできるように設定します。 *8

$ sudo service sudo restart

$ sudo su - webapp
$ mkdir -m 700 ~/.ssh
$ sudo cp -a /home/ubuntu/.ssh/authorized_keys ~/.ssh/
$ sudo chown webapp. ~/.ssh/authorized_keys
$ sudo chmod 600 ~/.ssh/authorized_keys

最後に、Mac 上から

$ ssh -i ~/.ssh/aws_p1.pem webapp@52.xxx.xxx.xxx

でサーバにログインできることが確認できれば OK。


3. Fabric スクリプトを実行

3.1. 本番デプロイ用の Mezzanine プロジェクトを作成

Mac上で、Fabric スクリプトを実行するための、本番デプロイ用の Mezzanine プロジェクトを作成します。

### virualenv が Mac にインストール済みという前提
$ virtualenv ~/.venvs/mezzanine_deploy
$ source ~/.venvs/mezzanine_deploy/bin/activate

### Fabric を実行するために必要なコンポーネントを pip install
(mezzanine_deploy)$ pip install future fabric mezzanine

Mezzanine (4.1.0)
Fabric (1.11.1)
paramiko (1.17.0)

### 適当なディレクトリにプロジェクトを作成
(mezzanine_deploy)$ cd ~/dev
(mezzanine_deploy)$ mkdir mezzanine_deploy_akiyokoproject_for_aws && cd $_
(mezzanine_deploy)$ mezzanine-project config .


本番デプロイ用に、config/local_settings.py を以下のように編集します。 *9

・
    ・
#################### DEPLOY SETTINGS ##################### Domains for public site
ALLOWED_HOSTS = [".akiyoko.com"]

# These settings are used by the default fabfile.py provided.# Check fabfile.py for defaults.

FABRIC = {
    "SSH_USER": "webapp",  # VPS SSH username and will be an application owner"SSH_KEY_PATH": "~/.ssh/aws_p1.pem",
    "HOSTS": ["52.xxx.xxx.xxx"],  # The IP address of your VPS"DOMAINS": ["akiyoko.com"],  # Edit domains in ALLOWED_HOSTS#"LIVE_HOSTNAME": "akiyoko.com", # Host for public site.#"VIRTUALENV_HOME": "/home/ubuntu/.virtualenvs",  # Absolute remote path for virtualenvs"PROJECT_NAME": "akiyokoproject", # Unique identifier for project"REQUIREMENTS_PATH": "requirements.txt",  # Project's pip requirements"GUNICORN_PORT": 8000, # Port gunicorn will listen on"LOCALE": "en_US.UTF-8",  # Should end with ".UTF-8""DB_PASS": "dbpass",  # Live database password"ADMIN_PASS": "adminpass",  # Live admin user password"SECRET_KEY": SECRET_KEY,
    "NEVERCACHE_KEY": NEVERCACHE_KEY,
}

(「ADMIN_PASS」および「ADMIN_PASS」の値はサンプルですので、コピペしないようにご注意ください。)


ちなみに、

"DEPLOY_TOOL": "git",

と設定すると、

Fatal error: local() encountered an error (return code 128) while executing 'git push -f ssh://ubuntu@52.xxx.xxx.xxx/home/ubuntu/git/akiyokoproject.git master'

というエラーになったので、今回は設定していません。


3.2. fabfile.py を修正

2016年7月時点では、fab all 実行時に、

$ /home/webapp/mezzanine/akiyokoproject/bin/python /home/webapp/mezzanine/akiyokoproject/manage.py syncdb --noinput ->

[52.xxx.xxx.xxx] out: Unknown command: 'syncdb'
[52.xxx.xxx.xxx] out: Type 'manage.py help' for usage.
[52.xxx.xxx.xxx] out:

Fatal error: run() received nonzero return code 1 while executing!

というエラーが出たので、fabfile.py を以下のように修正しました。 *10


fabfile.py

@@ -435,6 +435,7 @@ def install():"""
     # Install system requirements
     sudo("apt-get update -y -q")
+    sudo("apt-get upgrade -y -q")
     apt("nginx libjpeg-dev python-dev python-setuptools git-core "
         "postgresql libpq-dev memcached supervisor python-pip")
     run("mkdir -p /home/%s/logs" % env.user)
@@ -635,7 +636,7 @@ def deploy():
             rsync_upload()
     with project():
         manage("collectstatic -v 0 --noinput")
-        manage("syncdb --noinput")+        manage("makemigrations --noinput")
         manage("migrate --noinput")
     for name in get_templates():
         upload_template_and_reload(name)

原因は、fabfile.py 内で使用されている syncdb コマンドが Django 1.9(Django 1.7 以降)に対応していないからです。

(参考)Deploy Mezzanine to Ubuntu 14 server on DigitalOcean with Fabric | PerezProgramming


なお、今回のように AWS + Ubuntu でサーバを構築する場合は、fab secure の内容はほぼ網羅できているのでスキップした(fab secure コマンドは実行しなかった)のですが、それだと「apt-get upgrade -y -q」が唯一実行できていないので、fabfile.py の install() に追加しています。


3.3. デプロイ実行

先述のように、今回は AWS + Ubuntu でサーバを構築したので、

(mezzanine_deploy)$ fab secure

は今回実行しません。


以下のコマンドのみを実行します。

(mezzanine_deploy)$ fab all

正常に Fabric スクリプトが流れ終わったら、デプロイ後の後処理を実施していきます。


4. SSL の設定

ここではすでに、正規の SSL証明書を取得しているものとします。
取得方法については、以下の過去記事を参考にしてください。

<過去記事>
akiyoko.hatenablog.jp


まずは、「GoGetSSL」の管理ページから、www_akiyoko_com.crt(SSL証明書)と www_akiyoko_com.ca-bundle(中間証明書)をダウンロードしておきます。


クライアント(Mac)からサーバに SSL証明書と中間証明書を転送します。

$ scp -i ~/.ssh/aws_p1.pem ~/Downloads/www_akiyoko_com.crt ubuntu@52.xxx.xxx.xxx:/tmp/
$ scp -i ~/.ssh/aws_p1.pem ~/Downloads/www_akiyoko_com.ca-bundle ubuntu@52.xxx.xxx.xxx:/tmp/

次に、Ubuntu 上で、SSL証明書を(Fabric スクリプトが作成してくれたデフォルトのものから)入れ替えます。

$ sudo mv /etc/nginx/conf/akiyokoproject.crt /etc/nginx/conf/akiyokoproject.crt.orig
$ sudo mv /etc/nginx/conf/akiyokoproject.key /etc/nginx/conf/akiyokoproject.key.orig
$ sudo cp /tmp/www_akiyoko_com.crt /etc/nginx/conf/akiyokoproject.crt
$ sudo chmod 644 /etc/nginx/conf/akiyokoproject.crt

### 中間証明書を連結する
$ cat /tmp/www_akiyoko_com.ca-bundle | sudo tee -a /etc/nginx/conf/akiyokoproject.crt

なお、Android 実機(Nexus 5)から HTTPS で閲覧したときに証明書エラーが出たので、以下を参考に、SSL証明書に中間証明書を連結しました。 *11

(参考)


最後に、秘密鍵を書き換えて(*12)、Nginx をリロードします。

$ sudo vi /etc/nginx/conf/akiyokoproject.key
(秘密鍵をコピペ)

$ ls -al /etc/nginx/conf
total 24
drwxr-xr-x 2 root root 4096 Jul  7 15:29 .
drwxr-xr-x 6 root root 4096 Jul  7 15:14 ..
-rw-r--r-- 1 root root 1964 Jul  7 15:29 akiyokoproject.crt
-rw-r--r-- 1 root root 1111 Jul  7 15:14 akiyokoproject.crt.orig
-rw-r--r-- 1 root root 1704 Jul  7 15:29 akiyokoproject.key
-rw-r--r-- 1 root root 1704 Jul  7 15:14 akiyokoproject.key.orig

### Nginx をリロード
$ sudo service nginx reload


5. URL の転送設定

ここで、

http://akiyoko.com/foo/bar ⇒ https://akiyoko.com/foo/bar
http://www.akiyoko.com/foo/bar ⇒ https://akiyoko.com/foo/bar
https://www.akiyoko.com/foo/bar ⇒ https://akiyoko.com/foo/bar

のように URL転送(要するに全部 https の wwwなしドメインに転送)したいので、Nginx の設定を修正して 80 番ポートアクセス時の転送先を変更します。


/etc/nginx/sites-enabled/akiyokoproject.conf

server {

    #listen 80;
     listen 443 ssl;

    ・
    ・

server {
    listen 80;
    server_name akiyoko.com;
    return 301 https://akiyoko.com$request_uri;
}

server {
    listen 80;
    listen 443 ssl;
    server_name www.akiyoko.com;
    return 301 https://akiyoko.com$request_uri;
}

なお、以下 ↓ のように設定しても動作しましたが、上記の方がベターかと。

server {

    #listen 80;
     listen 443 ssl;

    ・
    ・

server {
    listen 80;
    server_name akiyoko.com;
    return 301 https://akiyoko.com$request_uri;
}

server {
    server_name www.akiyoko.com;
    return 301 https://akiyoko.com$request_uri;
}

一旦、Nginx をリロードします。

$ sudo service nginx reload


6. BASIC認証の設定

(デプロイ時はまだリリース前だったので)ここで一旦、BASIC認証をかけておきます。もちろん、サイト公開時には設定を外しておくのを忘れずに。

$ sudo apt-get -y install apache2-utils
$ sudo htpasswd -c /etc/nginx/.htpasswd test
(パスワードを入力)


Nginx の設定を変更します。

/etc/nginx/sites-enabled/akiyokoproject.conf

server {

    #listen 80;
     listen 443 ssl;
    server_name akiyoko.com;

    ・
    ・

    location / {
        auth_basic "Restricted";
        auth_basic_user_file /etc/nginx/.htpasswd;

        proxy_redirect      off;
        proxy_set_header    Host                    $host;
        proxy_set_header    X-Real-IP               $remote_addr;
        proxy_set_header    X-Forwarded-For         $proxy_add_x_forwarded_for;
        proxy_set_header    X-Forwarded-Protocol    $scheme;
        proxy_pass          http://akiyokoproject;
    }}


Nginx をリロードして作業完了です。

$ sudo service nginx reload


(参考)Nginx で Basic 認証 - Qiita


7. MySQL のインストール

先述の通り今回は、Fabric スクリプトを実行してインストールされる PostgreSQL から MySQL にデータベースを入れ替えました。実際の作業としては、インストールされた PostgreSQL を手動で削除し、Ansible スクリプトを実行して MySQL をインストールしました。

以下、その手順です。

7.1. PostgreSQL のアンインストール

まず、手動で PostgreSQL を削除します。

$ sudo apt-get -y --purge remove postgresql\*
$ sudo rm -rf /etc/postgresql/
$ sudo rm -rf /etc/postgresql-common/
$ sudo rm -rf /var/lib/postgresql/
$ sudo userdel -r postgres
$ sudo groupdel postgres


7.2. MySQL のインストール

次に、MySQL を Ansible を使って Mac からインストールします。
今回は、Ansible Galaxy を使ってインストールをおこないました。

<過去記事>
akiyoko.hatenablog.jp


Mac 上の適当なディレクトリにプロジェクトを作成します。

$ cd ~/dev/ansible-mysql

hosts

[db-servers]
52.xxx.xxx.xxx

site.yml

- hosts: db-servers
  user: ubuntu
  vars_files:- vars/database.yml
  roles:- {role: ANXS.mysql }

vars/database.yml

mysql_current_root_password:''mysql_root_password: dbpass
mysql_databases:- name: akiyokoproject
mysql_users:- name: akiyokoproject
    pass: akiyokoprojectpass
    priv:"akiyokoproject.*:ALL"

(「mysql_root_password」および「pass」の値はサンプルですので、コピペしないようにご注意ください。)


Ansible を実行します。

$ ansible-playbook -i hosts site.yml --sudo --private-key ~/.ssh/aws_p1.pem -vv


7.3. MySQL 用の設定

データベースを MySQL に変更したのに伴い、Ubuntu サーバの各種設定を変更します。


MySQL 用のプラグインをインストールします。

$ sudo apt-get -y install libmysqlclient-dev
$ pip install MySQL-python


settings.py のデータベース設定を修正します。

config/local_settings.py

・
    ・
DATABASES = {
    "default": {
        # Ends with "postgresql_psycopg2", "mysql", "sqlite3" or "oracle"."ENGINE": "django.db.backends.mysql",
        # DB name or path to database file if using sqlite3."NAME": "akiyokoproject",
        # Not used with sqlite3."USER": "akiyokoproject",
        # Not used with sqlite3."PASSWORD": "akiyokoprojectpass",
        # Set to empty string for localhost. Not used with sqlite3."HOST": "127.0.0.1",
        # Set to empty string for default. Not used with sqlite3."PORT": "",
    }
}
    ・
    ・

データベースのマイグレーションを実行します。

$ python manage.py migrate
$ python manage.py createsuperuser

username (leave blank to use 'webapp'): admin
Email address: admin@akiyoko.com
Password: 
Password (again):


とりあえずデータベースをバックアップしておきます。

$ mkdir ~/db_backup
$ mysqldump --single-transaction -u root -p akiyokoproject > ~/db_backup/akiyokoproject_init.dump

### タイムスタンプをバックアップファイル名に含める場合
$ mysqldump --single-transaction -u root -p akiyokoproject > ~/db_backup/akiyokoproject_backup_`date +%y%m%d%H%M`.dump

### リストアするときのコマンド
### mysql -u root -p akiyokoproject < ~/db_backup/akiyokoproject_init.dump

(参考)MySQLのデータベースをmysqldumpでバックアップ/復元する方法 | WEB ARCH LABO


最後に gunicorn を再起動して完了です。

(akiyokoproject)$ python manage.py collectstatic
$ sudo supervisorctl restart all


ここで万が一(バックアップした AMI から起動した直後など?)、virtualenvwrapper を使って workon しようとした際に、

$ workon akiyokoproject
workon: command not found

というエラーが出てしまう場合は、一旦 Ubuntu からログアウトして、ubuntuユーザで接続し直してから、

$ sudo su - webapp

として .bashrc を読み込み直すとよさそうです(source ~/.bashrc としてもよかったのかな??)。


8. メールの設定

前提として、AWS Management Console で SES の設定が完了し、起動した EC2インスタンスに SES の権限を持った IAMロール(今回は「ec2-prod」がそれに相当)が付与されているものとします。

<過去記事>
akiyoko.hatenablog.jp


なお、Amazon SES を利用するため、postfix などの MTA のインストールは不要です。


(参考)


Ubuntuサーバ上で、django-ses をインストールします。

(akiyokoproject)$ pip install django-ses


config/local_settings.py の末尾に以下を追加します。

################# AWS SETTINGS ##################AWS_ACCESS_KEY_ID = "AKIxxxxxxxxxxxxxxxxx"#AWS_SECRET_ACCESS_KEY = "xxxxxxxxxxxxxxxxxxxxxxxxxxxxxxxxxxxxxxxx"################### EMAIL SETTINGS ###################
EMAIL_BACKEND = "django_ses.SESBackend"
AWS_SES_REGION_NAME = "us-west-2"
AWS_SES_REGION_ENDPOINT = "email.us-west-2.amazonaws.com"#EMAIL_HOST_USER = "admin@akiyoko.com"#EMAIL_USE_TLS = True#EMAIL_HOST = "email-smtp.us-west-2.amazonaws.com"#DEFAULT_FROM_EMAIL = SERVER_EMAIL = u"no-reply <no-reply@akiyoko.com>"

上記は、SES を「Oregon」リージョンで開設した場合の設定になります。

なお、コメントアウト部分はあってもなくても OK なのですが、「EMAIL SETTINGS」に設定している 3つは最低限必要となります。 *13

あと、「AWS_SES_REGION_ENDPOINT」は、普段(?)のホスト名とは違う(「email.」で始まる)ので注意が必要かと。


(参考)Customizing Mezzanine | ROSS LAIRD

の記事が、一番参考になりました。

その他、

も参考に。


9. ログの設定

Fabric スクリプト実行後の状態ではアプリケーションの各種ログが出力されないようになっているので、ここで、Mezzanine のログ設定を変更します。


まず、ログを出力するディレクトリを掘っておきます。
なお、gunicorn のプロセスは webapp ユーザで起動されるので、ディレクトリのオーナーを webapp.webapp にしておきます。

$ sudo mkdir /var/log/akiyokoproject
$ sudo chown webapp. /var/log/akiyokoproject


config/local_settings.py の末尾に、以下の設定を追加します。

################# LOG SETTINGS #################
LOGGING = {
    'version': 1,
    'disable_existing_loggers': False,
    'handlers': {
        'file': {
            'level': 'DEBUG',
            'class': 'logging.FileHandler',
            'filename': '/var/log/akiyokoproject/application.log',
        },
    },
    'loggers': {
        'django': {
            'handlers': ['file'],
            'level': 'DEBUG',
            'propagate': True,
        },
    },
}

(上記は、DEBUGレベル以上のログを「/var/log/akiyokoproject/application.log」に出力する設定になります。)


gunicorn を再起動して設定を反映させます。

$ sudo supervisorctl restart all


10. タイムゾーンを Asia/Tokyo に変更

これはちょっと「やっちまった系」です。

本番稼働して何日か経ってからふと思い立ってタイムゾーンを「Asia/Tokyo」に変更したのですが、本来は、Fabric スクリプトを実行する前にやっておくべきだったかもしれません。。

10.1. Ubuntuサーバのタイムゾーンを変更

$ timedatectl
      Local time: Mon 2016-07-25 13:02:02 UTC
  Universal time: Mon 2016-07-25 13:02:02 UTC
        Timezone: Etc/UTC (UTC, +0000)
     NTP enabled: yes
NTP synchronized: no
 RTC in local TZ: no
      DST active: n/a

$ sudo timedatectl set-timezone Asia/Tokyo

$ timedatectl
      Local time: Mon 2016-07-25 22:02:44 JST
  Universal time: Mon 2016-07-25 13:02:44 UTC
        Timezone: Asia/Tokyo (JST, +0900)
     NTP enabled: yes
NTP synchronized: no
 RTC in local TZ: no
      DST active: n/a

$ date
Mon Jul 25 22:05:10 JST 2016

(参考)


10.2. settings.py の修正

settings.py の TIME_ZONE を「Asia/Tokyo」に変更して、プロセスを再起動します。

config/settings.py

@@ -101,7 +101,7 @@ ALLOWED_HOSTS = []
 # timezone as the operating system.
 # If running in a Windows environment this must be set to the same as your
 # system time zone.
-TIME_ZONE = 'UTC'+TIME_ZONE = 'Asia/Tokyo'

 # If you set this to True, Django will use timezone-aware datetimes.
 USE_TZ = True


10.3. MySQL のタイムゾーン変更

本番運用を開始した後に Ubuntu のタイムゾーンを変更したからか(十中八九それが原因だと思いますが・・)、Django Admin で [Content] > [Blog posts] に移動しようとすると、「Sorry, an error occurred.」と画面に出て、以下のエラーログが出るようになってしまいました。

・
    ・
ValueError: Database returned an invalid value in QuerySet.datetimes(). Are time zone definitions for your database and pytz installed?
Exception while resolving variable 'get_admin_url' in template 'includes/editable_toolbar.html'.
Traceback (most recent call last):
  File "/home/webapp/.virtualenvs/akiyokoproject/local/lib/python2.7/site-packages/django/template/base.py", line 905, in _resolve_lookup
    (bit, current))  # missing attribute
VariableDoesNotExist: Failed lookup for key [get_admin_url] in u'None'

 
先に、MySQL の設定を確認しておきます。

$ mysql -u root -p
mysql> showvariableslike'%time_zone%';
+------------------+--------+
| Variable_name    | Value  |
+------------------+--------+
| system_time_zone | JST    |
| time_zone        | SYSTEM |
+------------------+--------+
2rowsin set (0.00 sec)

mysql> selectcount(*)from `mysql`.`time_zone_name`;
+----------+
| count(*) |
+----------+
|        0 |
+----------+
1rowin set (0.00 sec)


対策として、タイムゾーンデータをインポートしました(ちなみに、最後の「mysql」はテーブル名)。 *14

$ mysql_tzinfo_to_sql /usr/share/zoneinfo | mysql -u root -p mysql
Enter password:
Warning: Unable to load '/usr/share/zoneinfo/iso3166.tab' as time zone. Skipping it.
Warning: Unable to load '/usr/share/zoneinfo/leap-seconds.list' as time zone. Skipping it.
Warning: Unable to load '/usr/share/zoneinfo/zone.tab' as time zone. Skipping it.

### ↓のコマンドを実行すると、MySQLを再起動しなくてもOK
$ mysql -u root -p -e "flush tables;" mysql

(参考)mysql - Database returned an invalid value in QuerySet.dates() - Stack Overflow


なお、「MySQLでタイムゾーンを設定する - Qiita」に書かれているように、「/etc/my.cnf」のタイムゾーンを「default-time-zone = 'Asia/Tokyo'」などと追加しなくてもよさそうです(詳細は不明)。


最後に、MySQL の設定を再び確認。

$ mysql -u root -p
mysql> showvariableslike'%time_zone%';
+------------------+--------+
| Variable_name    | Value  |
+------------------+--------+
| system_time_zone | JST    |
| time_zone        | SYSTEM |
+------------------+--------+
2rowsin set (0.00 sec)

mysql> selectcount(*)from `mysql`.`time_zone_name`;
+----------+
| count(*) |
+----------+
|     1808 |
+----------+
1rowin set (0.00 sec)

(「/etc/my.cnf」のタイムゾーンを変更すると、time_zone の値は「Asia/Tokyo」になりますが)time_zone は「SYSTEM」のままです。


これで解決しました!!


11. sitemap.xml / robot.txt の設定

これは公開直前におこなう作業ですが、Google Search Console の設定に先駆けて、sitemap.xml および robot.txt の設定をしておきます。


これまたありがたいことに、Mezzanine には、sitemap.xml および robot.txt を提供してくれる仕組みがすでに整っています。


11.1. sitemap.xml の設定

sitemap.xml については、Mezzanine にデフォルトで「django.contrib.sitemaps」がインストールされているので、「/sitemap.xml」にアクセスするとコンテンツに応じた sitemap.xml が自動的に生成されて表示されます。

しかしながら Mezzanine 4.1.0 では、「/sitemap.xml」にアクセスすると以下のエラーが出てしまいます。

Internal Server Error: /sitemap.xml
Traceback (most recent call last):
  File "/home/webapp/.virtualenvs/akiyokoproject/local/lib/python2.7/site-packages/django/core/handlers/base.py", line 149, in get_response
    response = self.process_exception_by_middleware(e, request)
    (中略)
  File "/home/webapp/.virtualenvs/akiyokoproject/local/lib/python2.7/site-packages/mezzanine/core/sitemaps.py", line 27, in items
    return list(Displayable.objects.url_map(in_sitemap=True).values())
  File "/home/webapp/.virtualenvs/akiyokoproject/local/lib/python2.7/site-packages/mezzanine/core/managers.py", line 366, in url_map
    home = self.model(title=_("Home"))
  File "/home/webapp/.virtualenvs/akiyokoproject/local/lib/python2.7/site-packages/django/db/models/base.py", line 416, in __init__
    val = field.get_default()
  File "/home/webapp/.virtualenvs/akiyokoproject/local/lib/python2.7/site-packages/django/db/models/fields/related.py", line 905, in get_default
    if isinstance(field_default, self.remote_field.model):
TypeError: isinstance() arg 2 must be a class, type, or tuple of classes and types
Exception while resolving variable 'get_admin_url' in template 'includes/editable_toolbar.html'.
Traceback (most recent call last):
  File "/home/webapp/.virtualenvs/akiyokoproject/local/lib/python2.7/site-packages/django/template/base.py", line 905, in _resolve_lookup
    (bit, current))  # missing attribute
VariableDoesNotExist: Failed lookup for key [get_admin_url] in u'None'


この不具合は本家で修正されていたのですが、残念ながら、私が本番デプロイした Mezzanine 4.1.0 にはまだマージされていませんでした(4.2.0 から適用されています)。
Fix dummy homepage object in sitemap. Closes #1516. · stephenmcd/mezzanine@94d5729 · GitHub


そこで以下の手順で、Mezzanine 4.1.0 にパッチを充てました。


まず、GitHub 上で stephenmcd/mezzanine を clone しておきます。
その後、Mac 上で以下のコマンドを実行します。

### ローカルに clone
$ git clone https://github.com/akiyoko/mezzanine.git

### tag 4.1.0 でチェックアウト(ブランチ名は「release」)
$ git checkout -b release refs/tags/4.1.0

### パッチを充てる
$ git cherry-pick 94d57294bcc1e934fdd723546be7ea15bb9dcd1a

### リモートリポジトリに push
$ git push origin release


本番環境にて、akiyoko リポジトリから release タグ指定で Mezzanine をインストールし直します。

$ workon akiyokoproject
$ pip install -U git+https://github.com/akiyoko/mezzanine.git@release#egg=Mezzanine

これで解決しました。


(参考)


11.2. robot.txt の設定

Fabric スクリプトを実行することで配置される robots.txtは、Google 検索エンジン bot のクローリングを全てのページで拒否するような設定になっているため、本番サイトの公開前に、以下のように「/admin/」以外をクローリング許可するような設定に書き換えます。


static/robots.txt

User-agent: *
Disallow:

となっているのを、

User-agent: *
Disallow: /admin/

Sitemap: https://akiyoko.com/sitemap.xml

に修正します。
(なお、「static/robots.txt」は、.gitignore に「/static」が含まれているため Git管理下にはなりません。)


12. デプロイ後の本番環境確認

最後に、デプロイ後の本番環境の各種設定を確認します。


まずは、tree をインストールします。

$ sudo apt-get -y install tree

12.1. ディレクトリ構成

$ find . -name "*.pyc" -exec rm {} \;
$ tree ~/ -L 4
/home/webapp/
├── db_backup
│   └── akiyokoproject_init.dump
├── logs
│   ├── akiyokoproject_error.log
│   ├── akiyokoproject_error_nginx.log
│   └── akiyokoproject_supervisor
└── mezzanine
    ├── akiyokoproject
    │   ├── config
    │   │   ├── __init__.py
    │   │   ├── local_settings.py
    │   │   ├── settings.py
    │   │   ├── urls.py
    │   │   └── wsgi.py
    │   ├── custom
    │   │   ├── __init__.py
    │   │   ├── static
    │   │   ├── templates
    │   │   └── templatetags
    │   ├── deploy
    │   │   ├── crontab.template
    │   │   ├── gunicorn.conf.py.template
    │   │   ├── local_settings.py.template
    │   │   ├── nginx.conf.template
    │   │   └── supervisor.conf.template
    │   ├── fabfile.py
    │   ├── gunicorn.conf.py
    │   ├── gunicorn.pid
    │   ├── gunicorn.sock
    │   ├── __init__.py
    │   ├── last.db
    │   ├── manage.py
    │   ├── requirements.txt
    │   ├── static
    │   │   ├── admin
    │   │   ├── bootstrap
    │   │   ├── CACHE
    │   │   ├── css
    │   │   ├── filebrowser
    │   │   ├── fonts
    │   │   ├── grappelli
    │   │   ├── images
    │   │   ├── img
    │   │   ├── js
    │   │   ├── media
    │   │   ├── mezzanine
    │   │   ├── plugins
    │   │   ├── robots.txt
    │   │   ├── test
    │   │   └── videos
    │   └── templates
    │       ├── base.html
    │       ├── blog
    │       ├── email
    │       ├── errors
    │       ├── generic
    │       ├── includes
    │       ├── index.html
    │       ├── pages
    │       ├── search_results.html
    │       └── twitter
    └── akiyokoproject.tar


12.2. 各種ログ

Nginx: /var/log/nginx

$ sudo ls -al /var/log/nginx/
total 8
drwxr-x---  2 www-data adm    4096 Jun 25 07:06 .
drwxrwxr-x 11 root     syslog 4096 Jun 25 07:06 ..
-rw-r--r--  1 root     root      0 Jun 25 07:06 access.log
-rw-r--r--  1 root     root      0 Jun 25 07:06 error.log


Supervisor: /var/log/supervisor

$ ls -al /var/log/supervisor
total 12
drwxr-xr-x  2 root root   4096 Jun 25 07:07 .
drwxrwxr-x 11 root syslog 4096 Jun 25 07:06 ..
-rw-------  1 root root      0 Jun 25 07:07 gunicorn_akiyokoproject-stderr---supervisor-VP9pQh.log
-rw-r--r--  1 root root    760 Jun 25 07:07 supervisord.log


アプリケーションログ: /var/log/akiyokoproject/

$ ls -al /var/log/akiyokoproject/
total 42520
drwxr-xr-x  2 webapp webapp     4096 Aug 11 20:11 .
drwxrwxr-x 12 root   syslog     4096 Oct 25 06:39 ..
-rw-r--r--  1 webapp webapp 43527221 Oct 25 21:30 application.log


エラー系ログ: /home/webapp/logs/

$ ls -al /home/webapp/logs/
total 3808
drwxrwxr-x 2 webapp   webapp    4096 Aug 11 20:11 .
drwxr-xr-x 8 webapp   webapp    4096 Oct 22 14:38 ..
-rw-r--r-- 1 webapp   webapp   23980 Aug 11 20:04 akiyokoproject_error.log
-rw-r--r-- 1 www-data root   3851602 Oct 25 21:58 akiyokoproject_error_nginx.log
-rw-r--r-- 1 root     root      5985 Aug 11 20:04 akiyokoproject_supervisor


12.3. Mezzanine の各種設定

config/local_settings.py

from __future__ import unicode_literals

SECRET_KEY = "xxxxxxxxxxxxxxxxxxxxxxxxxxxxxxxxxxxxxxxx"
NEVERCACHE_KEY = "xxxxxxxxxxxxxxxxxxxxxxxxxxxxxxxxxxxxxxxx"
ALLOWED_HOSTS = ['akiyoko.com']

DATABASES = {
    "default": {
        # Ends with "postgresql_psycopg2", "mysql", "sqlite3" or "oracle"."ENGINE": "django.db.backends.mysql",
        # DB name or path to database file if using sqlite3."NAME": "akiyokoproject",
        # Not used with sqlite3."USER": "akiyokoproject",
        # Not used with sqlite3."PASSWORD": "akiyokoprojectpass",
        # Set to empty string for localhost. Not used with sqlite3."HOST": "127.0.0.1",
        # Set to empty string for default. Not used with sqlite3."PORT": "",
    }
}

SECURE_PROXY_SSL_HEADER = ("HTTP_X_FORWARDED_PROTOCOL", "https")

CACHE_MIDDLEWARE_SECONDS = 60

CACHE_MIDDLEWARE_KEY_PREFIX = "akiyokoproject"

CACHES = {
    "default": {
        "BACKEND": "django.core.cache.backends.memcached.MemcachedCache",
        "LOCATION": "127.0.0.1:11211",
    }
}

SESSION_ENGINE = "django.contrib.sessions.backends.cache"################# AWS SETTINGS ##################AWS_ACCESS_KEY_ID = "AKIxxxxxxxxxxxxxxxxx"#AWS_SECRET_ACCESS_KEY = "xxxxxxxxxxxxxxxxxxxxxxxxxxxxxxxxxxxxxxxx"################### EMAIL SETTINGS ###################
EMAIL_BACKEND = "django_ses.SESBackend"
AWS_SES_REGION_NAME = "us-west-2"
AWS_SES_REGION_ENDPOINT = "email.us-west-2.amazonaws.com"#EMAIL_HOST_USER = "admin@akiyoko.com"#EMAIL_USE_TLS = True#EMAIL_HOST = "email-smtp.us-west-2.amazonaws.com"#DEFAULT_FROM_EMAIL = SERVER_EMAIL = u"no-reply <no-reply@akiyoko.com>"################# LOG SETTINGS #################ifnot DEBUG:
    LOGGING = {
        'version': 1,
        'disable_existing_loggers': False,
        'handlers': {
            'file': {
                'level': 'DEBUG',
                'class': 'logging.FileHandler',
                'filename': '/var/log/akiyokoproject/application.log',
            },
        },
        'loggers': {
            'django': {
                'handlers': ['file'],
                'level': 'DEBUG',
                'propagate': True,
            },
        },
    }


12.4. pip でインストールしたパッケージリスト

(akiyokoproject)$ pip list
beautifulsoup4 (4.4.1)
bleach (1.4.3)
chardet (2.3.0)
Django (1.9.7)
django-appconf (1.0.2)
django-compressor (2.0)
django-contrib-comments (1.7.1)
filebrowser-safe (0.4.3)
future (0.15.2)
grappelli-safe (0.4.2)
gunicorn (19.6.0)
html5lib (0.9999999)
Mezzanine (4.1.0)
MySQL-python (1.2.5)
oauthlib (1.1.2)
Pillow (3.3.0)
pip (8.1.2)
psycopg2 (2.6.2)
python-memcached (1.58)
pytz (2016.4)
rcssmin (1.0.6)
requests (2.10.0)
requests-oauthlib (0.6.1)
rjsmin (1.0.12)
setproctitle (1.1.10)
setuptools (24.0.2)
six (1.10.0)
tzlocal (1.2.2)
wheel (0.29.0)

(2016年7月時点のもの)


11.5. Supervisor の設定

以下の 2つの Supervisor 設定ファイルは、Fabric スクリプト実行時に自動生成されたものです。


/etc/supervisor/conf.d/akiyokoproject.conf

[program:gunicorn_akiyokoproject]
command=/home/webapp/.virtualenvs/akiyokoproject/bin/gunicorn -c gunicorn.conf.py -p gunicorn.pid config.wsgi:application
directory=/home/webapp/mezzanine/akiyokoproject
user=webapp
autostart=true
stdout_logfile = /home/webapp/logs/akiyokoproject_supervisor
autorestart=true
redirect_stderr=true
environment=LANG="en_US.UTF-8",LC_ALL="en_US.UTF-8",LC_LANG="en_US.UTF-8"


/home/webapp/mezzanine/akiyokoproject/gunicorn.conf.py

from __future__ import unicode_literals
import multiprocessing

bind = "unix:/home/webapp/mezzanine/akiyokoproject/gunicorn.sock"
workers = multiprocessing.cpu_count() * 2 + 1
errorlog = "/home/webapp/logs/akiyokoproject_error.log"
loglevel = "error"
proc_name = "akiyokoproject"


11.6. Nginx の設定

$ ls -al /etc/nginx/
total 80
drwxr-xr-x  6 root root 4096 Jul  8 01:03 .
drwxr-xr-x 92 root root 4096 Aug 11 21:59 ..
drwxr-xr-x  2 root root 4096 Jul 10 15:41 conf
drwxr-xr-x  2 root root 4096 Jun  3 00:16 conf.d
  (中略)
-rw-r--r--  1 root root 1601 Mar  5  2014 nginx.conf
  (中略)
drwxr-xr-x  2 root root 4096 Jul  8 00:14 sites-available
drwxr-xr-x  2 root root 4096 Jul  8 00:15 sites-enabled
  (後略)

$ ls -al /etc/nginx/conf.d/
total 8
drwxr-xr-x 2 root root 4096 Jun  2 15:16 .
drwxr-xr-x 6 root root 4096 Jun 18 04:29 ..

$ ls -al /etc/nginx/sites-available/
total 12
drwxr-xr-x 2 root root 4096 Jul  8 00:14 .
drwxr-xr-x 6 root root 4096 Jul  8 01:03 ..
-rw-r--r-- 1 root root 2593 Mar  5  2014 default

$ ls -al /etc/nginx/sites-enabled/
total 12
drwxr-xr-x 2 root   root   4096 Jun 18 04:30 .
drwxr-xr-x 6 root   root   4096 Jun 18 04:29 ..
-rw-rw-r-- 1 webapp webapp 2226 Jun 18 04:30 akiyokoproject.conf
lrwxrwxrwx 1 root   root     34 Jun 18 04:29 default -> /etc/nginx/sites-available/default


/etc/nginx/nginx.conf

user www-data;
worker_processes 4;
pid /run/nginx.pid;

events {
    worker_connections 768;
    # multi_accept on;
}

http {

    ### Basic Settings##

    sendfile on;
    tcp_nopush on;
    tcp_nodelay on;
    keepalive_timeout 65;
    types_hash_max_size 2048;
    # server_tokens off;# server_names_hash_bucket_size 64;# server_name_in_redirect off;

    include /etc/nginx/mime.types;
    default_type application/octet-stream;

    ### Logging Settings##

    access_log /var/log/nginx/access.log;
    error_log /var/log/nginx/error.log;

    ### Gzip Settings##

    gzip on;
    gzip_disable "msie6";

    # gzip_vary on;# gzip_proxied any;# gzip_comp_level 6;# gzip_buffers 16 8k;# gzip_http_version 1.1;# gzip_types text/plain text/css application/json application/x-javascript text/xml application/xml application/xml+rss text/javascript;### nginx-naxsi config### Uncomment it if you installed nginx-naxsi###include /etc/nginx/naxsi_core.rules;### nginx-passenger config### Uncomment it if you installed nginx-passenger###passenger_root /usr;#passenger_ruby /usr/bin/ruby;### Virtual Host Configs##

    include /etc/nginx/conf.d/*.conf;
    include /etc/nginx/sites-enabled/*;
}

(後略)


/etc/nginx/sites-available/default

# You may add here your# server {#   ...# }# statements for each of your virtual hosts to this file### You should look at the following URL's in order to grasp a solid understanding# of Nginx configuration files in order to fully unleash the power of Nginx.# http://wiki.nginx.org/Pitfalls# http://wiki.nginx.org/QuickStart# http://wiki.nginx.org/Configuration## Generally, you will want to move this file somewhere, and start with a clean# file but keep this around for reference. Or just disable in sites-enabled.## Please see /usr/share/doc/nginx-doc/examples/ for more detailed examples.##

server {
    listen 80 default_server;
    listen [::]:80 default_server ipv6only=on;

    root /usr/share/nginx/html;
    index index.html index.htm;

    # Make site accessible from http://localhost/
    server_name localhost;

    location / {
        # First attempt to serve request as file, then# as directory, then fall back to displaying a 404.
        try_files $uri $uri/ =404;
        # Uncomment to enable naxsi on this location# include /etc/nginx/naxsi.rules
    }

  (中略)
}

(後略)


/etc/nginx/sites-enabled/akiyokoproject.conf

upstream akiyokoproject {
    server unix:/home/webapp/mezzanine/akiyokoproject/gunicorn.sock fail_timeout=0;
}

server {

    listen 80;
     listen 443 ssl;
    server_name akiyoko.com;
    client_max_body_size 10M;
    keepalive_timeout    15;
    error_log /home/webapp/logs/akiyokoproject_error_nginx.log info;

     ssl_certificate      conf/akiyokoproject.crt;
     ssl_certificate_key  conf/akiyokoproject.key;
     ssl_session_cache    shared:SSL:10m;
     ssl_session_timeout  10m;
     ssl_ciphers ECDHE-RSA-AES128-GCM-SHA256:ECDHE-ECDSA-AES128-GCM-SHA256:ECDHE-RSA-AES256-GCM-SHA384:ECDHE-ECDSA-AES256-GCM-SHA384:DHE-RSA-AES128-GCM-SHA256:DHE-DSS-AES128-GCM-SHA256:kEDH+AESGCM:ECDHE-RSA-AES128-SHA256:ECDHE-ECDSA-AES128-SHA256:ECDHE-RSA-AES128-SHA:ECDHE-ECDSA-AES128-SHA:ECDHE-RSA-AES256-SHA384:ECDHE-ECDSA-AES256-SHA384:ECDHE-RSA-AES256-SHA:ECDHE-ECDSA-AES256-SHA:DHE-RSA-AES128-SHA256:DHE-RSA-AES128-SHA:DHE-DSS-AES128-SHA256:DHE-RSA-AES256-SHA256:DHE-DSS-AES256-SHA:DHE-RSA-AES256-SHA:AES128-GCM-SHA256:AES256-GCM-SHA384:AES128-SHA256:AES256-SHA256:AES128-SHA:AES256-SHA:AES:CAMELLIA:DES-CBC3-SHA:!aNULL:!eNULL:!EXPORT:!DES:!RC4:!MD5:!PSK:!aECDH:!EDH-DSS-DES-CBC3-SHA:!EDH-RSA-DES-CBC3-SHA:!KRB5-DES-CBC3-SHA;
     ssl_prefer_server_ciphers on;

    # Deny illegal Host headers
    if ($host !~* ^(akiyoko.com)$) {
        return 444;
    }

    location / {
        proxy_redirect      off;
        proxy_set_header    Host                    $host;
        proxy_set_header    X-Real-IP               $remote_addr;
        proxy_set_header    X-Forwarded-For         $proxy_add_x_forwarded_for;
        proxy_set_header    X-Forwarded-Protocol    $scheme;
        proxy_pass          http://akiyokoproject;
    }

    location /static/ {
        root            /home/webapp/mezzanine/akiyokoproject;
        access_log      off;
        log_not_found   off;
        expires 30d;
    }

    location /robots.txt {
        root            /home/webapp/mezzanine/akiyokoproject/static;
        access_log      off;
        log_not_found   off;
    }

    location /favicon.ico {
        root            /home/webapp/mezzanine/akiyokoproject/static/img;
        access_log      off;
        log_not_found   off;
    }

}


まとめ

今回、Mezzanine の本番デプロイとして、

  • 本番サーバ(Ubuntu)を起動
  • Fabric スクリプトを実行
  • Fabric スクリプト実行後の各種設定
    • SSL の設定
    • URL の転送設定
    • BASIC認証の設定
    • MySQL のインストール
    • メールの設定
    • ログの設定
    • タイムゾーンを Asia/Tokyo に変更
    • sitemap.xml / robot.txt の設定

を実施した内容を記載しました。

次回は、Mezzanine 本番設定の第四弾として、「その4:Mezzanine の運用設定」について記載します。


参考本

CentOS の本ならたくさんあるのに、Ubuntu の本はあまり無いんですよねぇ。
上級者向けではないですが、こんな感じでしょうか。

絶対つまずかない Linuxサーバー構築ガイド(日経BPパソコンベストムック)

絶対つまずかない Linuxサーバー構築ガイド(日経BPパソコンベストムック)


MySQL 本なら。

MySQL徹底入門 第3版 ~5.5新機能対応~

MySQL徹底入門 第3版 ~5.5新機能対応~

  • 作者:遠藤俊裕,坂井恵,館山聖司,鶴長鎮一,とみたまさひろ,班石悦夫,松信嘉範
  • 出版社/メーカー:翔泳社
  • 発売日: 2011/08/26
  • メディア:大型本
  • 購入: 9人 クリック: 82回
  • この商品を含むブログ (9件) を見る

*1:Mezzanine を採用したのは、個人の趣味です。

*2:Fabric スクリプトの実体は、https://github.com/stephenmcd/mezzanine/blob/4.1.0/mezzanine/project_template/fabfile.pyです。

*3:参考:PostgreSQLとMySQLはどちらかに明確な優位性がありますか? - QA@IT

*4:Fabric じゃないけど一応

*5:現時点の最新は 4.2.2 ですが、2016年7月当時は 4.1.0 でした。

*6:実際に運用しているドメインは akiyoko.com ではありませんので悪しからず。

*7:「完全な管理者アクセス権限(AdministratorAccess)」ポリシーを付けた EC2インスタンス用 Role です。

*8:ちょっとした裏技(?)ですが、ubuntu ユーザの authorized_keys ファイルをコピーすれば簡単です。

*9:Git 管理下に置きたくない各種設定は、local_settings.py で管理します。

*10:Mezzanine 4.2.0 から修正されたようです。 https://github.com/stephenmcd/mezzanine/commit/898e330a26500d473663f9602165e40d313677d1

*11:「GoGetSSL」からダウンロードした中間証明書に「^M」が入ってたけど、気にしなくて OK!

*12:秘密鍵は GoGetSSL からメールで送られます。

*13:「ec2-prod」ロールを EC2 に付与しているため、「AWS_ACCESS_KEY_ID」および「AWS_SECRET_ACCESS_KEY」が不要になっています。もし IAMロールをインスタンス起動時に付与しない場合は、6つが最低限必要となります。

*14:以下のように Warning がいくつか出ましたが、特に影響なさそうなので無視しました。

本番運用しているブログサイトの Mezzanine を 4.1.0 から 4.2.2 にアップデートしてみた

$
0
0

Monotalk さんの以下の記事に触発されて、私が本番運用している某ブログサイトの Mezzanine を 4.1.0 から 4.2.2 にアップデートしてみました。


アップデートするのに結構苦労したように書いてあったので、念のため、Vagrant の開発環境と EC2 のバックアップイメージから起動したインスタンス上でのリハーサルをしてから臨みました。


結論から言うと、あまり苦労せずにアップデートできました。Monotalk さんは Mezzanine 3 系から運用していたような感じだったので、そこからの負債が溜まっていたのではないかと推測します。


アップデート手順

アップデートの手順はたったこれだけです。

$ pip install -U Mezzanine==4.2.2

$ python manage.py makemigrations
$ python manage.py migrate


アップデート前の本番環境のインストール済みライブラリ一覧(2016/11/2 時点)

$ pip list
awscli (1.11.10)
beautifulsoup4 (4.5.1)
bleach (1.4.3)
boto (2.41.0)
botocore (1.4.67)
chardet (2.3.0)
colorama (0.3.7)
Django (1.9.9)
django-appconf (1.0.2)
django-compressor (2.0)
django-contrib-comments (1.7.2)
django-ses (0.8.0)
docutils (0.12)
filebrowser-safe (0.4.5)
future (0.15.2)
futures (3.0.5)
grappelli-safe (0.4.4)
gunicorn (19.6.0)
html5lib (0.9999999)
jmespath (0.9.0)
Mezzanine (4.1.0)
MySQL-python (1.2.5)
oauthlib (1.1.2)
Pillow (3.3.1)
pip (8.1.2)
psycopg2 (2.6.2)
pyasn1 (0.1.9)
python-dateutil (2.5.3)
python-memcached (1.58)
pytz (2016.6.1)
rcssmin (1.0.6)
requests (2.11.1)
requests-oauthlib (0.6.2)
rjsmin (1.0.12)
rsa (3.4.2)
s3transfer (0.1.9)
setproctitle (1.1.10)
setuptools (24.0.2)
six (1.10.0)
tzlocal (1.2.2)
wheel (0.29.0)


アップデート後のインストール済みライブラリの一覧は、以下のようになりました。

$ pip list
awscli (1.11.10)
beautifulsoup4 (4.5.1)
bleach (1.4.3)
boto (2.41.0)
botocore (1.4.67)
chardet (2.3.0)
colorama (0.3.7)
Django (1.10.3)
django-appconf (1.0.2)
django-compressor (2.0)
django-contrib-comments (1.7.3)
django-ses (0.8.0)
docutils (0.12)
filebrowser-safe (0.4.6)
future (0.16.0)
futures (3.0.5)
grappelli-safe (0.4.5)
gunicorn (19.6.0)
html5lib (0.9999999)
jmespath (0.9.0)
Mezzanine (4.2.2)
MySQL-python (1.2.5)
oauthlib (2.0.0)
Pillow (3.4.2)
pip (8.1.2)
psycopg2 (2.6.2)
pyasn1 (0.1.9)
python-dateutil (2.5.3)
python-memcached (1.58)
pytz (2016.7)
rcssmin (1.0.6)
requests (2.11.1)
requests-oauthlib (0.7.0)
rjsmin (1.0.12)
rsa (3.4.2)
s3transfer (0.1.9)
setproctitle (1.1.10)
setuptools (24.0.2)
six (1.10.0)
tzlocal (1.3)
wheel (0.29.0)


Mezzanine 4.1.0 から 4.2.2 への一番の変更点は、Django のバージョンが 1.9 系から 1.10 系にアップデートされることでしょうか。

4.1.0 から 4.2.2 への全ての変更箇所は以下で確認することができます。
https://github.com/stephenmcd/mezzanine/compare/4.1.0...4.2.2


このアップデートでいくつかのバグ(*1)が本家で修正されたのに伴い、技術的な負債を少し解消することができました。


影響

4.2.2 へのアップデート後、ping_google コマンド実行時にエラーが出るようになってしまいました。

$ python manage.py ping_google
Traceback (most recent call last):
  File "manage.py", line 14, in <module>
    execute_from_command_line(sys.argv)
  File "/home/vagrant/.virtualenvs/akiyokoproject/local/lib/python2.7/site-packages/django/core/management/__init__.py", line 367, in execute_from_command_line
    utility.execute()
  File "/home/vagrant/.virtualenvs/akiyokoproject/local/lib/python2.7/site-packages/django/core/management/__init__.py", line 359, in execute
    self.fetch_command(subcommand).run_from_argv(self.argv)
  File "/home/vagrant/.virtualenvs/akiyokoproject/local/lib/python2.7/site-packages/django/core/management/base.py", line 294, in run_from_argv
    self.execute(*args, **cmd_options)
  File "/home/vagrant/.virtualenvs/akiyokoproject/local/lib/python2.7/site-packages/django/core/management/base.py", line 345, in execute
    output = self.handle(*args, **options)
  File "/home/vagrant/.virtualenvs/akiyokoproject/local/lib/python2.7/site-packages/django/contrib/sitemaps/management/commands/ping_google.py", line 12, in handle
    ping_google(sitemap_url=options['sitemap_url'])
  File "/home/vagrant/.virtualenvs/akiyokoproject/local/lib/python2.7/site-packages/django/contrib/sitemaps/__init__.py", line 36, in ping_google
    raise SitemapNotFound("You didn't provide a sitemap_url, and the sitemap URL couldn't be auto-detected.")
django.contrib.sitemaps.SitemapNotFound: You didn't provide a sitemap_url, and the sitemap URL couldn't be auto-detected.

いろいろ調査したのですが、まだ解決していません。。

Django 本体の差分にも原因があるのかなぁ??
https://fossies.org/diffs/Django/1.9.8_vs_1.10/django/contrib/sitemaps/__init__.py-diff.html


バックアップイメージでの検証

EC2 のバックアップイメージから起動したインスタンス上でのリハーサル手順をメモしておきます。

1. バックアップイメージからインスタンス起動

まずは、EC2 インスタンスの Create Image をおこない、AMI を作成します。

作成したイメージからインスタンスを起動し、新たな Elastic IP を付与します。


2. settings.py の修正

config/local_settings.py

ALLOWED_HOSTS = ['akiyoko.com']

を、

ALLOWED_HOSTS = ['52.199.xx.xx']

と修正します(新しい IP アドレスを「52.199.xx.xx」と想定)。


最後に、プロセスを再起動。

$ sudo supervisorctl restart all


なおこれを修正しないと、アクセス時に Bad Request (400) が発生してしまいます。

(参考)django - Bad request 400: nginx / gunicorn - Stack Overflow


3. Nginx の設定ファイル修正

server_name に指定しているドメインを、Elastic IP に変更します。
また、テスト検証では HTTPS は使用しないので、SSL の設定は取り除きます。


/etc/nginx/sites-enabled/akiyokoproject.conf

(変更前)

server {

    #listen 80;
     listen 443 ssl;
    server_name akiyoko.com;
    client_max_body_size 10M;
    keepalive_timeout    15;
    error_log /home/webapp/logs/akiyokoproject_error_nginx.log info;

     ssl_certificate      conf/akiyokoproject.crt;
     ssl_certificate_key  conf/akiyokoproject.key;
     ssl_session_cache    shared:SSL:10m;
     ssl_session_timeout  10m;
     ssl_ciphers ECDHE-RSA-AES128-GCM-SHA256:ECDHE-ECDSA-AES128-GCM-SHA256:ECDHE-RSA-AES256-GCM-SHA384:ECDHE-ECDSA-AES256-GCM-SHA384:DHE-RSA-AES128-GCM-SHA256:DHE-DSS-AES128-GCM-SHA256:kEDH+AESGCM:ECDHE-RSA-AES128-SHA256:ECDHE-ECDSA-AES128-SHA256:ECDHE-RSA-AES128-SHA:ECDHE-ECDSA-AES128-SHA:ECDHE-RSA-AES256-SHA384:ECDHE-ECDSA-AES256-SHA384:ECDHE-RSA-AES256-SHA:ECDHE-ECDSA-AES256-SHA:DHE-RSA-AES128-SHA256:DHE-RSA-AES128-SHA:DHE-DSS-AES128-SHA256:DHE-RSA-AES256-SHA256:DHE-DSS-AES256-SHA:DHE-RSA-AES256-SHA:AES128-GCM-SHA256:AES256-GCM-SHA384:AES128-SHA256:AES256-SHA256:AES128-SHA:AES256-SHA:AES:CAMELLIA:DES-CBC3-SHA:!aNULL:!eNULL:!EXPORT:!DES:!RC4:!MD5:!PSK:!aECDH:!EDH-DSS-DES-CBC3-SHA:!EDH-RSA-DES-CBC3-SHA:!KRB5-DES-CBC3-SHA;
     ssl_prefer_server_ciphers on;

    ・
    ・

server {
    listen 80;
    server_name akiyoko.com;
    return 301 https://akiyoko.com$request_uri;
}

server {
    listen 80;
    listen 443 ssl;
    server_name www.akiyoko.com;
    return 301 https://akiyoko.com$request_uri;
}


(変更後)

server {

    listen 80;
    # listen 443 ssl;
    server_name 52.199.xx.xx;
    client_max_body_size 10M;
    keepalive_timeout    15;
    error_log /home/webapp/logs/akiyokoproject_error_nginx.log info;

     #ssl_certificate      conf/akiyokoproject.crt;#ssl_certificate_key  conf/akiyokoproject.key;#ssl_session_cache    shared:SSL:10m;#ssl_session_timeout  10m;#ssl_ciphers ECDHE-RSA-AES128-GCM-SHA256:ECDHE-ECDSA-AES128-GCM-SHA256:ECDHE-RSA-AES256-GCM-SHA384:ECDHE-ECDSA-AES256-GCM-SHA384:DHE-RSA-AES128-GCM-SHA256:DHE-DSS-AES128-GCM-SHA256:kEDH+AESGCM:ECDHE-RSA-AES128-SHA256:ECDHE-ECDSA-AES128-SHA256:ECDHE-RSA-AES128-SHA:ECDHE-ECDSA-AES128-SHA:ECDHE-RSA-AES256-SHA384:ECDHE-ECDSA-AES256-SHA384:ECDHE-RSA-AES256-SHA:ECDHE-ECDSA-AES256-SHA:DHE-RSA-AES128-SHA256:DHE-RSA-AES128-SHA:DHE-DSS-AES128-SHA256:DHE-RSA-AES256-SHA256:DHE-DSS-AES256-SHA:DHE-RSA-AES256-SHA:AES128-GCM-SHA256:AES256-GCM-SHA384:AES128-SHA256:AES256-SHA256:AES128-SHA:AES256-SHA:AES:CAMELLIA:DES-CBC3-SHA:!aNULL:!eNULL:!EXPORT:!DES:!RC4:!MD5:!PSK:!aECDH:!EDH-DSS-DES-CBC3-SHA:!EDH-RSA-DES-CBC3-SHA:!KRB5-DES-CBC3-SHA;#ssl_prefer_server_ciphers on;・
    ・

#server {#    listen 80;#    server_name akiyoko.com;#    return 301 https://akiyoko.com$request_uri;#}#server {#    listen 80;#    listen 443 ssl;#    server_name www.akiyoko.com;#    return 301 https://akiyoko.com$request_uri;#}


最後に Nginx をリロード。

$ sudo service nginx reload


4. Mezzanine アップデート

$ workon akiyokoproject
(akiyokoproject)$ pip install -U Mezzanine==4.2.2
  ・
  ・
Successfully installed Mezzanine-4.2.2 django-1.10.3 django-contrib-comments-1.7.3 filebrowser-safe-0.4.6 future-0.16.0 grappelli-safe-0.4.5 oauthlib-2.0.0 pillow-3.4.2 pytz-2016.7 requests-oauthlib-0.7.0 tzlocal-1.3
(akiyokoproject)$ python manage.py makemigrations
(akiyokoproject)$ python manage.py migrate

Mezzanine 系のモデル変更はありませんでしたが、Django 系の auth_user のモデルが少し変更になったようです。

$ sudo supervisorctl restart all


5. テンプレートの更新

HTMLファイル確認用の templats ディレクトリに、テンプレートの更新差分(4.1.0 → 4.2.2)をマージします。

config/settings.py

@@ -273,7 +275,7 @@ TEMPLATES = [
     {
         "BACKEND": "django.template.backends.django.DjangoTemplates",
         "DIRS": [
-            os.path.join(PROJECT_ROOT, "custom/templates"),+            #os.path.join(PROJECT_ROOT, "custom/templates"),
             os.path.join(PROJECT_ROOT, "templates")
         ],
         "APP_DIRS": True,

上記のように修正して、一時的にカスタムテンプレートを外してから、

$ python manage.py collecttemplates

を実行して、テンプレートを上書きします。

なお、上書きするときにいちいちオーバーライドするかどうか聞かれるので、
~/.virtualenvs/akiyokoproject/lib/python2.7/site-packages/mezzanine/core/management/commands/collecttemplates.py

               self.stdout.write("Template exists%s.\n" % prev)
                #confirm = input("Overwrite?  (yes/no/abort): ")
                #while confirm not in ("yes", "no", "abort"):
                #    confirm = input(
                #        "Please enter either 'yes', 'no' or 'abort': ")
                #if confirm == "abort":
                #    self.stdout.write("Aborted\n")
                #    break  # exit templates copying loop
                #elif confirm == "no":
                #    self.stdout.write("[Skipped]\n")
                #    copy = False
            if copy:
                try:
                    os.makedirs(os.path.dirname(dest))
                except OSError:
                    pass
                shutil.copy2(path, dest)
                template_src[name] = app
                count += 1
        if verbosity >= 1:
            s = "s" if count != 1 else ""
            self.stdout.write("\nCopied %s template%s\n" % (count, s))

とコメントアウトすると、手間が省けます。


custom アプリケーションで独自に修正したテンプレートの一覧は以下の通りなので、

custom/__init__.py
custom/static/css/custom.css
custom/static/img/slide-1.jpg
custom/static/img/slide-2.jpg
custom/templates/base.html
custom/templates/blog/blog_post_detail.html
custom/templates/blog/blog_post_list.html
custom/templates/generic/includes/comment.html
custom/templates/generic/includes/comments.html
custom/templates/includes/form_fields.html
custom/templates/index.html
custom/templates/pages/menus/dropdown.html
custom/templates/twitter/tweets.html
custom/templatetags/__init__.py
custom/templatetags/add_attributes.py

本家テンプレートの更新差分(4.1.0 → 4.2.2)と重複したファイル

  • blog/blog_post_detail.html

については手動でマージをおこない、その他の

  • includes/editable_loader.html
  • pages/form.html
  • pages/menus/admin.html

については custom アプリケーションの templates ディレクトリ以下のものに上書きしました。

Mezzanine に Cartridge 0.12 を導入してみる

$
0
0

この前 4.2.2 にアップデートした Mezzanine サイトに、Cartridge 0.12 を導入してみました。


Mezzanineは、Python製の WordPress風フルスタックCMSフレームワークですが、一方の Cartridgeは、Mezzanine 専用に作られた、Mezzanine に ECサイト機能を搭載するためのアプリケーションです。 *1


イメージとしてはこんな感じです。

f:id:akiyoko:20161120180920p:plain


具体的には、商品登録やセール設定、ディスカウント設定、注文管理などの機能を備えたバックオフィス(Django Admin を拡張)、ショッピングカート、PayPal および Stripe に対応した決済モジュール(プラガブルに変更可能)などの機能が付きます。


f:id:akiyoko:20161120182828p:plain
(ショッピングカート機能)


f:id:akiyoko:20161120184415p:plain
(バックオフィス機能)


1. 導入手順

Mezzanine に Cartridge 0.12 を導入する手順は以下の通りです。


Cartridge 0.12.0 をインストールします。

(akiyokoproject)$ pip install cartridge==0.12.0

Successfully installed cartridge-0.12.0 pyPdf2-1.26.0 reportlab-3.3.0 xhtml2pdf-0.0.6


config/settings.py に Cartridge 用の設定を追記します。

--- a/config/settings.py+++ b/config/settings.py@@ -7,6 +7,76 @@ from django.utils.translation import ugettext_lazy as _


 ######################
+# CARTRIDGE SETTINGS #+######################++# The following settings are already defined in cartridge.shop.defaults+# with default values, but are common enough to be put here, commented+# out, for conveniently overriding. Please consult the settings+# documentation for a full list of settings Cartridge implements:+# http://cartridge.jupo.org/configuration.html#default-settings++# Sequence of available credit card types for payment.+# SHOP_CARD_TYPES = ("Mastercard", "Visa", "Diners", "Amex")++# Setting to turn on featured images for shop categories. Defaults to False.+# SHOP_CATEGORY_USE_FEATURED_IMAGE = True++# Set an alternative OrderForm class for the checkout process.+# SHOP_CHECKOUT_FORM_CLASS = 'cartridge.shop.forms.OrderForm'++# If True, the checkout process is split into separate+# billing/shipping and payment steps.+# SHOP_CHECKOUT_STEPS_SPLIT = True++# If True, the checkout process has a final confirmation step before+# completion.+# SHOP_CHECKOUT_STEPS_CONFIRMATION = True++# Controls the formatting of monetary values accord to the locale+# module in the python standard library. If an empty string is+# used, will fall back to the system's locale.+# SHOP_CURRENCY_LOCALE = ""++# Dotted package path and name of the function that+# is called on submit of the billing/shipping checkout step. This+# is where shipping calculation can be performed and set using the+# function ``cartridge.shop.utils.set_shipping``.+# SHOP_HANDLER_BILLING_SHIPPING = \+#                       "cartridge.shop.checkout.default_billship_handler"++# Dotted package path and name of the function that+# is called once an order is successful and all of the order+# object's data has been created. This is where any custom order+# processing should be implemented.+# SHOP_HANDLER_ORDER = "cartridge.shop.checkout.default_order_handler"++# Dotted package path and name of the function that+# is called on submit of the payment checkout step. This is where+# integration with a payment gateway should be implemented.+# SHOP_HANDLER_PAYMENT = "cartridge.shop.checkout.default_payment_handler"++# Sequence of value/name pairs for order statuses.+# SHOP_ORDER_STATUS_CHOICES = (+#     (1, "Unprocessed"),+#     (2, "Processed"),+# )++# Sequence of value/name pairs for types of product options,+# eg Size, Colour. NOTE: Increasing the number of these will+# require database migrations!+# SHOP_OPTION_TYPE_CHOICES = (+#     (1, "Size"),+#     (2, "Colour"),+# )++# Sequence of indexes from the SHOP_OPTION_TYPE_CHOICES setting that+# control how the options should be ordered in the admin,+# eg for "Colour" then "Size" given the above:+# SHOP_OPTION_ADMIN_ORDER = (2, 1)+++######################
 # MEZZANINE SETTINGS #
 ######################

@@ -21,7 +91,9 @@ from django.utils.translation import ugettext_lazy as _
 #
 # ADMIN_MENU_ORDER = (
 #     ("Content", ("pages.Page", "blog.BlogPost",
-#        "generic.ThreadedComment", (_("Media Library"), "media-library"),)),+#        "generic.ThreadedComment", (_("Media Library"), "fb_browse"),)),+#     (_("Shop"), ("shop.Product", "shop.ProductOption", "shop.DiscountCode",+#        "shop.Sale", "shop.Order")),
 #     ("Site", ("sites.Site", "redirects.Redirect", "conf.Setting")),
 #     ("Users", ("auth.User", "auth.Group",)),
 # )
@@ -247,6 +319,7 @@ INSTALLED_APPS = ("mezzanine.core",
     "mezzanine.generic",
     "mezzanine.pages",
+    "cartridge.shop","mezzanine.blog",
     "mezzanine.forms",
     "mezzanine.galleries",
@@ -272,6 +345,7 @@ MIDDLEWARE_CLASSES = ('django.contrib.messages.middleware.MessageMiddleware',
     'django.middleware.clickjacking.XFrameOptionsMiddleware',

+    "cartridge.shop.middleware.ShopMiddleware","mezzanine.core.request.CurrentRequestMiddleware",
     "mezzanine.core.middleware.RedirectFallbackMiddleware",
     "mezzanine.core.middleware.TemplateForDeviceMiddleware",
diff --git a/config/urls.py b/config/urls.py
index c67fd17..1b3b87c 100644
--- a/config/urls.py+++ b/config/urls.py@@ -8,6 +8,8 @@ from django.views.i18n import set_language
 from mezzanine.core.views import direct_to_template
 from mezzanine.conf import settings

+from cartridge.shop.views import order_history+

 admin.autodiscover()

@@ -27,6 +29,10 @@ if settings.USE_MODELTRANSLATION:
     ]

 urlpatterns += [
+    # Cartridge URLs.+    url("^shop/", include("cartridge.shop.urls")),+    url("^account/orders/$", order_history, name="shop_order_history"),+
     # We don't want to presume how your homepage works, so here are a
     # few patterns you can use to set it up.

@@ -93,7 +99,7 @@ urlpatterns += [
     # Note that for any of the various homepage patterns above, you'll
     # need to use the ``SITE_PREFIX`` setting as well.

-    # ("^%s/" % settings.SITE_PREFIX, include("mezzanine.urls"))+    # url("^%s/" % settings.SITE_PREFIX, include("mezzanine.urls"))

 ]

diff --git a/requirements.txt b/requirements.txt
index 0c4e494..4d43fbe 100644
--- a/requirements.txt+++ b/requirements.txt@@ -1,2 +1,3 @@
 Mezzanine==4.2.2
+cartridge==0.12.0
 django-ses

追加した内容については、Mezzanine と Cartridge を同時にインストールするコマンドを叩いたときの settings.py の差分を参照しました(詳しくは後述)。


マイグレーションを実行します。

(akiyokoproject)$ python manage.py makemigrations
No changes detected

(akiyokoproject)$ python manage.py migrate
System check identified some issues:

WARNINGS:
?: (mysql.W002) MySQL Strict Mode is not set for database connection 'default'
	HINT: MySQL's Strict Mode fixes many data integrity problems in MySQL, such as data truncation upon insertion, by escalating warnings into errors. It is strongly recommended you activate it. See: https://docs.djangoproject.com/en/1.10/ref/databases/#mysql-sql-mode
Operations to perform:
  Apply all migrations: admin, auth, blog, conf, contenttypes, core, django_comments, forms, galleries, generic, pages, redirects, sessions, shop, sites, twitter
Running migrations:
  Applying shop.0001_initial... OK
  Applying shop.0002_auto_20141227_1331... OK
  Applying shop.0003_emailfield... OK
  Applying shop.0004_productimage_file_field... OK
  Applying shop.0005_auto_20150527_1127... OK
  Applying shop.0006_auto_20150916_0459... OK
  Applying shop.0007_auto_20150921_2323... OK

shop 関連のテーブルが作成されました。


以下の Cartridge のテンプレートを、templates/ および custom/ 配下にコピーします。
(例によって、admin 関連のテンプレートは修正しないため、コピー対象に含めていません。)

templates/accounts/account_profile_update.html
templates/email/base.html
templates/email/order_receipt.html
templates/email/order_receipt.txt
templates/email/receipt.html
templates/email/receipt_rtl.html
templates/pages/category.html
templates/shop/base.html
templates/shop/billing_shipping.html
templates/shop/cart.html
templates/shop/checkout.html
templates/shop/complete.html
templates/shop/confirmation.html
templates/shop/includes/order_details.html
templates/shop/includes/order_details_rtl.html
templates/shop/includes/order_totals.html
templates/shop/includes/order_totals.txt
templates/shop/includes/payment_fields.html
templates/shop/includes/user_panel.html
templates/shop/order_history.html
templates/shop/order_invoice.html
templates/shop/order_invoice_pdf.html
templates/shop/payment.html
templates/shop/product.html
templates/shop/wishlist.html

custom/templates/accounts/account_profile_update.html
custom/templates/email/base.html
custom/templates/email/order_receipt.html
custom/templates/email/order_receipt.txt
custom/templates/email/receipt.html
custom/templates/email/receipt_rtl.html
custom/templates/pages/category.html
custom/templates/shop/base.html
custom/templates/shop/billing_shipping.html
custom/templates/shop/cart.html
custom/templates/shop/checkout.html
custom/templates/shop/complete.html
custom/templates/shop/confirmation.html
custom/templates/shop/includes/order_details.html
custom/templates/shop/includes/order_details_rtl.html
custom/templates/shop/includes/order_totals.html
custom/templates/shop/includes/order_totals.txt
custom/templates/shop/includes/payment_fields.html
custom/templates/shop/includes/user_panel.html
custom/templates/shop/order_history.html
custom/templates/shop/order_invoice.html
custom/templates/shop/order_invoice_pdf.html
custom/templates/shop/payment.html
custom/templates/shop/product.html
custom/templates/shop/wishlist.html


最後に、プロセスを再起動して完了です。

(akiyokoproject)$ sudo supervisorctl restart all


細かい話

2.1. ライブラリの差分

Cartridge 導入前のライブラリ一覧

awscli (1.11.10)
beautifulsoup4 (4.5.1)
bleach (1.4.3)
boto (2.41.0)
botocore (1.4.67)
chardet (2.3.0)
colorama (0.3.7)
Django (1.10.3)
django-appconf (1.0.2)
django-compressor (2.0)
django-contrib-comments (1.7.3)
django-ses (0.8.0)
docutils (0.12)
filebrowser-safe (0.4.6)
future (0.16.0)
futures (3.0.5)
grappelli-safe (0.4.5)
gunicorn (19.6.0)
html5lib (0.9999999)
jmespath (0.9.0)
Mezzanine (4.2.2)
MySQL-python (1.2.5)
oauthlib (2.0.0)
Pillow (3.4.2)
pip (8.1.2)
psycopg2 (2.6.2)
pyasn1 (0.1.9)
python-dateutil (2.5.3)
python-memcached (1.58)
pytz (2016.7)
rcssmin (1.0.6)
requests (2.11.1)
requests-oauthlib (0.7.0)
rjsmin (1.0.12)
rsa (3.4.2)
s3transfer (0.1.9)
setproctitle (1.1.10)
setuptools (24.0.2)
six (1.10.0)
tzlocal (1.3)
wheel (0.29.0)

導入後のライブラリ一覧

$ pip list
awscli (1.11.10)
beautifulsoup4 (4.5.1)
bleach (1.4.3)
boto (2.41.0)
botocore (1.4.67)
Cartridge (0.12.0)
chardet (2.3.0)
colorama (0.3.7)
Django (1.10.3)
django-appconf (1.0.2)
django-compressor (2.0)
django-contrib-comments (1.7.3)
django-ses (0.8.0)
docutils (0.12)
filebrowser-safe (0.4.6)
future (0.16.0)
futures (3.0.5)
grappelli-safe (0.4.5)
gunicorn (19.6.0)
html5lib (0.9999999)
jmespath (0.9.0)
Mezzanine (4.2.2)
MySQL-python (1.2.5)
oauthlib (2.0.0)
Pillow (3.4.2)
pip (8.1.2)
psycopg2 (2.6.2)
pyasn1 (0.1.9)
PyPDF2 (1.26.0)
python-dateutil (2.5.3)
python-memcached (1.58)
pytz (2016.7)
rcssmin (1.0.6)
reportlab (3.3.0)
requests (2.11.1)
requests-oauthlib (0.7.0)
rjsmin (1.0.12)
rsa (3.4.2)
s3transfer (0.1.9)
setproctitle (1.1.10)
setuptools (24.0.2)
six (1.10.0)
tzlocal (1.3)
wheel (0.29.0)
xhtml2pdf (0.0.6)


2.2. config/setting.py の差分

Mezzanine と Cartridge を同時にインストールするには、

mezzanine-project -a cartridge config .

というコマンドを叩けばよいのですが、Mezzanine だけをインストールした場合と Mezzanine と Cartridge を同時にインストールした場合とで、自動生成される settings.py の差分を確認してみました。


1)(Cartridge 無しの)通常 Mezzanine インストール
sudo mkdir -p /opt/webapps/mezzproject
sudo chown -R `whoami`. /opt/webapps
cd /opt/webapps/mezzproject/
mezzanine-project config .
2)Cartridge 付きの Mezzanine インストール
sudo mkdir -p /opt/webapps/mezzproject_cartridge
sudo chown -R `whoami`. /opt/webapps
cd /opt/webapps/mezzproject_cartridge/
mezzanine-project -a cartridge config .


(diff 関連の参考リンク)

$ diff -r -q /opt/webapps/mezzproject /opt/webapps/mezzproject_cartridge
$ diff -r -u /opt/webapps/mezzproject /opt/webapps/mezzproject_cartridge | vi -R -

-q : ファイル名だけ表示
-r : ディレクトリ比較
-u : ユニファイド形式
| vi -R - : vim の機能を使って色分け

ちなみに、進んでいる方を第二引数にした方がよさそうです(+ で diff表示されるので)。

$ diff -r -u /opt/webapps/mezzproject /opt/webapps/mezzproject_cartridge
Only in /opt/webapps/mezzproject_cartridge/config: dev.dbdiff -r -u /opt/webapps/mezzproject/config/local_settings.py /opt/webapps/mezzproject_cartridge/config/local_settings.py--- /opt/webapps/mezzproject/config/local_settings.py   2016-11-03 03:06:58.160419703 +0000+++ /opt/webapps/mezzproject_cartridge/config/local_settings.py 2016-11-03 03:07:09.000000000 +0000@@ -8,8 +8,8 @@
 DEBUG = True

 # Make these unique, and don't share it with anybody.
-SECRET_KEY = "k8dd+%#@kw6vh1a-#k(l1agb=@kibpbz&s$7nk)l@s06gz*gx9"-NEVERCACHE_KEY = "15fmx+kop%oxps(1w3uq5i1btc#3t=+t!#=ax@3!4^@$s%4gu2"+SECRET_KEY = "(#eotia6m9*m(9vt)@u7^6@)e$f44c(4)4n9*((o%(^u3!u&cw"+NEVERCACHE_KEY = "n66suh9!=@^-_6^toe)s_z)c$0g70e%in1ifzo7w%&uf&b#z(y"

 DATABASES = {
     "default": {
diff -r -u /opt/webapps/mezzproject/config/settings.py /opt/webapps/mezzproject_cartridge/config/settings.py--- /opt/webapps/mezzproject/config/settings.py 2016-11-03 03:06:58.164419703 +0000+++ /opt/webapps/mezzproject_cartridge/config/settings.py   2016-11-03 03:07:09.000000000 +0000@@ -7,6 +7,76 @@


 ######################
+# CARTRIDGE SETTINGS #+######################++# The following settings are already defined in cartridge.shop.defaults+# with default values, but are common enough to be put here, commented+# out, for conveniently overriding. Please consult the settings+# documentation for a full list of settings Cartridge implements:+# http://cartridge.jupo.org/configuration.html#default-settings++# Sequence of available credit card types for payment.+# SHOP_CARD_TYPES = ("Mastercard", "Visa", "Diners", "Amex")++# Setting to turn on featured images for shop categories. Defaults to False.+# SHOP_CATEGORY_USE_FEATURED_IMAGE = True++# Set an alternative OrderForm class for the checkout process.+# SHOP_CHECKOUT_FORM_CLASS = 'cartridge.shop.forms.OrderForm'++# If True, the checkout process is split into separate+# billing/shipping and payment steps.+# SHOP_CHECKOUT_STEPS_SPLIT = True++# If True, the checkout process has a final confirmation step before+# completion.+# SHOP_CHECKOUT_STEPS_CONFIRMATION = True++# Controls the formatting of monetary values accord to the locale+# module in the python standard library. If an empty string is+# used, will fall back to the system's locale.+# SHOP_CURRENCY_LOCALE = ""++# Dotted package path and name of the function that+# is called on submit of the billing/shipping checkout step. This+# is where shipping calculation can be performed and set using the+# function ``cartridge.shop.utils.set_shipping``.+# SHOP_HANDLER_BILLING_SHIPPING = \+#                       "cartridge.shop.checkout.default_billship_handler"++# Dotted package path and name of the function that+# is called once an order is successful and all of the order+# object's data has been created. This is where any custom order+# processing should be implemented.+# SHOP_HANDLER_ORDER = "cartridge.shop.checkout.default_order_handler"++# Dotted package path and name of the function that+# is called on submit of the payment checkout step. This is where+# integration with a payment gateway should be implemented.+# SHOP_HANDLER_PAYMENT = "cartridge.shop.checkout.default_payment_handler"++# Sequence of value/name pairs for order statuses.+# SHOP_ORDER_STATUS_CHOICES = (+#     (1, "Unprocessed"),+#     (2, "Processed"),+# )++# Sequence of value/name pairs for types of product options,+# eg Size, Colour. NOTE: Increasing the number of these will+# require database migrations!+# SHOP_OPTION_TYPE_CHOICES = (+#     (1, "Size"),+#     (2, "Colour"),+# )++# Sequence of indexes from the SHOP_OPTION_TYPE_CHOICES setting that+# control how the options should be ordered in the admin,+# eg for "Colour" then "Size" given the above:+# SHOP_OPTION_ADMIN_ORDER = (2, 1)+++######################
 # MEZZANINE SETTINGS #
 ######################

@@ -21,7 +91,9 @@
 #
 # ADMIN_MENU_ORDER = (
 #     ("Content", ("pages.Page", "blog.BlogPost",
-#        "generic.ThreadedComment", (_("Media Library"), "media-library"),)),+#        "generic.ThreadedComment", (_("Media Library"), "fb_browse"),)),+#     (_("Shop"), ("shop.Product", "shop.ProductOption", "shop.DiscountCode",+#        "shop.Sale", "shop.Order")),
 #     ("Site", ("sites.Site", "redirects.Redirect", "conf.Setting")),
 #     ("Users", ("auth.User", "auth.Group",)),
 # )
@@ -243,6 +315,7 @@"mezzanine.core",
     "mezzanine.generic",
     "mezzanine.pages",
+    "cartridge.shop","mezzanine.blog",
     "mezzanine.forms",
     "mezzanine.galleries",
@@ -251,6 +324,7 @@
     # "mezzanine.mobile",
 )

+
 # List of middleware classes to use. Order is important; in the request phase,
 # these middleware classes will be applied in the order given, and in the
 # response phase the middleware will be applied in reverse order.
@@ -267,12 +341,15 @@'django.contrib.messages.middleware.MessageMiddleware',
     'django.middleware.clickjacking.XFrameOptionsMiddleware',

+    "cartridge.shop.middleware.ShopMiddleware","mezzanine.core.request.CurrentRequestMiddleware",
     "mezzanine.core.middleware.RedirectFallbackMiddleware",
     "mezzanine.core.middleware.TemplateForDeviceMiddleware",
     "mezzanine.core.middleware.TemplateForHostMiddleware",
     "mezzanine.core.middleware.AdminLoginInterfaceSelectorMiddleware",
     "mezzanine.core.middleware.SitePermissionMiddleware",
+    # Uncomment the following if using any of the SSL settings:+    # "mezzanine.core.middleware.SSLRedirectMiddleware","mezzanine.pages.middleware.PageMiddleware",
     "mezzanine.core.middleware.FetchFromCacheMiddleware",
 )
diff -r -u /opt/webapps/mezzproject/config/urls.py /opt/webapps/mezzproject_cartridge/config/urls.py--- /opt/webapps/mezzproject/config/urls.py 2016-11-03 03:06:58.160419703 +0000+++ /opt/webapps/mezzproject_cartridge/config/urls.py   2016-11-03 03:07:09.000000000 +0000@@ -4,10 +4,11 @@
 from django.conf.urls.i18n import i18n_patterns
 from django.contrib import admin
 from django.views.i18n import set_language
-
 from mezzanine.core.views import direct_to_template
 from mezzanine.conf import settings

+from cartridge.shop.views import order_history+

 admin.autodiscover()

@@ -27,6 +28,11 @@
     ]

 urlpatterns += [
++    # Cartridge URLs.+    url("^shop/", include("cartridge.shop.urls")),+    url("^account/orders/$", order_history, name="shop_order_history"),+
     # We don't want to presume how your homepage works, so here are a
     # few patterns you can use to set it up.

@@ -93,7 +99,7 @@
     # Note that for any of the various homepage patterns above, you'll
     # need to use the ``SITE_PREFIX`` setting as well.

-    # ("^%s/" % settings.SITE_PREFIX, include("mezzanine.urls"))+    # url("^%s/" % settings.SITE_PREFIX, include("mezzanine.urls"))

 ]

Only in /opt/webapps/mezzproject_cartridge: .DS_Store


以上を踏まえて、内容を追加しました。

*1:Mezzanine 公式ページには「Ecommerce / Shopping cart module」と紹介されています。

ベスト・オブ・Django本!

$
0
0

この投稿は 「Django Advent Calendar 2016 - Qiita」 の 5日目の記事です。


「Django」を勉強するときに一番困るのは、やっぱり 「Django本がない」問題ですよね?


実際、Django 初心者や初級者のエンジニアがいざ本格的に勉強しようと思っても、Django の専門書が圧倒的に少ないという問題が大きな壁として立ちはだかっているのではないでしょうか。


あっても古いとか。

開発のプロが教える標準Django完全解説―Webアプリケーションフレームワーク (デベロッパー・ツール・シリーズ)

開発のプロが教える標準Django完全解説―Webアプリケーションフレームワーク (デベロッパー・ツール・シリーズ)

2008年発売って、Django のバージョンは 1.0 ですよね。
さすがに情報が古すぎます。。


あと、Django に割かれているページ数が少ないとか。

Pythonプロフェッショナルプログラミング第2版

Pythonプロフェッショナルプログラミング第2版

Django について書かれた章がありますが、それでも 20ページ程度しかありません。。


「もっと新しくて、ちゃんと全体を網羅している Django の専門書はないの??」
私も常々、こんな疑問を抱いていました。


書籍の充実した Ruby や PHP と比べて、Python のフルスタック Webアプリケーションフレームワークに関する書籍が少ないという問題が、Django があまり流行ってない大きな原因になっているのでは??というのが、私の率直な印象です。


で、見つけましたー!!


私が自信を持ってオススメできる ベスト・オブ・ Django本が「Two Scoops of Django: Best Practices for Django 1.8」です!

Two Scoops of Django: Best Practices for Django 1.8

Two Scoops of Django: Best Practices for Django 1.8


残念ながら全編英語の本ですが(*1)、設計のベストプラクティスから細かな Tips まで詳細に分かりやすく解説されている Django の専門書です。


対象者は、初心者というよりも、チュートリアルを読み終えたくらいの初級者から、現場で Django を何年か使っている中級者くらいを想定していると思われます。
専門書と言っても堅苦しさは全く無く、頻繁にアイスクリームショップの話が引き合いに出されたりと、ポップな世界観(!)を醸し出しています。


著者は Daniel Roy GreenfeldAudrey Roy Greenfeldの二人のエンジニアで(*2)、プロジェクトで Django を使い倒している超ベテランです。これまで、Django 1.5, 1.6 向けの Two Scoops of Djangoシリーズを出版してきた経歴もあるので、本の内容の充実度ぶりは半端ないです。


本のタイトル「Two Scoops of Django(Django の 2つのスクープ)」の由来は、「二人がお届けする Django の最新情報(スクープ)」という意味と、Django をアイスクリームに見立てて「二すくい(スクープ)のアイスクリーム」という意味を掛けているんじゃないかと思われます。


ちなみに、現時点の Django の最新バージョンは 1.10 ですが、この本の対象バージョンは Django 1.8 です。しかしながら、1.8 は LTS(長期サポートバージョン)なので、少なくとも 2018年4月までは本家からセキュリティとバグフィックスが提供されることになるため、現場で使う場合も安心です。

f:id:akiyoko:20161122010842p:plain
Download Django | Djangoより引用)


著者は、次の「Two Scoops of Django」シリーズはバージョン 2.2 のリリース以降と言っているので、2019年まではこの「Two Scoops of Django: Best Practices for Django 1.8」にお世話になりそうです。なので、この本を買って 2019年まで読み倒すのがよいかと思います。


目次

ざっと内容を紹介しますが、詳細には触れていませんので興味がある内容が一つでもあれば実際に読んでみてもらえればと思います。

著者曰く、どの章から読み始めても問題ないそうです(実際、問題ありません)。


第1章:Coding Style(コーディングスタイル)
  • p.1〜
  • PEP8に準拠すべし
  • OSSプロジェクトは1行79文字、その他のプロジェクトは1行99文字制限に
  • 明示的な相対インポートを使うべし
  • Django コーディングスタイルおよびその他のガイドラインについて
第2章:The Optimal Django Environment Setup(最適なDjango環境設定)
  • p.13〜
  • 開発環境のセットアップについて
  • 開発環境と本番環境で別々のデータベースを使っている場合は要注意 *3
  • pip と virtualenv を使おう。virtualenvwrapperもオススメ
  • コードを Git や Mercurial でバージョン管理しよう
  • Vagrant + VirtualBox、Docker などを使って開発環境を仮想化する
第3章:How To Lay Out Django Projects(Djangoプロジェクトをどのようにレイアウトすべきか)
  • p.21〜
  • プロジェクトレイアウトのベストプラクティス(リポジトリルート/プロジェクトルート/コンフィグレーションルート)
  • virtualenv の格納場所はプロジェクト外に *4
  • startproject の代わりに、cookiecutter-djangoコマンドを使って究極の Djangoテンプレートプロジェクトを作成しよう
第4章:Fundamentals of Django App Design(Djangoアプリケーション設計の基本)
  • p.33〜
  • Django app(アプリケーション)を理解しよう。 *5
  • それぞれのアプリケーションは一つのタスクに集中すべき(一文で説明できるようにできるだけ小さく設計すべき)
  • アプリケーション名はメインとなるモデルの複数形にすべし *6
  • アプリケーションに含めるべきモジュール群(とネーミング)
第5章:Settings and Requirements Files(SettingsモジュールとRequirementsファイル)
  • p.41〜
  • 「SECRET_KEY」などのシークレットキー(*7)を除く全ての設定はバージョン管理下に置くべき
  • シークレットキーの設定には環境変数を使う(付録Eを参照)
  • アンチ local_settings.py パターンとして、各環境に合わせた Settingsモジュール(base.py/local.py/staging.py/test.py/production.py)を用意
  • Settingsモジュール内のファイルパスの書き方について
第6章:Model Best Practices(モデルのベストプラクティス)
  • p.63〜
  • django-model-utilsの TimeStampedModel や django-extensionsはどのプロジェクトでも便利に使える
  • モデルが5個までに収まるようにアプリケーションの大きさを設計する
  • 3種類のモデルの継承方法(abstract base classes, multi-table inheritance, proxy models)のうちどれを使うべきか *8, *9
  • データベースのマイグレーション方法について
  • テーブル設計で非正規化をする前にキャッシングを検討しよう
  • null=True, blank=True の使いどころ
  • models.field.GenericForeignKey はなるべく使わないようにしよう
  • モデルの _meta API について
  • モデルマネージャについて
  • ファットモデル志向(データ処理やビジネスロジックはモデルに集約)
  • モデルがファットになりすぎないように、Mixin やステートレスなヘルパー関数に分離しよう
第7章:Queries and the Database Layer(クエリとデータベース層)
  • p.81〜
  • ビューで単一のオブジェクトを取得する場合は get() の代わりに get_object_or_404() を使う *10
  • ObjectDoesNotExist はどのモデルでも共通で使える
  • get() で複数のオブジェクトが抽出されてしまう場合は MultipleObjectsReturned で判定
  • 遅延評価を理解しよう。長いクエリは読みやすいように分割しよう
  • Django 1.8 から UPPER, LOWER, SUBSTR などの関数が使えるように *11
  • 生の SQL は出来る限り書かないようにする *12
  • デフォルトのトランザクションはクエリごと *13
第8章:Function- and Class-Based Views(関数ベースおよびクラスベースのビュー)
  • p.95〜
  • 関数ベース、クラスベースのビューのどちらを使うべきか? *14
  • URLConf にロジックを書かない(ビューやモデルを使い回せるように分離)
  • アプリケーションレベルの namespace を使うと便利
  • URLConf のビューへの参照は文字列で書かない
第9章:Best Practices for Function-Based Views(関数ベースビューのベストプラクティス)
  • p.109〜
  • 再利用できない、クラスベースビューのように継承が使えない、のが難点
  • HttpRequest を引数にしたヘルパー関数やデコレータを使うことで、ビューをシンプルにできる
第10章:Best Practices for Class-Based Views(クラスベースビューのベストプラクティス)
  • p.117〜
  • 継承構造がややこしいのが難点
  • Mixin を利用しよう *15
  • 代表的な GCBV(generic class-based view)の紹介 *16
  • CBV + ModelForm, CBV + Form の例
  • django-bracesの Mixin は GCBV の足りない部分を補完してくれるので便利
第11章:Form Fundamentals(フォームの基本)
  • p.137〜
  • ModelForm を使おう
  • 外部から入力された値はフォームでバリデーションすべし
  • データの更新を伴うリクエストには CSRF対策を施そう
  • Ajaxリクエストには、CSRF対策を施すか、HTTPヘッダに「X-CSRFToken」を設定する
  • django-bracesの ModelForm Mixin は便利 *17
  • form.is_valid() の仕組み
第12章:Common Patterns for Forms(フォームのよくあるパターン)
  • p.149〜
  • フォーム関連の便利パッケージについて *18
  • clean() には複数フィールドにまたがる相関チェックを書く
  • clean(), clean_xxx() には、データベースに永続化されたデータを使ったバリデーションを書いても OK
  • Model とほぼ同じフィールドを Form に加えるときは、コピペせずに ModelForm の __init__ で self.fields を参照すればよい
第13章:Templates: Best Practices(テンプレート:ベストプラクティス)
  • p.167〜
  • テンプレートファイルは templates/ にひとまとめにしよう
  • 二層構造にする。それぞれのアプリケーションごとにベースのレイアウトを変えたい場合は(base.html を継承した)三層構造にする
  • "Flat is better than nested"
  • テンプレートレイヤでは必要以上にクエリや処理が実行されないように注意
  • テンプレートは「データを表示する」だけにする
  • ループ内で不必要なクエリが発行されないように select_related を使う *19
  • テンプレートの継承を理解しよう
  • テンプレートファイルやブロックなどの名前には「-」ではなく「_」を使う
  • 他のテンプレートファイルから include されるテンプレートファイル名は「_」で始める
  • CBV を利用した場合、「object_list」という暗黙の変数名が使える
  • テンプレート内では URL のパスはハードコードせずに url タグを使う
  • テンプレートのデバッグには TEMPLATES の「string_if_invalid」オプションの設定を使うと便利
  • 404.html と 500.html のエラーページは最低限用意しておこう
第14章:Template Tags and Filters(テンプレートタグとフィルタ)
  • p.191〜
  • フィルタは単なる関数(ただし引数は二つまでという制限あり)
  • テンプレートタグはデバッグしづらい
  • カスタムテンプレートタグのモジュール名は <app name>_tags.py とする
第15章:Django Templates and Jinja2(DjangoテンプレートとJinja2)
  • p.197〜
  • Django 1.8 から Django template language (DTL) 以外に Jinja2をサポート
  • DTL と Jinja2 のどちらを使うべきか *20
  • ディレクトリごとに適用するテンプレートエンジンを替えることも可能
第16章:Building REST APIs(REST APIの構築)
  • p.207〜
第17章:Consuming REST APIs(REST APIの使用)
  • p.225〜
第18章:Tradeoffs of Replacing Core Components(コアコンポーネントを入れ替える場合のトレードオフ)
  • p.237〜
  • よっぽどのことがない限り Django のコアコンポーネントを入れ替えるのはやめよう
第19章:Working With the Django Admin(Django管理サイトを動かす)
  • p.243〜
  • Django 管理サイトはエンドユーザ向けのものではなく、管理者向けのもの
  • 一覧表示を見やすくするために、モデルに __str__() メソッドを用意しよう *21
  • 一覧に表示するフィールドは list_display で宣言する
  • 詳細表示をカスタマイズする場合は、ModelAdmin を継承したクラスを用意
  • どうしても管理サイトの見た目をカスタマイズしたい場合は https://github.com/sehmaschine/django-grappelli:titledjango-grappelliなどのスキンを使う
第20章:Dealing with the User Model(Userモデルを扱う)
  • p.255〜
  • Django 1.5 以降でユーザクラスを設定で変更できるようになったため、ユーザクラスを取得するには get_user_model() を使う
  • ユーザモデルに対して一対多・一対一・多対多関連のフィールドを作成する場合は、settings.AUTH_USER_MODEL を使う
  • ユーザモデルをカスタマイズするには django-authtoolsが便利
  • ユーザモデルにカスタムフィールドを追加するための 3つのオプション *22
第21章:Django's Secret Sauce: Third-Party Packages(Djangoの秘伝のソース:サードパーティのパッケージ)
  • p.263〜
  • 本の中で言及したパッケージの一覧については付録Aを参照
  • 55,000 を超える Python パッケージが PyPIで管理されている *23
  • Django Packagesは Django関連のプロダクトが集められている比較サイト
  • 依存パッケージはバージョン番号も指定しておこう
  • パッケージの完成度を見極める方法
  • Cookiecutter で Python/Django プロジェクトのテンプレートを作ろう
  • PyPI に登録する方法について
第22章:Testing Stinks and Is a Waste of Money!(疑わしいものをテストしよう!テストはお金の無駄!)
  • p.283〜
  • カバレッジを取るには coverage.py を使うとよい
  • テストモジュールにはファイル名に「test_」のプレフィックスを付けよう
  • 一つの単体テストメソッドでは一つのことをテストするようにしよう
  • request オブジェクトを生成するには RequestFactoryを使おう。ただし、Middleware を通さないといけない場合は工夫が必要
  • データのメンテナンスが大変になるので、フィクスチャは使い過ぎないようにしよう *24
  • Mock ライブラリを使ってモックアウトする *25
  • unittest には便利なアサーションメソッドが多数用意されている *26
  • 統合テスト/CI について
  • unittest の代わりの単体テストツールとして、pytest-django, django-noseも便利 *27
第23章:Documentation: Be Obsessed(ドキュメンテーションせずにはいられない)
  • p.301〜
  • ドキュメントは reStructuredText(RST)形式で書こう *28
  • .rstファイルは Sphinxで各種フォーマットに変換して出力する
  • どんなドキュメントを作るべきか?
第24章:Finding and Reducing Bottlenecks(ボトルネックの発見と解消)
第25章:Asynchronous Task Queues(非同期タスクキュー)
  • p.319〜
  • Celery, Redis Queue, django-background-tasks のどれを使うべきか?
  • タスクはビューのように小さくせよ
第26章:Security Best Practices(セキュリティのベストプラクティス)
  • p.327〜
  • XSS、CSRF、SQLインジェクション、クリックジャッキング、TLS/HTTPS サポート、HTMLタグの自動エスケープなどが標準装備
  • SECERT_KEY の取り扱いに注意すべし(バージョン管理ツールの管理下にしないように)
  • HTTPS/SSL 化するには django.middleware.security.SecurityMiddleware を使う(ただし、static, media は含まれないので注意)
  • 標準ライブラリの pickle には気をつけよう
  • cookieベースのセッションは使わない
  • クレジットカード番号やパスワードなどのセキュアなデータ入力フィールドを利用する際の注意点 *29
  • 強度の高いパスワードを生成するには django-passwords, django-autoadminなどを利用する
  • アップロードファイルは python-magic でファイルヘッダを確認する
  • Django管理サイトへのIPアドレス制限をする場合は Middleware で判別
第27章:Logging: What’s It For, Anyway?(ロギング:それって何のため?)
  • p.355〜
  • 各ログレベル(CRITICAL/ERROR/WARNING/INFO/DEBUG)の用途
  • ロガーは再利用せずにモジュールごとに用意する
  • Logger.exception() について
  • logutils パッケージが便利
第28章:Signals: Use Cases and Avoidance Techniques(シグナル:ユースケースと回避テクニック)
  • p.365〜
  • シグナルは同期・ブロッキングなので、パフォーマンスを考慮すべし
  • 複数モデルを操作する場合や save後にキャッシュを無効化したい場合などはシグナルを使ってよい
  • models.Manager のメソッドやフォームの cleanメソッドで置き換えられないか検討する
  • 単一モデルを操作している場合は saveメソッド内に書けないか検討する
第29章:What About Those Random Utilities?(ちょっとしたユーティリティはどうしたらいい?)
  • p.371〜
  • 汎用的な共通モジュールは coreアプリケーションに配置しよう
  • 各アプリケーション直下にヘルパーモジュール utils.py(helpers.py)を
  • Django に内蔵されているヘルパーを利用しよう *30, *31, *32
第30章:Deployment: Platforms as a Service(デプロイ:プラットフォーム・アズ・ア・サービス)
  • p.387〜
第31章:Deploying Django Projects(Djangoプロジェクトのデプロイ)
  • p.395〜
第32章:Continuous Integration(継続的インテグレーション)
  • p.411〜
  • テストをスピードアップするための Tips
  • 複数の異なる Python, Django バージョンで検証したい場合は toxを使う
  • Jenkins, Travis-CI, CircleCI などの CIツール/CIサービスを使おう
第33章:The Art of Debugging(デバッグの技術)
  • p.417〜
  • django-debug-toolbarを使おう
  • PDB を使おう *33
  • ファイルアップロードを扱う際のチェックポイント
第34章:Where and How to Ask Django Questions(Djangoに関する質問をする場所と方法)
  • p.427〜
  • 同じ問題を抱えている人がいないかググったり、MLStackOverflowをチェックしてみよう
  • django-users の MLや IRC で直接聞いてみよう
第35章:Closing Thoughts(最後に)
  • p.431〜
  • Django 2.2 がリリースされるまでは次のシリーズは書かない
  • Django 1.8 は LTE なので、しばらくはこの本が使えるでしょう


まとめ

「Two Scoops of Django」の著者は、Django を理解するには、フォーム(Form)、モデル(Model)、クラスベースビュー(CBV)について理解することが重要だと言っていますが、私は特に、モデルと Django ORM 周りについての理解がネックになると考えています。


「Two Scoops of Django」は全編英語で、英語が苦手な人には取っ付きにくいかもしれませんが、どの章から読み始めてもよいという性質と堅苦しくないポップな雰囲気から、Django 初級者にピッタリな本だと思います。ポップなタッチながらも、Django の実戦的なノウハウが一から十まできめ細やかに書かれていて、Django アプリのデベロッパーにとって非常に貴重な本に仕上がっています。


英語が苦手でない人には絶対オススメなので、是非読んでみてください!!


明日は、felyceさんの 6日目の記事「DjangoのForm(CreateView、UpdateViewなど)について - Qiita」です。よろしくお願いします。


英単語

最後に、「Two Scoops of Django」本に出てきた英単語をピックアップしました。
読むときのお役に立てば。


p.xxxv vet : 吟味する

p.xxxv distill : 抽出する

p.xxxv suffice : 十分である

p.xxxvi errata : 正誤表

p.1 abbreviate : 省略する

p.3 accommodate : 適応する、同意する

p.3 provision : 規定、供給

p.8 It goes without saying : 〜は言うまでもない

p.13 optimal : 最適な

p.13 pitfall : 落とし穴

p.13 identically : 完全に同じように

p.14 without a hitch : 問題なく

p.15 pre-populate : 自動入力する

p.15 familiarize : 習熟させる

p.26 intentional : 故意の

p.34 truncated : 省略された

p.34 in essence : 要するに

p.34 moderate : 適度な

p.35 envision : 心に思い描く

p.36 convention : 慣習、慣例

p.36 dull : つまらない

p.36 correspond with : 〜と一致する

p.36 discouraged : 推奨されない

p.37 when in doubt : 判別がつかないときは

p.37 a modicum of : 少量の

p.41 stay away from : 〜を避ける

p.42 purposefully : 意図的に

p.48 substantially : 実質的に

p.48 without hesitation : 気兼ねなく

p.63 think things through : じっくり物事を考える

p.63 down the road : やがて

p.63 sound : 堅固な、安定した

p.64 ramification : 予期せぬ問題

p.64 sloppy : ずさんな

p.64 derived : 生成された

p.65 concrete : 具象的な

p.65 overlap : 重複部分

p.65 inadvertent : うっかりした

p.65 substantial : 相当の

p.65 traverse : 横断する

p.67 nasty : 不快な

p.67 propagation : 伝播

p.67 aptly : 適切に

p.68 unwieldy : 手に負えない

p.68 bring someone to heel : 〜を従わせる

p.69 prematurely : 時期尚早に

p.69 panacea : 万能薬

p.73 unconstrained : 拘束されない

p.73 akin : 同種の

p.73 comforted : 安心した

p.78 infer : 推察する

p.79 judiciously : 思慮深く

p.81 consistently : 一貫して

p.81 quirk : 奇癖

p.81 cartwheel : 車輪

p.81 unconstrained : 制約されない、とらわれない

P.83 legible : 読みやすい

p.84 mitigate : 和らげる、軽減する

p.84 lean on : 〜に頼る

p.85 shudder : 身震いする

p.86 comparison : 比較

p.86 under the hood : 内部で

p.87 decent : 適切な

p.87 drastically : 抜本的に

p.88 approximate : 〜に近い

p.89 practitioner : 実行者

p.89 acronym : 頭字語

p.89 overhaul : 〜を徹底的に点検する

p.89 modernize : 近代化する

p.90 monumental : (記念碑のように)巨大な

p.90 embarrassing : 厄介な

p.90 crop up : 不意に起こる

P.92 downside : 否定的側面

p.96 err on the side of : 〜し過ぎて失敗する(傾向にある)

p.97 yell : 怒鳴る

p.98 argue : 異議を唱える、主張する

p.98 steer clear of : 〜を避ける

P.98 stick to : 〜に忠実である

p.101 hackery : ハッカー行為

p.101 elaborative : 入念な

p.101 automagically : 魔法のごとく自動的に

p.103 collide : 衝突する

p.104 prevalence : 普及、行き渡ること

p.104 tangible : 明らかな、具体的な

p.105 come into play : 動き始める

p.106 when it comes down to it : いざというときには、ここ一番というときには

p.106 algebra : 代数

p.107 one-off : 一回限りの、単発の

p.108 annoy : 困らせる、イライラさせる

p.108 exploit : 〜を利用する、十分に引き出す

p.108 adhere to : 〜を支持する、忠実に守る

p.109 come at the expense of : 〜を犠牲にして成り立つ、〜という代償で手に入る

p.110 cognitive overload : 認知的過負荷

p.110 arbitrary : 任意の

p.111 in the meantime : その間に

p.113 for once : 今回に限り

p.113 parlance : 専門用語

p.113 out of necessity : 必要に迫られて

p.113 to the point of : 〜するくらいまで

p.113 ubiquitous : 至る所にある

p.115 astute : 抜け目のない

p.117 advent : 出現、到来

p.117 out of the box : 難しい設定などは一切なしで

p.117 address : 対処する、取り組む

p.118 along the line of : 〜に従って

p.122 constrain : 制約する

p.128 catch : 落とし穴、わな

p.128 wire into : 〜に配線する

p.130 queue up : 列を作る

p.131 to recap : 要点をまとめると

p.131 intention : 意図

p.133 readily : すぐに、容易に

p.135 straight-forward : 簡単な、分かりやすい

p.135 in essence : 要するに

p.137 trivial : ささいな

p.137 anguish : 苦悩

p.137 albeit : 〜ではあるが

p.140 alteration : 変更

p.140 idempotent : 冪等の

p.141 capability : 能力、機能

p.141 exempt : 免除された

p.142 in conjunction with : 〜と連動して

p.144 iterate : 〜を反復する

p.144 coerce : 〜を強要する

p.146 streamline : 簡素化する

p.149 extensively : 広範囲に渡って

p.149 explicitly : 明確に

p.152 corruption : (データの)破壊

p.154 corruption : 〜を除いて

p.159 fancy : 手の込んだ

p.161 gross : 不作法な、気持ち悪い

P.167 constrain : 〜を制約する

p.168 tier : 層

p.169 consistent : 矛盾のない、一貫した

p.169 distinctive : 独特の

p.171 eloquently : 雄弁に

p.171 inefficiency : 効率が悪いこと

p.171 redeemable : 商品と交換できる

p.172 redeem : 商品と引き換える

p.173 breakdown : 分析結果

p.173 redemption : 回収

p.177 implied : 暗黙の

p.178 intensive : 集中的な

p.179 consumption : 消費

p.179 distract : 〜の気を散らす

p.179 bluntly : 単刀直入に

p.179 realign : 再編成する

p.185 mnemonic : (記憶を助ける)短い語句

p.186 intuitive : 直感的な

p.189 draw : 呼び物、引き付けるもの

p.189 carry away : 心を奪う

p.189 worse yet : さらに悪いことには

P.189 a blessing in disguise : 災い転じて福となす

p.190 bulky : 大きい

p.190 not to mention : 〜は言うまでもなく

p.191 trait : 特徴

p.191 prone : 〜しがちな

p.191 abuse : 〜を乱用する

p.193 unbearably : 我慢できないほど

p.195 fury : 激怒

p.196 supposedly : おそらく

p.196 chagrin : 残念さ

p.196 obscure : 目立たない

p.196 contention : 主張、論争

p.197 syntactical : 構文の

p.198 First off : 最初に

p.198 advent : 出現

p.198 harmoniously : 平和に

p.199 mitigate : 和らげる

p.200 incorporate : 〜を組み込む

p.237 hype : 誇大広告、うそ

p.237 sacrifice : 〜を犠牲にする

p.237 prematurely : 時期尚早に

p.238 Franken : フランケンの、遺伝子組換えの

p.238 fad : 流行のもの

p.239 implication : 影響

p.239 compliant : 準拠した

p.240 non-issue : 取るに足りない問題

p.240 swallow : 鵜呑みにする

p.241 take it too far : 行き過ぎる、無理する

P.241 advocate : 支持する、推奨する

p.243 mess around with : 〜をいじり回す

p.243 revoke : 〜を無効にする、〜を取り消す

p.243 surreal : 非現実的な

p.250 oddly : 変に

p.251 venerable : 尊敬すべき、非常に古い

p.251 up-and-comer : 新人

p.252 arcane : 難解な

p.252 account for : 〜を構成する、〜の主要因である

p.252 idiosyncrasy : 特異性

p.252 invariably : いつも、常に

p.252 mind-numbing : 極めて退屈でつまらない

p.255 significantly : 著しく、かなり

p.255 radical : 抜本的な、急進的な

p.257 timid : 臆病な

p.257 intrusive : 煩わしい

p.257 in place : 適所に

p.259 bare-bones : 必要最低限の

p.259 slate : 候補者リスト

p.259 sane : 健全な

p.260 unobtrusive : 控えめな

p.261 dedicated : 専用の

p.263 incorporation : 組み込み、合体

p.265 competent : 有能な

p.265 tragic : 悲惨な

p.265 downfall : 転落、崩壊

p.267 formality : 手続き

p.268 pore over : 〜を熟読する

p.268 be willing to : 喜んで〜しようとする

p.269 submission : 提出

p.270 suffice : 十分である

p.270 bulletproof : 防弾の

p.270 in lieu of : 〜の代わりに

p.271 diverge : 分岐する

p.271 invasive : 侵略的な

p.273 forthcoming : 来たるべき

p.273 purist : 純粋主義者

p.274 be meant to : 〜であることを意図されている

p.274 harness : 利用する、役立てる

p.274 scare off : (怖がらせて)追い払う

p.274 obscenity : わいせつなもの

p.275 permissive : 寛大な

p.275 litigation : 訴訟

p.275 liable : 責任がある

p.275 disclaimer : 免責事項

p.275 liability : 法的責任、損害賠償

p.275 interoperability : 相互運用性

p.276 rewarding : やりがいのある

p.277 burnout : 燃え尽き症候群

p.278 irresponsible : 責任のない

p.278 fault : 〜を責める

p.280 in turn : 次に

p.280 exploit : 〜を悪用する

p.281 invariably : いつも、必ず

p.281 give away : 譲る

p.281 notable : 有名な

p.282 diligence : 不断の努力

p.283 stink : 疑わしいもの、悪臭

p.283 rigorous : 厳しい、厳密な

p.283 adequate : 適正な、適切な

p.285 hence : だから、したがって

p.286 therein : その中に、その点で

p.286 conundrum : 難しい問題

p.288 when possible : 可能であれば

p.290 subtly : 微妙に

p.290 wrestle with : 〜と格闘する

p.290 malignant : 悪意のある

p.290 intruder : 侵入者

p.290 at a distance : 少し離れて

p.290 grief : 厄介、面倒

p.292 undetected : 発見されていない

p.292 alas : ああ、悲しいかな

p.295 remedy : 改善する、是正する

p.296 fragile : 壊れやすい、不安定な

p.296 boredom : 退屈

p.297 error-prone : 間違いを起こしやすい

p.299 mandate : 命令する

p.299 gradual : 段階的な

p.299 bogus : 偽造の

p.299 thus far : ここまでは

p.299 comprehend : 理解する

p.301 That being said : そうは言っても

p.301 can't help but : 〜せずにはいられない

p.305 infrequently : まれに

p.305 tangential : 無関係の、脱線した

p.309 snappy : きびきびした

p.309 excessive : 必要以上の、過度の

p.310 invaluable : すこぶる有益な

p.312 noticeable : 目立つ

p.320 pitch in : 協力する

p.320 supervision : 監督、管理

p.320 Arguably : 議論の余地はあるが、ほぼ間違いなく

p.320 intensive : 集約的な

p.321 overkill : やり過ぎ

p.321 footprint : 足跡、専有面積

p.321 rules of thumb : 経験則

p.322 quirk : 奇癖

p.322 portability : 可搬性

p.323 underlying : 下部の、内在する

p.323 counter-productive : 非生産的な

p.328 malicious : 悪意のある

p.328 sniff : 盗聴する

p.328 up for grabs : 容易に手に入る

p.329 reputable : 信頼できる

p.332 expedite : 〜を早める、〜を迅速に処理する

p.332 malignant : 悪意のある

p.334 beware of : 〜に気をつける

p.335 falsify : 改ざんする

p.335 impersonate : 〜になりすます

p.336 transmit : 送信する

p.338 coerce : 〜を強要する

p.338 grave : 重大な

p.341 arbitrary : 任意の

p.341 be of concern : 心配事である

p.341 adequate : 適切な

p.342 incorporate : 〜を組み込む

p.343 paraphrased : 言い換える

p.343 trivial : ささいな

p.344 fine-grain : 微粒子の

p.344 in conjunction with : 〜と連動して

p.345 concealed : 隠れた

p.345 devastating : 壊滅的な

p.347 venerable : 尊敬すべき

p.347 punctuation : 句読点

p.347 pledge : 誓う

p.348 put up : 用意する、立ち上げる

p.348 overwhelm : 圧倒する、〜をひっくり返す

p.348 snap decision : 即断、見切り発車

p.348 ill-advised : 軽率な

p.349 bonded : 保証付きの

p.351 compromise : 譲歩

p.351 obfuscate : 分かりにくくする

p.351 cumbersome : 扱いにくい

p.352 nigh : ほとんど

p.352 corresponding : 同様の

p.353 diligence : 不断の努力

p.355 What's it for? : それは何に使うの?

p.355 once in a while : たまに

p.355 meticulously : 慎重に

p.356 go-to : 頼りになる

p.356 unpredictable : 予測できない

p.356 might as well : 〜してもいい

p.356 fine-tune : 微調整する

p.356 account for : 〜を構成する

p.356 introspection : 内省

p.357 catastrophic : 壊滅的な

p.357 sparingly : 控えめに

p.358 intruder : 侵入者

p.360 sprinkle : ちりばめる

p.360 debt : 負債

p.360 go overboard : やり過ぎる

p.360 clutter : 〜で溢れさせる

p.363 reduction : 減少

p.365 last resort : 最後の手段

p.365 knot : からまる

p.365 hairball : 毛玉

p.365 untangle : 〜のもつれを解く

p.365 dispatch : 〜を送り出す

p.365 obfuscation : 難読化

p.366 inversion : 逆転

p.370 delve into : 掘り下げる

p.371 general-purpose : 用途の広い

p.372 inevitably : 必然的に

p.372 Synonymous with : 〜と同じ意味の

p.373 brobdingnagian : 巨大な

p.374 indispensable : 不可欠の

p.385 a plethora of : 過多の

p.385 tangle : 混乱

p.411 originator : 創始者

p.411 cohesive : 団結した、まとまりのある

p.412 statically typed : 静的に型付けされた

p.413 oodles : たくさん

p.414 analogue : 類似品

p.415 outweigh : 上回る

p.417 annoying : うるさい

p.418 -naut : 〜の航行者

p.419 in regards to : 〜に関しては

p.419 disastrous : 破滅的な

p.419 essential : 必要不可欠なもの

p.419 frustrating : イライラする

p.422 immensely : 広大に

p.422 embrace : 受け入れる、採用する

p.422 to the fullest : 最大限に

p.423 replicate : 〜を複製する

p.424 nemesis : 悪の根源、因果応報

p.425 haywire : めちゃくちゃな

p.425 utter : ひどい

p.425 unfold : 姿を現す

p.425 aficionado : 熱狂的なファン

p.426 in exchange for : 〜と引き換えに

p.427 get stuck : 行き詰まる

p.427 descriptive : 記述的な

p.428 troll : 煽る

p.428 cranky : 気難しい

p.428 gratitude : 感謝、感謝の気持ち

p.428 go a long way : 大いに役立つ

p.428 make someone's day : 人を幸せな気分にさせる

p.428 fill up : 満たす

p.428 a tidbit of : ちょっとした

p.429 put in : 投資する

p.429 diversity : 多様性

p.429 underrepresent : 過小評価する

p.431 ground : 領域

p.431 starter : 初心者

p.431 as for : 〜に関しては

p.431 genuinely : 心から

p.431 omission : 省略、手抜かり

*1:英語は易しめだと思います

*2:二人は 2013年末に結婚しています。 https://www.pydanny.com/i-married-audrey-roy.html また、cookiecutter-django のコアコミッターとしても有名です。 https://github.com/audreyr/cookiecutter

*3:データベースごとにフィールドタイプの扱い方が違っていたりする

*4:例えば「~/projects/」あるいは「~/.envs/」など。virtualenvwrapper を使っているのであれば「~/.virtualenvs/」など

*5:「Django apps are small libraries designed to represent a single aspect of a project.」とのこと。

*6:推奨しないが、単語と単語の間にはアンダースコアを使ってもよい

*7:AWS・Stripe などの APIキー、OAuth トークンなども含まれる

*8:「abstract base classes」は Metaクラスに「abstract = True」を記述した抽象ベースクラスを継承する方式、「multi-table inheritance」は OneToOneField で複数のテーブルを一対一関連させる方式、「proxy models」は Metaクラスに「proxy = True」を記述した子クラスで継承する方式。 Models | Django documentation | Django

*9:multi-table inheritance 方式は使わないようにしよう!

*10:ヘルパー関数、フォーム、モデルのメソッドなど、ビュー(やビューに直接関連した部品)以外では使わないこと

*11:https://docs.djangoproject.com/en/1.8/ref/models/database-functions/

*12:書くなら raw() で。extra() は使わない

*13:リクエストごとにしたいのであれば、settings.py の「ATOMIC_REQUESTS」の設定を True にする。ビュー中の特定の範囲にのみトランザクションを適用する場合は「with transaction.non_atomic_requests()」で囲む

*14:複雑にカスタマイズしたい場合だけ関数ベースのビューを使えばよい

*15:Mixin を自作するときは Python object 型を継承し、複雑に継承させない設計にする

*16:View, RedirectView, TemplateView, ListView, DetailView, FormView, CreateView, UpdateView, DeleteView, Generic date views が紹介されている

*17:https://django-braces.readthedocs.io/en/latest/form.html#userformkwargsmixin:UserFormKwargsMixin, https://django-braces.readthedocs.io/en/latest/form.html#userkwargmodelformmixin:UserKwargModelFormMixinなど

*18:django-floppyforms, django-crispy-forms, django-forms-bootstrap が紹介されている

*19:select_related の詳細については、過去記事「Django ORM の select_related, prefetch_related の挙動を詳しく調べてみた - akiyoko blog」を参照

*20:パフォーマンスの問題がある場合以外は DTL のままでよい

*21:Python 2.7 の場合は python_2_unicode_compatible デコレータを使うか、__unicode__() メソッドを用意する

*22:AbstractUser を継承する方法、AbstractBaseUser を継承する方法、ユーザモデルに対して一対多・一対一・多対多関連のフィールドを作成する方法

*23:「パイピーアイ」と発音する。pip はここからパッケージを検索する

*24:代わりに、factory boyなどのツールを使おう

*25:過去記事「Python で MagicMock を使う - akiyoko blog」を参照

*26:https://docs.python.org/2/library/unittest.html#assert-methods

*27:過去記事「akiyoko.hatenablog.jp」を参照

*28:Python, Django 界隈ではあまり使われないが、Markdown 形式も人気。なお、Pandoc を使えばマークアップを自由に変換可能

*29:Djangoフォームで autocomplete を off にする、django.forms.PasswordInput を使うなど

*30:ただし、django.utils 内のモジュールは内部向けに作られたものでバージョンによって挙動が変わるので注意。詳しくは Django Utils | Django documentation | Djangoを参照

*31:django.core.exceptions のいくつかのビルトイン例外クラスが利用可能

*32:シリアライズ/デシリアライズには django.core.serializers が使える

*33:過去記事「PDB QUEST ~ pdb のショートカットはドラクエ風に覚えよう ~ - akiyoko blog」を参照

Django と Paypal と私(主に PayPal 決済の最新事情について)

$
0
0

この投稿は 「Django Advent Calendar 2016 - Qiita」 の 22日目の記事です。


この記事では、「Django と PayPal REST API で In-Context Window による PayPal 決済フロー」を実装・検証します。

はじめに謝罪しておきますが、「Django Advent Calendar」にも関わらず、結果として Django はオマケ程度にしか扱っていません。。


はじめに

オンライン決済の仕組み

ECサイトの決済処理の仕組みを簡単に図解すると、以下のようになります。

f:id:akiyoko:20160515172525p:plain
10 Safe and Popular Gateways for Online Payment Processing | InstantShiftを参考に作成)


決済業者と直接契約するのはいろいろと面倒なので、代わりに決済代行業者と契約することで、Visa や Master Card などの各種クレジットカード(決済代行サービスによっては銀行振込やコンビニ決済も)が ECサイトで利用できるようになります。


少し細かい話になりますが、決済代行サービスごとに、決済処理システムとのやり取りの方式が異なります。

決済処理システムとの接続方式には、大きく分けて次の二種類があります。

接続方式説明
リンク(画面遷移)方式決済代行サービスのサイトに一旦遷移してクレジットカード情報(あるいは決済代行サービスのアカウント)などを入力させる方式
直接決済方式画面遷移をおこなわず、バックエンドで直接決済処理をおこなう方式。実現方式や実装方法によってさらに細分化される。 *1


現在のところ、PayPal の接続方式は「リンク方式」のみとなっています。PayPal には「Direct Credit Card Payments」という直接決済方式の決済サービスもあるのですが、残念ながら(利用できるのは UKのみで)日本では利用できません。 *2

なお、GMOペイメントゲートウェイゼウスなどの決済代行業者ではそれぞれの方式の決済代行サービスが各種取り揃えられています。また、最近本番サービスインとなった話題の Stripeは「直接決済方式」となっています。


なぜ PayPal?

私が必要としている決済サービスとしては、

  • 海外からの決済が可能(JPY以外の通貨が扱える) *3

というのを最低条件としていました。

そのほか、

  • PayPal に慣れている
  • PayPal のビジネスアカウントを既に持っている

という理由から、PayPal を第一候補に考えています。


PayPal の ECサイト用オンライン決済にもいろいろと実装方式(使用する API の種類など)があるのですが、

  • Braintree v.zeroがプロダクション利用できるのは 2017年以降(2018年?)
  • Classic API よりも REST API を使いたい
  • In-Context Window を使ったフローの方が離脱が少ない

という事情を勘案して、「In-Context Window による決済フローを PayPal REST API で実装」するのがベストな選択肢であるという結論に達しました。


In-Context Window とは?

今回検証した PayPal のオンライン決済パターンは、下図のようなものになります。

f:id:akiyoko:20161222132204p:plain
NVP/SOAP Integration - PayPal Developerの図を元に作成。緑枠:自サイト、青枠:PayPal サイト)

① ショッピングカート画面(「PayPal で支払う」ボタン)
    ↓
② (In-Context Window 内)ログイン画面(「ログイン」ボタン)
    ↓
③ (In-Context Window 内)支払承認画面(「支払いに同意」ボタン)
    ↓
④ 決済完了画面


In-Context Window は、過去記事の「5. ポップアップウィンドウ型(In-Context Window)」(小さなポップアップを立ち上げてその内部で PayPal サイトを表示させる新しいタイプの画面遷移パターン)に該当する決済フローです。

これまでの Express Checkout と違って、全画面が PayPal 決済ページにリダイレクトされることなく、小さなポップアップが立ち上がってその中で PayPal 決済ページを表示するというのが最大の特徴です。


<過去記事>
akiyoko.hatenablog.jp


これが、PayPal の数あるオンライン決済パターンの中で一番シンプルで最も新しいパターンになるかと思います。


また PayPal の公式ページでも、

PayPal no longer recommends full-page redirects to PayPal for Express Checkout. Instead, Express Checkout only requires a payment ID generated by the REST Payments API, or a payment token generated by the legacy NVP/SOAP APIs, to initiate and finalize a payment.


https://developer.paypal.com/docs/integration/direct/express-checkout/integration-jsv4/other-integrations/

ということで、全画面をリダイレクトするような画面遷移は今後はオススメしないということなので、今後の PayPal 決済では In-Context Window 型のフローが増えてくると思われます。


In-Context Window 型の通常決済(Checkout)を利用するには、フロント側に「checkout.js」という PayPal 謹製の JSライブラリを読み込ませて(*4)、あとは決まったやり方に則って実装するだけで OK です。

checkout.js は少し前まで V 3.5.0 だったのですが、現在の最新バージョンは V.4.0.0 となって、実装方法が若干変更されています。 *5


今回、V 4.0.0 で検証する前に V 3.5.0 でも実装・検証してみたのですが、より簡単に、よりセキュアに実装できるようになったという印象です。

具体的には、V 4.0.0 になって、

  • PayPal ボタン生成のときに、PAYPAL_CLIENT_ID を画面に晒さなくてよくなった
  • Create Payment のときに、生成した Payment から「redirect_url」を取り出してリダイレクトしなくてよくなった *6

などのうれしい変更点がありました。


PayPal REST API とは?

PayPal REST API は、PayPal が提供する様々な決済サービスを利用することができる RESTful API です。現時点で、PayPal が実現できるほぼ全ての決済サービスを網羅しているようです。 *7


なお、PayPal REST API は OAuth 2.0 プロトコルによる認可システムを採用しており、PayPal Developer サイトで作成した売り手アカウントの Credential(Client ID および Secret)を使用して各 API 呼び出しに必要なトークンを払い出します。 *8


Credential の作成方法については、ここでは説明を省略します。 *9


先に述べたように、PayPal REST API には様々な API の種類がありますが、オンライン決済処理ではその中から「Payments API」を使用すれば事足りるでしょう。 *10


PayPal REST API を便利に利用するためのライブラリとして、Python であれば PayPal Python SDKが 本家 PayPal から提供されていますので(Python のほかにも Java, PHP, .NET, Ruby, Node.js など各種言語向けの SDK が揃っています)、 pip でインストールして使います。


Django パッケージは使わないの?

Django Packages : Payment ProcessingDjango Packages : django SHOP pluginsなどで、PayPal に対応している決済パッケージをチェックしてみたのですが、

  • Django 1.10
  • PayPal REST API
  • In-Context Window(checkout.js V 4.0.0)

に対応しているものは今のところ見当たりません。


スターの多い順に確認してみると、django-merchantは「PayPal Website Payments Pro」のみ対応ということで日本では利用不可、django-lfsは「PayPal Payments Standard」のみ対応ということで API が古くて NG、django-paypalも「PayPal Payments Standard」または「PayPal Website Payments Pro」のみ対応ということで先の二つと同じでした。


そもそも「PayPal REST API で In-Context Window 決済」は自前で実装してもそんなに大変ではなくて、Django パッケージをわざわざ使うまでもないといった印象です。


ということで、前置きがずいぶん長くなってしまいましたが、「Django と PayPal REST API で In-Context Window による PayPal 決済フロー」を実際に試していきます。


実装前には、以下のドキュメントをざっと読んでおくことをお勧めします。


実装

購入する商品と合計金額が表示されたカート画面から PayPal 決済をおこなうことを想定した、「shop」アプリケーションを作ってみます。

/opt/webapps/myproject/
├── config
│   ├── __init__.py
│   ├── local_settings.py
│   ├── settings.py
│   ├── urls.py
│   └── wsgi.py
├── manage.py
├── shop
│   ├── apps.py
│   ├── __init__.py
│   ├── urls.py
│   └── views.py
└── templates
    ├── base.html
    ├── error.html
    └── shop
        ├── base_shop.html
        ├── cart.html
        └── complete.html


動作確認をおこなった Python および Django のバージョンは以下の通りです。

  • Python 2.7.6
  • Django 1.10


ソースコードは GitHub に置きました。
github.com


Settings

conf/settings.py(抜粋)

# Application definition

INSTALLED_APPS = [
    ...
    'shop',
]
...
TEMPLATES = [
    {
        'BACKEND': 'django.template.backends.django.DjangoTemplates',
        'DIRS': [os.path.join(BASE_DIR, 'templates')],
        ...
        },
    },
]
...
# LOCAL SETTINGS
PROJECT_APP_PATH = os.path.dirname(os.path.abspath(__file__))
PROJECT_APP = os.path.basename(PROJECT_APP_PATH)
f = os.path.join(PROJECT_APP_PATH, 'local_settings.py')
if os.path.exists(f):
    import sys
    import imp
    module_name = '%s.local_settings' % PROJECT_APP
    module = imp.new_module(module_name)
    module.__file__ = f
    sys.modules[module_name] = module
    exec (open(f, 'rb').read())


conf/local_settings.py(抜粋)

DEBUG = True# PayPal
PAYPAL_MODE = '<paypal-mode>'# 'sandbox' or 'live'
PAYPAL_CLIENT_ID = '<paypal-client-id>'
PAYPAL_CLIENT_SECRET = '<paypal-client-secret>'


URLConfs

shop/urls.py

from django.conf.urls import url

from . import views

urlpatterns = [
    url(r'^cart$', views.ShowCartView.as_view(), name='cart'),
    url(r'^create-payment$', views.CreatePaymentView.as_view(), name='create-payment'),
    url(r'^execute-payment$', views.ExecutePaymentView.as_view(), name='execute-payment'),
]


Views

shop/views.py

import logging

from django.conf import settings
from django.contrib import messages
from django.http import JsonResponse, Http404
from django.shortcuts import render, reverse
from django.views.generic import View
import paypalrestsdk

logger = logging.getLogger(__name__)


classShowCartView(View):
    defget(self, request, *args, **kwargs):
        return render(request, 'shop/cart.html', {
            'paypal_mode': settings.PAYPAL_MODE,
        })


classCreatePaymentView(View):
    defpost(self, request, *args, **kwargs):
        paypalrestsdk.configure({
            'mode': settings.PAYPAL_MODE,
            'client_id': settings.PAYPAL_CLIENT_ID,
            'client_secret': settings.PAYPAL_CLIENT_SECRET,
        })

        payment = paypalrestsdk.Payment({
            'intent': 'sale',

            # Payer'payer': {
                'payment_method': 'paypal',
            },

            # Redirect URLs'redirect_urls': {
                'return_url': request.build_absolute_uri(reverse('shop:execute-payment')),
                'cancel_url': request.build_absolute_uri(reverse('shop:cart')),
            },

            # Transaction# Note: This is dummy. If production, transaction should be created with reference to cart items.'transactions': [{
                # Item List'item_list': {
                    'items': [{
                        'name': 'item',
                        'sku': 'item',
                        'price': '5.00',
                        'currency': 'USD',
                        'quantity': 1,
                    }]
                },
                # Amount'amount': {
                    'total': '5.00',
                    'currency': 'USD',
                },
                'description': 'This is the payment transaction description.',
            }]
        })

        # Create Paymentif payment.create():
            logger.info("Payment[{}] created successfully.".format(payment.id))
            return JsonResponse({'success': True, 'paymentId': payment.id})
        else:
            logger.error("Payment failed to create. {}".format(payment.error))
            return JsonResponse({'success': False, 'error': "Error occurred while creating your payment."}, status=500)


classExecutePaymentView(View):
    defget(self, request, *args, **kwargs):
        # Query strings are always in request.GET
        payment_id = request.GET.get('paymentId', None)
        payer_id = request.GET.get('PayerID', None)

        try:
            payment = paypalrestsdk.Payment.find(payment_id)
        except paypalrestsdk.ResourceNotFound as err:
            logger.error("Payment[{}] was not found.".format(payment_id))
            return Http404

        # Execute Paymentif payment.execute({'payer_id': payer_id}):
            logger.info("Payment[{}] executed successfully.".format(payment.id))
            messages.info(request, "Your payment has been completed successfully.")
            return render(request, 'shop/complete.html', {
                'payment': payment,
            })
        else:
            logger.error("Payment[{}] failed to execute.".format(payment.id))
            messages.error(request, "Error occurred while executing your payment.")
            return render(request, 'error.html')

Create Payment は
PayPal-Python-SDK/create_with_paypal.py at master · paypal/PayPal-Python-SDK · GitHub
を参考に、Execute Payment は
PayPal-Python-SDK/execute.py at master · paypal/PayPal-Python-SDK · GitHub
を参考にしました。


なお、例外処理は全然ケアしていないので、本番で使う場合には要注意です。


Templates

shop/cart.html

{% extends "./base_shop.html" %}

{% block title %}Cart{% endblock title %}

{% block content %}
{{ block.super }}
<divid="paypal-button"></div><scriptsrc="https://www.paypalobjects.com/api/checkout.js"data-version-4></script><script>    paypal.Button.render({        env: '{{ paypal_mode }}',        payment: function(resolve, reject){            paypal.request.post('{% url "shop:create-payment" %}', {csrfmiddlewaretoken: '{{ csrf_token }}'})
                .then(function(data){                    console.log("data=", data);if(data.success){                        resolve(data.paymentId);}else{                        reject(data.error);}})
                .catch(function(err){                    console.log("err=", err);                    reject(err);});},        onAuthorize: function(data, actions){return actions.redirect();},        onCancel: function(data, actions){return actions.redirect();},        onError: function(err){// Show an error page here, when an error occurs}}, '#paypal-button');</script>
{% endblock content %}

フロントのスクリプトは、

などを参考にしていただければ。


また、POST送信時に「csrfmiddlewaretoken」というパラメータを付与しないと 403エラーになるのは、Django に詳しい皆さんにはお馴染みですよね。


shop/complete.html

{% extends "./base_shop.html" %}

{% block title %}Complete{% endblock title %}

{% block content %}
<spanstyle="font-size: 0.7rem;">{{ payment }}</span>
{% endblock content %}


処理概要

ここで、In-Context Window の処理フローを少し解説すると以下のようになります。

  1. paypal.Button.render で PayPal ボタンを表示
  2. ユーザがボタンをクリックすると、paypal.requet.post() で '/shop/create-payment'にリクエストを POST する
  3. サーバ側で商品情報や合計金額、およびPayPal からリダイレクトさせる URL を含めた Payment を create して、payment.id を JSON で返す
  4. checkout.js が勝手に PayPalサイトにリダイレクトしてくれる
  5. In-Conetxt Window 内でユーザが決済を承認して同意すると、onAuthorize、キャンセルすると onCancel がコールバックされるので、それぞれのコールバック関数の中で適宜リダイレクトをする(ここでは勝手にリダイレクトされない)
  6. 「/shop/execute-payment?paymentId=xxx&token=yyy&PayerID=zzz」という URL でリクエストされるので、サーバ側で paymentId, PayerID を取得して Payment を execute して、決済完了画面を表示させる


実装を見ながら、処理の流れをチェックすると分かりやすいかと思います。


動作確認

最後に、実際に検証環境で画面を動かしながら、動作を確認してみます。


ブラウザで「http://localhost:8000/shop/cart」にアクセスし、PayPal のチェックアウトボタンをクリックします。
f:id:akiyoko:20161221135159p:plain

In-Context Window(モーダルウィンドウみたいなもの)が起動して、PayPal サイト(サンドボックス)のログイン画面が表示されます。
PayPal の買い手アカウント情報を入力してログインし、
f:id:akiyoko:20161221145000p:plain

「同意して続行」をクリックします。
f:id:akiyoko:20161221145025p:plain

onAuthorize がコールバックされ、return_url の「/shop/execute-payment」に redirect() され、shop/complete.html に payment オブジェクトの中身がダンプされました。
f:id:akiyoko:20161221145046p:plain


まとめ

Django で PayPal 決済を検討しているのであれば、今回紹介したように、フロントは「In-Context Window の checkout.js V 4.0.0」、バックエンドは「PayPal REST API 」という現時点での最新スタイルがオススメです。

ドキュメントや記事がまだ少ないのが欠点ですが、PayPal の日本チームもそこには今後力を入れていくそうなので期待しましょう。

PayPal の決済フローもドキュメントも、現在進行形でどんどん進化していますよ!!


最後にひと言。

PayPal REST API で In-Context Window 決済はいいぞ!


ご拝読ありがとうございました。「Django と Paypal と私」でした。


明日は、luizs81さんの 23日目の記事です。よろしくお願いします。


オススメ Django 本

Django のベストプラクティス本です。
全編英語ですが絶対オススメです。

Two Scoops of Django: Best Practices for Django 1.8

Two Scoops of Django: Best Practices for Django 1.8


記事を書きましたので、是非ご参考に。


<過去記事>
akiyoko.hatenablog.jp

*1:決済代行業者によって呼び方も異なる。例えば、GMOペイメントゲートウェイでは「プロトコルタイプ」「モジュールタイプ」、ゼウスでは「トークン(JavaScript)型」「データ伝送(API)型」などと呼ばれるが、いずれも画面遷移を伴わない直接決済方式である。

*2:https://developer.paypal.com/docs/classic/api/#website-payments-pro

*3:2017年4月末でのサービス終了が宣言された「WebPay」では、海外向けでの販売のみを前提とした利用はできないと規定されていました。 https://webpay.jp/faq#constraints

*4:常に最新版のものを利用するために、PayPal の CDN を利用することが推奨されています。

*5:V 3.5.0 から V 4.0.0 への移行方法については、「Upgrade checkout.js to V4.0.0 - PayPal Developer」を参照

*6:payment_id を JSON形式で返すだけで、後は checkout.js が勝手にリダイレクトしてくれるようになりました。

*7:利用できる API の種類については「REST API reference - PayPal Developer」を参照

*8:詳しい仕組みについては「How PayPal uses OAuth 2.0 - PayPal Developer」を参照

*9:https://www.paypal-knowledge.com/infocenter/index?page=content&id=FAQ1949が新しくて参考になりそうです。

*10:本番では「Payment Experience API」を組み合わせて使うこともありますが今回は利用しません。

Django と Stripe と私(Stripe 決済の最新事情)

$
0
0

この投稿は 「Django Advent Calendar 2016 - Qiita」 の 4日目の記事です。


今日は クリスマス Advent Calendar の最終日ですが、4日目の記事を書いています。
というのも、自分が担当した 12/5 の「ベスト・オブ・Django本! - akiyoko blog」の前日だけ何故かずーっと空いていて、気持ち悪かったので。。

f:id:akiyoko:20161224150324p:plain


この記事では、「Django で Stripe 決済」を実装・検証します。


Django Advent Calendar 22日目の「Django と Paypal と私(主に PayPal 決済の最新事情について) - akiyoko blog」のスピンオフ的な位置付けです。


<過去記事>
akiyoko.hatenablog.jp


Stripe とは

まず、「Stripe とは何ぞや?」から説明します。

Stripe は、2016年10月に日本で本番サービスインした、新しい決済代行サービスです。後発サービスだけに、導入が簡単だったり、API が洗練されていて使いやすかったり、管理画面(ダッシュボード)がスッキリしていて直感的に分かりやすかったりと、なかなかイケてるサービスなのです。

なお、決済サービスの接続方式は「直接決済方式」で、他のサイトへの画面遷移を伴わず、離脱が少ないのも特徴です。 *1


本社は米国カリフォルニア州サンフランシスコで、立ち上げが 2011年という比較的新しいスタートアップですが、今や世界中で数千社、年間数十億ドルの支払いを処理しており、飛ぶ鳥を落とす勢いの一大企業にまで成長しています。 *2


現時点で 世界25ヶ国でサービスを展開しており、日本企業であれば、世界中のあらゆる国のエンドユーザから利用してもらうことが可能です。ちなみに私は、これを「世界25ヶ国でしか使えない」と勘違いしていたのですが、気になって問い合わせてみたところ、

「25 ヶ国に展開」という意味につきましては、Stripeのアカウントを作成し、オンラインで決済を受けることができる国数が25か国、という意味となります。


御社のサービス・プロダクトを購入されるエンドユーザに関しては、国の制限なく利用可能です。御社のターゲットとなるお客様に合わせた通貨を指定することで、その通貨でエンドユーザは決済を行うことができ、購入体験を損なうことなく決済が完結いたします。そして、日本以外の通貨でお支払いを受けた際には、Stripeが自動で円換算を行い、御社の銀行口座へ毎週お振込みいたします。


という丁寧な返事がすぐに返ってきました。
私の勘違いで危うく Stripe を候補から外してしまうところでした。。 念のため問い合わせしておいて良かったぁ。俺、グッジョブ!!


なお、私が必要としている決済サービスとしては、

  • 海外からの決済が可能(JPY以外の通貨が扱える) *3

というのを最低条件としていて、調査前は PayPal を第一候補、Stripe を第二候補と考えていたのですが、実際に両者を触って検討してみた現在の率直な感想では、Stripe の方が使い勝手が良さそうな印象です。


PayPal の最新事情については、以下の過去記事を参考にしてください。


<過去記事>
akiyoko.hatenablog.jp


Stripe については、以下の公式サイトのほか、


以下のサイトを参考にしました(本番サービスイン前の少し古い情報もあるのでご注意を)。


Stripe のメリットとデメリットは?

私が思いつく限りの、Stripe のメリット(プラス面)とデメリット(マイナス面)を挙げてみます。

メリット(プラス面)
  • 固定費用なし(決済成立ごとに手数料 3.6%) *4
  • 導入(≒実装)がめちゃくちゃ簡単
  • 直接決済方式(画面遷移がない)のため、離脱が少ない
  • クレジットカード情報の入力フォームを用意しなくても、checkout.js や stripe.js でセキュア(PCI-DSS に準拠)なフォームを簡単に作成できる
    • フォームの自動ローカライズにも対応 *5
  • 管理画面(ダッシュボード)が見やすい
  • 三井住友カードが全面バックアップしている(らしい)ので安心 *6
  • 売上金の円建て振り込みが可能(手数料は週一回の振り込みまで無料)
  • 定期支払い(継続課金)も利用可能
  • Stripe Radar, CVC, ZIP code などによる不正使用対策が充実


デメリット(マイナス面)
  • 現時点で JCB カードが利用不可 *7, *8
  • 銀行振込み・コンビニ支払いは利用不可(クレジットカードのみ)


現状、大きなデメリットは JCBカードが使えないというほぼ一点のみかと思われます。
それを許容できるのであれば、Stripe は決済サービスの筆頭候補になり得るはずです。


(参考)


Stripe 決済の仕組みは?

Stripe が推奨しているオンライン即時決済フローは、下図のようなものになります。
f:id:akiyoko:20161224150344p:plain

① ショッピングカート画面(「Stripe で支払う」ボタン)
    ↓
② 決済モーダルウィンドウ(「支払う」ボタン)
    ↓
③ 決済完了画面


すごくシンプルですよね。

Stripe 決済の接続方式は「直接決済方式」で、Stripe サイト等にリダイレクトされることなく決済を完了させることができます。つまり、エンドユーザが「Stripe」を意識することがないので、ユーザの離脱防止に効果が期待できます。


次に、Stripe がユーザのクレジット情報を処理するまでの詳細な仕組みについて、順を追って説明します。

Step 1:Securely collecting payment information

(参考)Card Payments Quickstart

  1. フォームに Stripe 謹製の「checkout.js」を設置しておく。
  2. ユーザがボタンをクリックすると、クレジットカード(およびその他の)情報を入力するためのモーダルウィンドウが立ち上がる。
  3. モーダルウィンドウ内でクレジットカード情報を入力して決済ボタンをクリックすると、checkout.js が裏側で Stripe の API とやり取りをおこない、数分間だけ有効になるトークンを生成してから、自サーバのアクションに POSTリクエストを実行する(トークンを「stripeToken」というパラメータで送信)。


Step 2:Creating Charges

(参考)Card Payments Quickstart

  1. 自サーバ側でトークンを受け取り、Stripe の API を利用して決済処理を実行する(トークンも渡す)


たったこれだけ。

フォームに埋め込むスクリプトもほんの数行だけですし、サーバ側の処理もリクエストからトークンを受け取って Stripe API を使って即時決済を実行するだけです。


ユーザが入力したクレジットカード情報は、Stripe API によって自動的にトークンとして自前に暗号化され、自サーバ側には流れてこないので安全です。ただし、Stripe API とのやり取りをセキュアに保つためには、フォームを置くサイトを SSL化しておく必要があります。


なお、Step 1 でトークンを生成する手段は、

  • Checkout.js(簡単標準フォーム)
  • Stripe.js(カスタマイズ可能なフォーム)
  • Mobile SDKs

の 3種類が用意されており、ECサイトのオンライン決済では上の二つのいずれかを利用すればよいでしょう。

なお、checkout.js のパラメータをいろいろとカスタマイズできるようになっているので、ほとんどの場合は標準フォーム(checkout.js)の方で事足りるのではないでしょうか。

(参考)Checkout Reference


実装

購入する商品と合計金額が表示されたカート画面から Stripe 決済をおこなうことを想定した、「shop」アプリケーションを作ってみます。

/opt/webapps/myproject/
├── config
│   ├── __init__.py
│   ├── local_settings.py
│   ├── settings.py
│   ├── urls.py
│   └── wsgi.py
├── manage.py
├── shop
│   ├── apps.py
│   ├── __init__.py
│   ├── urls.py
│   └── views.py
└── templates
    ├── base.html
    ├── error.html
    └── shop
        ├── base_shop.html
        ├── cart.html
        └── complete.html


動作確認をおこなった Python および Django のバージョンは以下の通りです。

  • Python 2.7.6
  • Django 1.10


ソースコードは GitHub に置きました。
github.com


Settings

conf/settings.py(抜粋)

# Application definition

INSTALLED_APPS = [
    ...
    'shop',
]
...
TEMPLATES = [
    {
        'BACKEND': 'django.template.backends.django.DjangoTemplates',
        'DIRS': [os.path.join(BASE_DIR, 'templates')],
        ...
        },
    },
]
...
# LOCAL SETTINGS
PROJECT_APP_PATH = os.path.dirname(os.path.abspath(__file__))
PROJECT_APP = os.path.basename(PROJECT_APP_PATH)
f = os.path.join(PROJECT_APP_PATH, 'local_settings.py')
if os.path.exists(f):
    import sys
    import imp
    module_name = '%s.local_settings' % PROJECT_APP
    module = imp.new_module(module_name)
    module.__file__ = f
    sys.modules[module_name] = module
    exec (open(f, 'rb').read())


conf/local_settings.py(抜粋)

DEBUG = True############### STRIPE KEY ###############
STRIPE_API_KEY = '<stripe-api-key>'
STRIPE_PUBLISHABLE_KEY = '<stripe-publishable-key>'


上記 2つのキーには、管理画面(ダッシュボード)の[Your account]>[Account settings]>[API Keys]で確認できる、「Test Secret Key」と「Test Publishable Key」をそれぞれ設定します。

https://dashboard.stripe.com/account/apikeys
f:id:akiyoko:20161224194651p:plain


URLConfs

shop/urls.py

from django.conf.urls import url

from . import views

urlpatterns = [
    url(r'^cart$', views.ShowCartView.as_view(), name='cart'),
    url(r'^checkout$', views.CheckoutView.as_view(), name='checkout'),
]


Views

shop/views.py

import logging

from django.conf import settings
from django.contrib import messages
from django.shortcuts import render
from django.views.generic import View
import stripe

logger = logging.getLogger(__name__)


classShowCartView(View):
    defget(self, request, *args, **kwargs):
        return render(request, 'shop/cart.html', {
            'data_key': settings.STRIPE_PUBLISHABLE_KEY,
            'data_amount': 500,  # Amount in cents'data_name': 'akiyoko blog',
            'data_description': 'TEST',
        })


classCheckoutView(View):
    defpost(self, request, *args, **kwargs):
        # Set your secret key: remember to change this to your live secret key in production# See your keys here: https://dashboard.stripe.com/account/apikeys
        stripe.api_key = settings.STRIPE_API_KEY

        # Get the credit card details submitted by the form
        token = request.POST['stripeToken']

        # Create a charge: this will charge the user's cardtry:
            charge = stripe.Charge.create(
                amount=500,  # Amount in cents
                currency='usd',
                source=token,
                description='This is a test.',
            )
        except stripe.error.CardError as e:
            # The card has been declinedreturn render(request, 'error.html', {
                'message': "Your payment cannot be completed. The card has been declined.",
            })

        logger.info("Charge[{}] created successfully.".format(charge.id))
        messages.info(request, "Your payment has been completed successfully.")
        return render(request, 'shop/complete.html', {
            'charge': charge,
        })

 
バックエンドの実装は、Card Payments Quickstartのサンプルのほぼコピペです。


Templates

shop/cart.html

{% extends "./base_shop.html" %}

{% block title %}Cart{% endblock title %}

{% block content %}
{{ block.super }}
<formaction="{% url 'shop:checkout' %}"method="POST"><scriptsrc="https://checkout.stripe.com/checkout.js"class="stripe-button"data-key="{{ data_key }}"data-amount="{{ data_amount }}"data-name="{{ data_name }}"data-description="{{ data_description }}"data-image="https://stripe.com/img/documentation/checkout/marketplace.png"data-locale="auto"></script>
    {% csrf_token %}
</form>
{% endblock content %}


POST送信時に「csrfmiddlewaretoken」というパラメータを付与しないと 403エラーになるのは、Django に詳しい皆さんには釈迦に説法ですよね。


shop/complete.html

{% extends "./base_shop.html" %}

{% block title %}Complete{% endblock title %}

{% block content %}
<spanstyle="font-size: 0.7rem;">{{ charge }}</span>
{% endblock content %}


動作確認

最後に、実際に検証環境で画面を動かしながら、動作を確認してみます。


ブラウザで「http://localhost:8000/shop/cart」にアクセスし、Stripe のチェックアウトボタン(今回は公式サンプルと同じく「Pay with Card」のまま)をクリックします。
f:id:akiyoko:20161224210831p:plain

モーダルウィンドウが起動して、クレジットカードの入力フォームが表示されるので、テスト用のクレジットカード情報(*9)を入力して、支払いボタンをクリックします。(なお、テスト用クレジットカード番号を入力した場合は、カードの有効期限、CVC は適当で構いません。)
f:id:akiyoko:20161224210853p:plain

自サーバ側で Stripe API の即時決済が実行され、shop/complete.html に charge オブジェクトの中身がダンプされました。
f:id:akiyoko:20161224210908p:plain


Django ベースの ECパッケージとの連携

これまで、クレジットカードの入力フォームを用意していない場合に Stripe の標準フォーム(checkout.js あるいは stripe.js)を利用する方法について解説してきました。

Django Oscar*10)や Cartridge*11)などの Django ベースの ECパッケージを使ってクレジットカード情報の入力フォームを利用している場合は、さらに簡単に Stripe API を使うことができます。


例えば、このような感じで(Stripe の標準フォームを使わなくても)サーバ側の処理のみで決済を完結させることができます。


cartridge/shop/payment/stripe_api.py

defprocess(request, order_form, order):
    """    Payment handler for the stripe API."""
    data = {
        "amount": int((order.total * 100).to_integral()),
        "currency": getattr(settings, "STRIPE_CURRENCY", "usd"),
        "card": {
            'number': request.POST["card_number"].strip(),
            'exp_month': request.POST["card_expiry_month"].strip(),
            'exp_year': request.POST["card_expiry_year"][2:].strip(),
            'cvc': request.POST["card_ccv"].strip(),
            'address_line1': request.POST['billing_detail_street'],
            'address_city': request.POST['billing_detail_city'],
            'address_state': request.POST['billing_detail_state'],
            'address_zip': request.POST['billing_detail_postcode'],
            'country': request.POST['billing_detail_country'],
        },
    }
    try:
        response = stripe.Charge.create(**data)
    except stripe.CardError:
        raise CheckoutError(_("Transaction declined"))
    exceptExceptionas e:
        raise CheckoutError(_("A general error occured: ") + str(e))
    return response.id

https://github.com/stephenmcd/cartridge/blob/0.12.0/cartridge/shop/payment/stripe_api.py#L24-L49


ほかにも、dj-stripeというパッケージは、「Two Scoops of Django: Best Practices for Django 1.8」の著者として有名な Daniel Greenfeld もプロジェクトに参加しているため、比較的信頼できるプロダクトになっていると推測されます(私自身は全然使ったことはありませんが)。


まとめ

Stripe を使ってみた印象をひと言で言うと、「超絶シンプル」です。これ以上簡単に使える決済サービスが果たしてあるのか?と思ってしまうくらいシンプルです。


PayPal や GMOペイメントゲートウェイなど他の決済代行サービスと比較して、面倒な実装が削ぎ落とされていて最低限の実装だけで決済 API を利用することができたり、管理画面(ダッシュボード)が直感的に使えたりするなど、「開発者に優しい決済サービス」になっている思います。


Stripe、今後すごく流行る予感がします。


オススメ Django 本

最後に、Django のベストプラクティス本の紹介です。

Two Scoops of Django: Best Practices for Django 1.8

Two Scoops of Django: Best Practices for Django 1.8


記事を書きましたので、是非ご参考に。


<過去記事>
akiyoko.hatenablog.jp

*1:決済サービスの接続方式については、過去記事「Django と Paypal と私(主に PayPal 決済の最新事情について) - akiyoko blog」を参考のこと

*2:Stripe: Press resourcesより

*3:2017年4月末でのサービス終了が宣言された「WebPay」では、海外向けでの販売のみを前提とした利用はできないと規定されていました。 https://webpay.jp/faq#constraints

*4:Stripe: Pricingを参照

*5:「data-locale」パラメータを「auto」に設定することで実現可能。パラメータの詳細については Checkout Referenceを参照

*6:Stripeが日本で正式ローンチ、三井住友カードが資本参加を発表 | TechCrunch Japanより

*7:Which cards and payment types can I accept with Stripe? : Stripe: Help & Supportより

*8:【徹底比較】話題の5大オンライン決済サービスPayPal、SPIKE、Stripe、WebPay、Yahoo!ウォレット FastPay、を比べてみた(比較表有り)には「順次対応予定」とは書いてありましたが。。

*9:https://stripe.com/docs/testing#cardsにテストで使用できるクレジットカード情報がリストアップされています

*10:過去記事「ゼロからはじめる Django で ECサイト構築(その3:Django Oscar の機能を調べる) - akiyoko blog」を参照

*11:Cartridge は、Mezzanine専用に作られた、Mezzanine に ECサイト機能を搭載するためのアプリケーションです。Mezzanine 公式ページには「Ecommerce / Shopping cart module」と紹介されています。


「第2回PythonのWebスタートアップを詳しく語る会」に参加してきました

$
0
0

会場

株式会社ミクシィ
東京都渋谷区東1-2-20 住友不動産渋谷ファーストタワー7F

Twitter

twitter.com


全体の感想など

最近多くなってきた気がする Python 関連の勉強会ですが、Python の Webサービス系(特に Django)の話が聞けるのは結構レアだと思います。
というわけで、忙しい中、しかも体調の悪い中でしたが参加してみました。

5人の登壇者がいろいろな話をする中、Django の話になると、やはり初心者のためのドキュメントや本が少ないこと、特に日本語のものが少ないことが問題点として挙げられてました。私も全く同意見なのですが、結局私の中では「Two Scoops of Django」という英語本がベストという結論に達しています。


《過去記事》
akiyoko.hatenablog.jp


Pythonicな開発文化の作り方

株式会社SQUEEZE リードエンジニア 新井正貴氏


《発表スライド》
https://slideship.com/users/@massa142/presentations/2017/08/EErUdBKVhasoNhGdvNVPEb/

《参加メモ》
第2回PythonのWebスタートアップを詳しく語る会でPythonicな開発文化について発表してきた #Pythonstartup - massa142's blog


  • Design Doc(Google が推奨)
    • 仕様のレビュー・文章化
  • トップダウンな意思決定はしない
  • 一次面接はCTOが担当
  • 二次面接はエンジニア3人以上で
    • +2/+1/-1/-2 のポイントを理由とともに投票
    • 誰か一人でも-2をつければオファーしない
    • 平均+1を上回れば次の面接へ
  • プルリクは小さく!
    • CIのトリガーツール「Danger」でプルリクのサイズもチェックできる

SQUEEZE の CTO関根氏の「SQUEEZEのプロダクトを支える技術」も参考に。


Re:dash x Pythonではじめるサービス改善

株式会社ビザスク 取締役CTO 花村創史氏


  • GoogleAppEngine x Python
  • Python x Django x Angular
  • 分析ツール重要
  • データ連携、クエリの定時実行もできる
  • Pythonの計算結果をテーブルとして出せる(データソースとして別のテーブルからも取ってこれる)
  • データをキャッシュしてくれる
  • 実行結果を csv, json でダウンロードできる


チュートリアルの次へ・初心者向けDjangoの歩き方

株式会社フンザ 取締役CTO 酒徳千尋氏

チケットキャンプを運営している株式会社フンザ 酒徳氏の LT でした。チケットキャンプで「PyCon JP」のチケットが売ってない云々ありましたが、さっき確認したらちゃんと登録されていました。早い!

ticketcamp.net


参考になるオープンソースプロジェクトの Mezzanineは、私もイチ押しだったので嬉しかったです。

《過去記事》
akiyoko.hatenablog.jp

akiyoko.hatenablog.jp


それにしても、「Mezzanine」の読み方は「メッツァニーネ」だったのでしょうか。。気になるところです。


Pythonで作るHRTechサービスの裏側

株式会社リーディングマーク 中途事業開発責任者 長岡 諒氏


  • 沼津エンジニア
  • レクミーTV(Python, Flask)
  • Djangoの良さ
    • 1. 強力な管理画面作成機能がある
      • Grappelliというライブラリでデザイン強化やダッシュボードも
    • 2. Webアプリ作成に必要な機能が揃っている
    • 3. 標準のORMが一定強力
      • 1.11でサブクエリもサポート
    • 4. 後方互換製の重視
    • 5. Puthonの豊富なライブラリで機能追加できる
      • django-sendgrid, REST framework


ここでも、Two scoop of django 推しが!!

Two Scoops of Django: Best Practices for Django 1.8

Two Scoops of Django: Best Practices for Django 1.8


クイズ・python勝ち抜きバトル!!

株式会社アイリッジ 開発グループ 副グループ長 植木 基博氏


面白かったのですが、二択にしてくれた方が参加者が適度に残って良かったかなぁ、と思いました。PyCon JP 2017 での本番に期待です。

まだ Moodle で消耗してるの? オープンソースの Python製 LMS「RELATE」が圧倒的にカスタマイズしやくてヤバイぞ!

$
0
0

この投稿は 「Django Advent Calendar 2017 - Qiita」 の 19日目の記事です。


こんにちは、akiyoko です。

「Django Advent Calendar」は 2年連続 4度目の参加になります。昨年は最後まで枠が空いていたので、調子に乗って3日分も担当してしまいました。 *1, *2, *3


あと、2年前に Python製 CMS「Mezzanine」を紹介したときの流れで、煽りタイトルを付けてしまいました。申し訳ございません。

《過去記事》
akiyoko.hatenablog.jp


はじめに

オープンソースの LMS(学習管理システム)と言えば、

などがまず真っ先に挙げられますが、今回紹介するのは、Python 製で Webフレームワークの代表格「Django」をベースに開発されたオープンソースの LMS、その名も「RELATE」です。 *4


例えば、Pythonista なあなたが LMS を開発することになったとしましょう。
良さげな候補が Moodle しか見つからず、「仕方ない、PHP で開発するか・・」というのは精神衛生上よろしくないですよね?(すいません、個人の意見です。)

そんなとき、Moodle じゃない Python製の LMS があればワクワクしてきませんか? ・・しませんか、そうですか。


あとよく聞くのは、Moodle は要らない機能が多すぎるという問題。ちょっとしたテキストと動画、小テスト(クイズ)が受講できる講座をオンラインで実施したいだけなら、もっとシンプルなものが求められるケースもありますよね。


しかも、Moodle は GPLライセンスのため、Moodle をカスタマイズしてオンライン学習サービスをリリースした場合にはソースコードの公開が求められることになります。

Moodleはコピー・利用・修正してかまいませんが,条件として,ソースコードを公開し,元のライセンスや著作権表示を修正したり削除したりせず,同じライセンスをMoodleから派生したソフトにも与えなければなりません。


Moodleとは - MoodleDocs


そのため、BtoB 向けに Moodle をカスタマイズして提供するというのはライセンス上どうしても困難な面があるかと思います。その点、RELATE は MITライセンスなのでソースコードの公開義務はありません。機能追加し放題、思う存分カスタマイズすることができます。


RELATE の特徴

まず、RELATE には、

  • Python 製、Django ベース
  • コースコンテンツを Markdown 形式で記述(プログラマ向け!)
  • コースコンテンツは1講座ごとに Git 管理(管理画面でバージョンの切り替えも可能)
  • VideoJSによる動画埋め込みを標準サポート
  • 日本語にも翻訳可能 *5

といった特徴があります。特に、コースコンテンツを Markdown で書くという特徴はオンリーワンじゃないでしょうか(私の知る限りでは)。


画面はトップ画面、テキスト(動画)画面、クイズ画面、成績画面、管理側画面などで構成され、LMS としてひと通りの機能が揃っています。機能はさほど多くないですが、実用的でしっかりと作り込まれていて、Moodle や Canvas の2000オーバーには及びませんが、GitHub スターは現時点で120ほど付いています。また、Python 3、Django 1.11 にも対応しています。

GitHub の履歴を見てみると、2014年5月から inducerがコツコツとプロトタイプを作り始め、dzhuangが途中で加わり、現在は主に二人で開発を続けていますが、最近も頻繁にコミットがされています(今日も何件かコミットされていました)。

inducler(https://mathema.tician.de/aboutme/:title+Andreas Klöckner)はプロフィールを公開していて、ドイツ出身で現在はイリノイ州立大学のコンピュータサイエンスの助教授をしているとのこと。自身(?)の オンラインクラスにこの RELATE を使っているようです。なので、ちゃんと Python や Django のバージョンアップに追随しているのですね。

全部を一個人が作ったのではなく(一応)複数人が開発していて、Issue や PR をオープンに受け入れているのでサポートもある程度期待できそうです。何よりも、ベースが Django なのでコードが理解しやすくカスタマイズしやすいのが嬉しいところです。


これで SPA だったら最高なのになぁ、と思ったあなた。・・そんなあなたのために、「Web Expedition」(webexp)という「Django + Angular」なイケてる LMS を見つけておきました(*6)。一応オープンソースなのですが開発者が最新版のソースコードを push してないのか、昔触ったときにうまく動かなかった記憶がありますのでご注意を。


Ubuntu 16.04 on Docker for Mac で構築してみる

Ubuntu 16.04 on Docker for Mac 上に RELATE のサイトを構築してみます。
もちろん、以下の構築手順は本番向けではありませんのでくれぐれもご注意を。

環境

$ sw_vers
ProductName:	Mac OS X
ProductVersion:	10.12.6
BuildVersion:	16G1114

$ docker --version
Docker version 17.09.1-ce, build 19e2cf6


Docker コンテナを起動

$ docker run -it -p 80:8000 --name relate ubuntu:16.04

# cat /etc/issue
Ubuntu 16.04.3 LTS \n \l

# apt-get update
# apt-get install -y python3-dev python3-pip
# pip3 install -U pip
# apt-get install -y vim git curl

# python3 -V
Python 3.5.2
# pip3 -V
pip 9.0.1 from /usr/local/lib/python3.5/dist-packages (python 3.5)

### Bower をインストール
# apt-get install -y nodejs npm
# nodejs -v
v4.2.6
# npm -v
3.5.2
# npm install -g bower


以降は、Installation — RELATE 2015.1 documentationを参考にして RELATE のインストールを進めていきます。

なお、検証時の RELATE のバージョンは、66d3d38です(2017/12/19 時点の最新版)。

# cd /opt/
# git clone https://github.com/inducer/relate.git

### 事前にコースコンテンツも配置しておく
# git clone https://github.com/inducer/relate-sample.git
# cd relate
# pip3 install -r requirements.txt

ここで、

Command "python setup.py egg_info" failed with error code 1 in /tmp/pip-build-uh2f9ekj/django-select2/

というエラーが出る場合がありますが、「django-select2」6.0.0 のバグの可能性があります。

diff --git a/requirements.txt b/requirements.txt
index 3a5dbd3..e39372f 100644
--- a/requirements.txt+++ b/requirements.txt@@ -94,7 +94,7 @@ git+https://github.com/celery/django-celery.git@6232c79557517afa74967fcb980c0db2
 # }}}

 # For searchable select widgets
-django_select2>=5.5.0+django_select2<6

 # To sanitize HTML generated by user code
 bleach>=2.0,<3

と修正して

# pip3 install -r requirements.txt

をやり直せば、うまくインストールできました。

# cp local_settings.example.py local_settings.py
# vi local_settings.py

で、

ALLOWED_HOSTS = ["*"]

に変更。

# python3 manage.py migrate
# python3 manage.py createsuperuser
### (admin/admin@example.com/pass)

# python3 manage.py bower_install --allow-root

ここで、Ubuntu 16 は "node"ではなくて "nodejs"として認識するため、ここで以下のようなエラーが出てしまう場合があります。

/usr/bin/env: 'node': No such file or directory

この場合は、以下のコマンドを実行すれば OK です。

# ln -s /usr/bin/nodejs /usr/bin/node

改めて、

# python3 manage.py bower_install --allow-root

を実行。

最後に、runserver を起動します。

# python3 manage.py runserver 0.0.0.0:8000

ブラウザで、
http://localhost/login/
にアクセスします。

f:id:akiyoko:20171219230405p:plain


コースコンテンツの登録

「Sign in」のリンクを辿り、superuser でログインします。

f:id:akiyoko:20171219230421p:plain

ログインできたら、「Set up new course」ボタンをクリックします。

f:id:akiyoko:20171219230508p:plain


以下のようにサンプル講座の設定をおこない、「Validate and create」ボタンを押下。

Course identifier: t-001
Course name: Test Course
Number: T001
Time period: March 2018
Start date:
End date:
Only visible to course staff: チェック
Listed on main page: チェック
Accepts enrollment: チェック
Git source: /opt/relate-sample
SSH private key: 
Course root in repository: 
Course file: course.yml(デフォルト)
Events file: events.yml(デフォルト)
Enrollment approval required: 
Enrollment required email suffix: 
From emai: admin@example.com
Notify email: admin@example.com

f:id:akiyoko:20171219230813p:plain:w300


サンプル講座のトップ画面が表示されます。

f:id:akiyoko:20171219233802p:plain


講座を受講してみる

本来は受講者を作成してログインし直すべきですが(成りすましモードもあります)、このまま進めていきます。

トップ画面から以下のリンクをクリックするか、「http://localhost/course/t-001/flow/001-linalg-recap/start/」にアクセスすると、テキストページのフローに進むことができます。

f:id:akiyoko:20171219233606p:plain

ここに動画やテキストを配置します。ページ移動は上部のナビゲーションから可能です。

f:id:akiyoko:20171219233129p:plain


次に、クイズ(小テスト)です。


トップ画面から、「sample quiz」というリンクをクリックするか、「http://localhost/course/t-001/flow/quiz-test/start/」にアクセスします。

f:id:akiyoko:20171219233629p:plain

クイズが横に並んでいます。

f:id:akiyoko:20171219231934p:plain

いろんな形式のクイズを出すことができます。

f:id:akiyoko:20171219232041p:plain

クイズの形式はこの他にも多数用意されています。

f:id:akiyoko:20171219232011p:plain

クイズを提出する場合は、右側のボタンをクリック。

f:id:akiyoko:20171219232146p:plain

確認画面が表示されます。

f:id:akiyoko:20171219232604p:plain

結果画面も用意されています。

f:id:akiyoko:20171219232639p:plain

完了したクイズは、後で振り返りをすることもできます。

f:id:akiyoko:20171219232748p:plain


管理者側の画面で成績の一覧をチェックすることも可能です。

f:id:akiyoko:20171219232906p:plain


まとめ

2年前に Python製で Django ベースの CMS「Mezzanine」を紹介しましたが、今回は同じく Python 製で Django ベースの LMS「RELATE」を紹介してみました。


Django ベースで開発されているため、Django に慣れている Pythonista であれば容易にカスタマイズができますし、既存の様々なライブラリを利用することができるため、思うがままの LMS を創り上げることができます。

これを機にオリジナルのオンライン学習サービスをリリースしてみてはいかがでしょうか。


明日は、kzkamago0721さんの「Django Advent Calendar 2017 - Qiita」 20日目の記事です。よろしくお願いします。

*1:昨年は最後まで枠が空いていたので、調子に乗って3日分も担当してしまいました。《過去記事》akiyoko.hatenablog.jp

*2:《過去記事》akiyoko.hatenablog.jp

*3:《過去記事》akiyoko.hatenablog.jp

*4:検索に引っかかりにくい名前つけやがって、こんちくしょう!!

*5:ただし、コースコンテンツの翻訳は難しいかも。

*6:Quiz Web App with Django + Angular and deployment on pythonanywhere | Bhargav Patel

バージョン1.7 になる前に Django の再入門

$
0
0

Django は、

  • DRY (Don't Repeat Yourself) の精神
  • Python 製の MVC フレームワーク(All-in-One & Pluggable)
  • BSDライセンスの OSS
  • O/R マッピング API
  • 強力なテンプレートエンジン
  • ユーザ認証・セッション
  • 国際化

などの特徴を備えた Webフレームワークです。

Python 製の Webフレームワークとしては、現在ほぼ一択になっていると言ってもいいのではないでしょうか。実際使っていても、足りないところはあまり無いように感じます。


現時点での最新バージョンは、1.6.5 ですが、もうすぐ 1.7 にバージョンアップする予定となっています。
(2014/9/3 追記:9/2 にようやく、バージョン 1.7 がリリースされました!)


(参考)


今回は、バージョンが 1.7 にアップグレードされる前に、Django の使い方をおさらいしておこうと思います。


Python Django入門 (3) - Qiita」によると、

は読んでおいた方がよいとのこと。
ただし、日本語翻訳版は Django のバージョンが 1.4 と若干古いので注意が必要です。


なお、チュートリアルで使用するソースコードの最終版は、
https://github.com/Chive/django-poll-app
にあるので、参考にしてください(公式のものではないようですが・・)。


目的

Django の以下の機能の使い方を復習する。

  • アプリケーションの雛形作成
  • データベース
  • テンプレート
  • 管理サイトの作成
  • 国際化とローカライズ

環境

  • Ubuntu 12.04 (on Vagrant hosted by Mac OS)


Vagrant で Ubuntu 12.04 を起動して、SSHで乗り込む

### 仮想マシンを起動
$ cd Vagrant/precise64/
$ vagrant up

### SSHで接続
$ ssh vagrant@192.168.33.10
vagrant@192.168.33.10's password: (vagrant)


VirtualBox、Vagrant がインストール済みで、Vagrantfile で IPアドレスを「192.168.33.10」で設定済みの前提です。このあたりは、「Mac OS X+Vagrant+VirtualBox で Ubuntu 12.04 仮想環境を構築」を参考にしてください。


pip, virtualenv, virtualenvwrapper をインストール

$ lsb_release -d
Description:    Ubuntu 12.04 LTS
$ python --version
Python 2.7.3

### pip をインストール
$ sudo apt-get update
$ sudo apt-get -yinstall python-pip
$ pip --version
pip 1.0 from /usr/lib/python2.7/dist-packages (python 2.7)
$ sudo pip --version
pip 1.0 from /usr/lib/python2.7/dist-packages (python 2.7)### pip のバージョンが古いのでアップデート
$ sudo pip install-U pip
### このままでは使えないので再起動
$ sudo reboot

$ pip --version
pip 1.5.6 from /usr/local/lib/python2.7/dist-packages (python 2.7)
$ sudo pip --version
pip 1.5.6 from /usr/local/lib/python2.7/dist-packages (python 2.7)

$ sudo pip install virtualenv virtualenvwrapper
$ virtualenv --version
1.11.6
$ which virtualenvwrapper.sh
/usr/local/bin/virtualenvwrapper.sh

### virtualenv環境の設定
$ cat << EOF>> ~/.bash_profileif [ -f ~/.bashrc ]; then    . ~/.bashrcfiEOF

$ cat << EOF>> ~/.bashrcsource /usr/local/bin/virtualenvwrapper.shexport WORKON_HOME=~/.virtualenvsEOF

$ source ~/.bashrc


virtualenv環境で Django サイトを作成

Django ベストプラクティスによると、

我々は慣例的に本番サイトを /opt/webapps/で、開発用サイトを ~/webapps/でホストします。

ということなので、「/opt/webapps/」に Djangoサイトを作っていきます。

### virtualenv環境を作成
$ mkvirtualenv mysite

### Django をインストール(mysite)$ pip install django
(mysite)$ pip list | grep Django
Django (1.6.5)### /opt/webapps配下に Djangoサイトを作成(mysite)$ sudo mkdir-p /opt/webapps
(mysite)$ sudo chown `whoami`. /opt/webapps
(mysite)$ cd /opt/webapps/
(mysite)$ django-admin.py startproject mysite
(mysite)$ tree /opt/webapps
/opt/webapps
`-- mysite|-- manage.py    `-- mysite
        |-- __init__.py
        |-- settings.py
        |-- urls.py
        `-- wsgi.py


はじめての Django アプリ作成、その 1 — Django 1.4 documentation」に、各ファイル・ディレクトリについての説明がありました。

  • 外側の mysite/ ディレクトリは、このプロジェクトのただの入れ物です。 名前は Django に関係しませんので、好きな名前に変更できます。
  • manage.py: Django プロジェクトに対する様々な操作を行うための コマンドラインユーティリティです。詳しくは django-admin.py と manage.pyを参照してください。
  • 内側の mysite/ ディレクトリは、このプロジェクトの本当の Python パッケージです。この名前が Python パッケージの名前であり、 import の際に 使用する名前です (例えば import mysite.settings) 。
  • mysite/__init__.py: このディレクトリが Python パッケージであることを Python に知らせるための空のファイルです。(Python の初心者は、 Python の公式 ドキュメントの パッケージの詳しい説明を読んで下さい。)
  • mysite/settings.py: Django プロジェクトの設定ファイルです。 設定の仕組みは Django の設定を参照してください。
  • mysite/urls.py: Django プロジェクトの URL 宣言、いうなれば Django サイトにおける「目次」に相当します。詳しくは URL ディスパッチャを参照 してください。
  • mysite/wsgi.py: WSGI互換のある Web サーバでプロジェクトを動かすための エントリーポイントです。詳しくは WSGI 環境にデプロイする方法を参照 してください。


Django を起動してみます。

(mysite)$ cd mysite/
(mysite)$ python manage.py runserver 0.0.0.0:8000

ブラウザから
http://192.168.33.10:8000/
にアクセスして、「It worked!」が表示されればひとまずOK。

f:id:akiyoko:20140815222116p:plain


このあたりは、「Ubuntu+virtualenv環境で Djangoアプリケーションを作ってみる」を参照にしてください。


データベースの設定

mysite/settings.py で、データベースの設定が SQLite になっていることを確認します。
 
mysite/settings.py(抜粋)

# Database# https://docs.djangoproject.com/en/1.6/ref/settings/#databases

DATABASES = {
    'default': {
        'ENGINE': 'django.db.backends.sqlite3',
        'NAME': os.path.join(BASE_DIR, 'db.sqlite3'),
    }
}

MySQLの場合は、以下のように変更します。

# Database# https://docs.djangoproject.com/en/1.6/ref/settings/#databases

DATABASES = {
    'default': {
        'ENGINE': 'django.db.backends.mysql',
        'HOST': 'localhost',
        'NAME': 'testdb',
        'USER': 'admin',
        'PASSWORD': 'adminpass',
        'PORT': '3306',
    }
}


ここで、ついでに TIME_ZONE にタイムゾーンをセットしておきます。
(修正前)

# Internationalization# https://docs.djangoproject.com/en/1.6/topics/i18n/

LANGUAGE_CODE = 'en-us'

TIME_ZONE = 'UTC'

(修正後)

# Internationalization# https://docs.djangoproject.com/en/1.6/topics/i18n/

LANGUAGE_CODE = 'ja'

TIME_ZONE = 'Asia/Tokyo'

(参考)


syncdb を使って、データベースを自動生成します。(MySQL の場合はこの前にデータベースを準備しておきます。)

(mysite)$ python manage.py syncdb
  ・
  ・
Would you like to create one now? (yes/no): yes
Username (leave blank to use 'vagrant'): admin
Email address:
Password: adminpass
Password (again): adminpass
Superuser created successfully.
Installing custom SQL ...
Installing indexes ...
Installed 0 object(s) from 0 fixture(s)


「db.sqlite3」が作成されました。
(スーパーユーザは「admin/adminpass」で設定しました。)


アプリケーション

Writing your first Django app, part 1 | Django documentation | Django」を手本に、polls アプリケーションを追加していきます。(日本語翻訳版でもいいのですが、Djangoのバージョンが 1.4 と若干古いので、オリジナル版を参照した方がよいと思います。)


1)polls アプリケーションの雛形を作成

startapp を実行すると、pollsアプリケーションの雛形が生成されます。

(mysite)$ python manage.py startapp polls
(mysite)$ tree /opt/webapps/mysite
/opt/webapps/mysite
|-- db.sqlite3
|-- manage.py
|-- mysite
|   |-- __init__.py
|   |-- settings.py
|   |-- urls.py
|   `-- wsgi.py`-- polls
    |-- admin.py
    |-- __init__.py
    |-- models.py
    |-- tests.py
    `-- views.py


ここで、mysite/settings.py の「INSTALLED_APPS」に「polls」を追加しておきます。(次の「データモデルの作成」などで必要になります。)

 
mysite/settings.py

# Application definition

INSTALLED_APPS = (
    'django.contrib.admin',
    'django.contrib.auth',
    'django.contrib.contenttypes',
    'django.contrib.sessions',
    'django.contrib.messages',
    'django.contrib.staticfiles',
    'polls',
)


2)データモデルの作成

データモデルの開発サイクルにあたっては、

  1. データモデルを models.py でコーディング
  2. python manage.py syncdb

という手順を取ることで、わざわざ CREATE文や ALTER文を用意しなくても、データモデルの変更に応じてテーブルを変更したりすることができるので、開発が楽になります。


では、進めていきます。

 
まず、polls/models.py にモデルを書いていきます。

polls/models.py

from django.db import models

classPoll(models.Model):
    question = models.CharField(max_length=200)
    pub_date = models.DateTimeField('date published')

    def__unicode__(self):
        return self.question


classChoice(models.Model):
    poll = models.ForeignKey(Poll)
    choice = models.CharField(max_length=200)
    votes = models.IntegerField()

    def__unicode__(self):
        return self.choice


syncdb でデータベースを同期します。

(mysite)$ python manage.py syncdb


実行後、polls_choiceテーブルと polls_pollテーブルがちゃんと追加されていました。

$ sqlite3 db.sqlite3
sqlite> .tables
auth_group                  django_admin_log
auth_group_permissions      django_content_type
auth_permission             django_session
auth_user                   polls_choice
auth_user_groups            polls_poll
auth_user_user_permissions


なお、事前に、

(mysite)$ python manage.py sql poll

を実行することで、発行される SQL をチェックすることもできます。


3)リクエストへの応答を作成

pollsアプリケーションで、リクエストに応じた応答をさせるようにしていきます。

以下の3ファイルを新規追加・修正します。

  • poll/views.py
  • polls/urls.py (新規追加)
  • mysite/urls.py

 
polls/views.py を以下のように書き換えます。

from django.http import HttpResponse

from polls.models import Poll

defindex(request):
    return HttpResponse("Hello, world. You're at the poll index.")

defdetail(request, poll_id):
    return HttpResponse("You're looking at poll %s." % poll_id)

defresults(request, poll_id):
    return HttpResponse("You're looking at the results of poll %s." % poll_id)

defvote(request, poll_id):
    return HttpResponse("You're voting on poll %s." % poll_id)


View関数が返すものを、HttpResponse か例外となるようにします。


次に、リクエストを受け取る polls/urls.py を新規作成します。

from django.conf.urls import patterns, url

from polls import views

urlpatterns = patterns('',
    # ex: /polls/
    url(r'^$', views.index, name='index'),
    # ex: /polls/5/
    url(r'^(?P<poll_id>\d+)/$', views.detail, name='detail'),
    # ex: /polls/5/results/
    url(r'^(?P<poll_id>\d+)/results/$', views.results, name='results'),
    # ex: /polls/5/vote/
    url(r'^(?P<poll_id>\d+)/vote/$', views.vote, name='vote'),
)


ここで、url() を少し説明すると、

url(regex, view, kwargs=None, name=None, prefix='')
  • regex

regex には、正規表現形式でリクエストURLを指定します。
「(?P<poll_id>\d+)」という形で記述することで、View関数に渡す引数を指定することができます。

  • view

view には、リクエストURL に対応する views.py の関数(view function)を指定します。

  • kargs

kargsは、「URL dispatcher | Django documentation | Django」のように使います。
例えば、

urlpatterns = patterns('blog.views',
    url(r'^blog/(?P<year>\d{4})/$', 'year_archive', {'foo': 'bar'}),
)

と定義されていて、「http://192.168.32.10:8000/blog/2005/」というリクエストがあった場合には、blog.views.year_archive という関数が、year_archive(request, year='2005', foo='bar') という引数で呼び出されます。

  • name

name は、View関数が同じ URLが URLconfs に複数存在する場合、つまり View関数名から一意に URLを逆引きできない場合に指定するためのものです。
詳しくは、「URL dispatcher | Django documentation | Django」を参照。


最後に、mysite/urls.py に polls/urls.py への include を以下のように追記します。

from django.conf.urls import patterns, include, url

from django.contrib import admin
admin.autodiscover()

urlpatterns = patterns('',
    url(r'^polls/', include('polls.urls')),
    url(r'^admin/', include(admin.site.urls)),
)


4)テンプレートファイルを使う

次は、テンプレートファイルを使った画面表示方法についてです。

Django は、

(Using loader django.template.loaders.filesystem.Loader)
1: /opt/webapps/mysite/templates/polls/index.html


(Using loader django.template.loaders.app_directories.Loader)
2: /home/vagrant/.virtualenvs/mysite/local/lib/python2.7/site-packages/django/contrib/admin/templates/polls/index.html
3: /home/vagrant/.virtualenvs/mysite/local/lib/python2.7/site-packages/django/contrib/auth/templates/polls/index.html
4: /opt/webapps/mysite/polls/templates/polls/index.html

の順にテンプレートファイルを探しに行く仕様になっているので、テンプレートファイルは mysite 配下の、

  • templates/polls/index.html
  • polls/templates/polls/index.html

のどちらかに置くのがよいでしょう。

ここでは、チュートリアルに沿って、polls/templates/polls/index.html にテンプレートファイルを作成していきます。


以下の2ファイルを新規追加・修正します。

  • polls/templates/polls/index.html(新規追加)
  • polls/views.py


ディレクトリを作成しておくのを忘れずに。

mkdir-p polls/templates/polls


polls/templates/polls/index.html

{% if latest_poll_list %}
    <ul>
    {% for poll in latest_poll_list %}
        <li><ahref="/polls/{{ poll.id }}/">{{ poll.question }}</a></li>
    {% endfor %}
    </ul>
{% else %}
    <p>No polls are available.</p>
{% endif %}

 
polls/views.py

from django.shortcuts import render_to_response

from polls.models import Poll

defindex(request):
    latest_poll_list = Poll.objects.all().order_by('-pub_date')[:5]
    context = {'latest_poll_list': latest_poll_list}
    return render_to_response('polls/index.html', context)

テンプレートファイルに渡す context は、テンプレート変数名を Pythonオブジェクトに対応付けた辞書になっています。


現時点のファイル構成は、以下のようになっているはず。

$ tree /opt/webapps/mysite 
/opt/webapps/mysite
|-- db.sqlite3
|-- manage.py
|-- mysite
|   |-- __init__.py
|   |-- settings.py
|   |-- urls.py
|   `-- wsgi.py`-- polls
    |-- admin.py
    |-- __init__.py
    |-- models.py
    |-- templates
    |   `-- polls|       `-- index.html
    |-- tests.py
    |-- urls.py
    `-- views.py


なお、テンプレートでは、次のようなタグが使えます。

  • {% if %} {% elif %} {% else %} {% endif %} タグ
  • {% for %} {% endfor %} タグ
  • {% url %} タグ
  • {% block %} {% extends %} タグ


(参考)


{% url %} タグのサンプルはこちら。
 
polls/index.html

<li><ahref="{% url 'detail' poll.id %}">{{ poll.question }}</a></li>

ただし、Django 1.5未満の場合は、

<li><ahref="{% url detail poll.id %}">{{ poll.question }}</a></li>

とするか、

{% load url from future %}

を先頭行に付けるかしないと、エラーが発生するとのこと。


{% block %} {% extends %} タグについては、
https://docs.djangoproject.com/en/1.6/topics/templates/#template-inheritance
で詳細に解説されています。


5)フォームを使う

https://docs.djangoproject.com/en/1.6/intro/tutorial04/


フォームの書き方です。次の2ファイルを更新していきます。

  • polls/detail.html
  • polls/views.py


polls/detail.html

<h1>{{ poll.question }}</h1>

{% if error_message %}<p><strong>{{ error_message }}</strong></p>{% endif %}

<formaction="{% url 'polls:vote' poll.id %}"method="post">
{% csrf_token %}
{% for choice in poll.choice_set.all %}
    <inputtype="radio"name="choice"id="choice{{ forloop.counter }}"value="{{ choice.id }}" /><labelfor="choice{{ forloop.counter }}">{{ choice.choice_text }}</label><br />
{% endfor %}
<inputtype="submit"value="Vote" /></form>


polls/views.py

from django.shortcuts import get_object_or_404, render
from django.http import HttpResponseRedirect, HttpResponse
from django.core.urlresolvers import reverse
from polls.models import Choice, Poll
# ...defvote(request, poll_id):
    p = get_object_or_404(Poll, pk=poll_id)
    try:
        selected_choice = p.choice_set.get(pk=request.POST['choice'])
    except (KeyError, Choice.DoesNotExist):
        # Redisplay the poll voting form.return render(request, 'polls/detail.html', {
            'poll': p,
            'error_message': "You didn't select a choice.",
        })
    else:
        selected_choice.votes += 1
        selected_choice.save()
        # Always return an HttpResponseRedirect after successfully dealing# with POST data. This prevents data from being posted twice if a# user hits the Back button.return HttpResponseRedirect(reverse('polls:results', args=(p.id,)))


6)クエリの発行(データベースの CRUD)

https://docs.djangoproject.com/en/1.6/topics/db/queries/

書き始めたらキリがないので、↑ を参照のこと。


管理サイトを作る

http://docs.djangoproject.jp/en/latest/intro/tutorial02.html
を手本に、管理サイトpolls アプリケーションを追加していきます。

なお、Django 1.6 から admin(管理サイト)がデフォルトで有効になっています。

(mysite)$ python manage.py startapp polls

すると自動で追加される polls/admin.py の正体は、管理サイト用のファイルなのです。


管理サイトを表示するには、
http://192.168.33.10:8000/admin/
にアクセスすれば OK です。

f:id:akiyoko:20140815222303p:plain


スーパーユーザの ID・パスワードでログインすると、

f:id:akiyoko:20140815222312p:plain

という画面が表示されるのですが、polls/admin.py に何も書いていない状態だと、まだ Poll や Choice は追加されていません。


polls/admin.py を追加し、

admin.site.register(Poll)
admin.site.register(Choice)

などと記述すると、管理サイトのページからGUIでCRUD操作ができるようになります。


f:id:akiyoko:20140815222326p:plain


国際化とローカライズ

https://docs.djangoproject.com/en/1.6/topics/i18n/translation/


1)Pythonコードの場合

関数 ugettext() を使います。タイプ数を減らすために、「 _ 」という別名で import するのが慣習的なやり方です。

(例)
polls/views.py

from django.http import HttpResponse
from django.utils.translation import ugettext as _

defindex(request):
    return HttpResponse(_("Welcome to my site."))


2)テンプレートファイルの場合

http://docs.djangoproject.jp/en/latest/topics/i18n/translation.html#specifying-translation-strings-in-template-code

テンプレートファイル内の翻訳では、{% trans %} タグを使います。
またファイルの先頭に、{% load i18n %} タグを入れておく必要があります。
なお、{% blocktrans %} タグを使うことで、プレースホルダを使用した複雑な文章を扱うことができます。


3)ローカライズ: 言語ファイルの作成方法

以下の手順で進めていきます。

  1. settings.py の「MIDDLEWARE_CLASSES」に「django.middleware.locale.LocaleMiddleware」を追加(初回のみ)
  2. django-admin.py makemessages を実行して、翻訳ファイル(poファイル)を作成
  3. poファイルを編集
  4. django-admin.py compilemessages を実行して、moファイルを作成


settings.py の「MIDDLEWARE_CLASSES」に「django.middleware.locale.LocaleMiddleware」を追加します。

mysite/settings.py

MIDDLEWARE_CLASSES = (
    ・
    ・
    'django.middleware.locale.LocaleMiddleware',
)

 
次の工程で makemessages を使うために、gettextをインストールしておきます。

$ sudo apt-get -yinstall gettext
$ gettext --version
gettext (GNU gettext-runtime) 0.18.1


翻訳ファイル(poファイル)を自動生成します。

### アプリケーションディレクトリ配下に移動
$ cd /opt/webapps/mysite/polls
### locale ディレクトリを作成
$ mkdir locale

### poファイルを自動生成
$ django-admin.py makemessages -l ja
processing locale ja


なお、ローカライズする対象文字列が一つも無いと、エラーになってしまいます。

CommandError: errors happened while running msguniq
msguniq: error while opening "/opt/webapps/mysite/polls/locale/django.pot" for reading: No such file or directory

 
poファイルを編集していきます。
polls/locale/ja/LC_MESSAGES/django.po

# SOME DESCRIPTIVE TITLE.# Copyright (C) YEAR THE PACKAGE'S COPYRIGHT HOLDER# This file is distributed under the same license as the PACKAGE package.# FIRST AUTHOR <EMAIL@ADDRESS>, YEAR.##, fuzzy
msgid ""
msgstr """Project-Id-Version: PACKAGE VERSION\n""Report-Msgid-Bugs-To: \n""POT-Creation-Date: 2014-08-16 18:56+0000\n""PO-Revision-Date: YEAR-MO-DA HO:MI+ZONE\n""Last-Translator: FULL NAME <EMAIL@ADDRESS>\n""Language-Team: LANGUAGE <LL@li.org>\n""Language: \n""MIME-Version: 1.0\n""Content-Type: text/plain; charset=UTF-8\n""Content-Transfer-Encoding: 8bit\n""Plural-Forms: nplurals=1; plural=0;\n"#: views.py:11
msgid "Welcome to my site."
msgstr "ようこそ"

 
poファイルをコンパイルして、moファイルを生成します。

$ django-admin.py compilemessages
processing file django.po in /opt/webapps/mysite/locale/ja/LC_MESSAGES


最後にサーバを再起動すると、翻訳が反映されます。

f:id:akiyoko:20140817043816p:plain


最終的なファイル構成はこうなります。

$ tree /opt/webapps/mysite
/opt/webapps/mysite
|-- db.sqlite3
|-- manage.py
|-- mysite
|   |-- __init__.py
|   |-- settings.py
|   |-- urls.py
|   `-- wsgi.py`-- polls
    |-- admin.py
    |-- __init__.py
    |-- locale
    |   `-- ja|       `-- LC_MESSAGES
    |           |-- django.mo
    |           `-- django.po|-- models.py|-- templates|   `-- polls
    |       `-- index.html|-- tests.py|-- urls.py    `-- views.py


(参考)


その他

その1)対話シェル

Django の設定を読み込みんだ対話シェルを起動するには、以下のようにします。

(mysite)$ cd /opt/webapps/mysite/
(mysite)$ python manage.py shell
Python 2.7.3 (default, Apr 202012, 22:39:59) 
[GCC 4.6.3] on linux2
Type "help", "copyright", "credits"or"license"for more information.
(InteractiveConsole)
>>> 

(参考)


その2)South

Django に含まれているわけではないのですが、Django と非常に親和性の高いマイグレーションツール。
しかしながら、Django 1.7 では migration がパワーアップして South と同等の機能を提供してくれるようになるので、1.7 からはサヨナラな感じになってしまうでしょうか。


(参考)
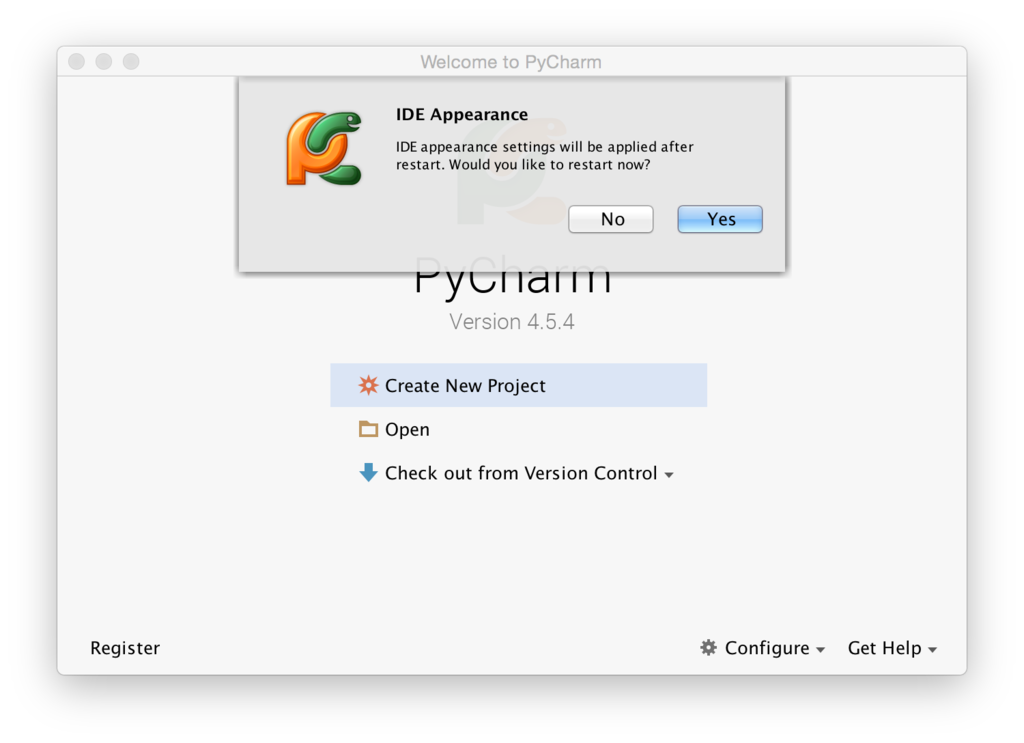
PyCharm で Djangoプロジェクトの開発環境を設定する

$
0
0

Mac (OSX Yosemite) に PyCharm Professional Edition をインストールして、Django プロジェクト開発環境の設定をします。

やりたいこと

  • Mac (OSX Yosemite) に PyCharm Professional Edition をインストール
  • 各種初期設定
  • GitHub から Django プロジェクトを Clone
  • Vagrant の仮想サーバとの連携設定
  • 仮想サーバとのソースコードの同期設定

前提条件

  • クライアントマシンは、OSX 10.10.5 (Yosemite)
  • 以下は Mac にインストール済み(手順は以下の 過去記事を参考)
    • Homebrew & Homebrew Cask
    • pip
    • virtualenv
    • JDK 1.8
    • Git
    • Vagrant & VirtualBox


<過去記事>
akiyoko.hatenablog.jp


1. PyCharm インストール

PyCharm Professional Edition を Homebrew cask を使ってインストールします。

$ brew cask install pycharm


2. PyCharm の初期設定

2.1. IDE theme

IDE theme を「Darcura」に設定します。

f:id:akiyoko:20150923012804p:plain
f:id:akiyoko:20150923012817p:plain
f:id:akiyoko:20150923012833p:plain


2.2. ライセンスキー

ライセンスキーは、起動後の画面から [Register] を選択し、購入後に PDFで送付されるライセンスキーを貼り付ければ完了です。

f:id:akiyoko:20151025223106p:plain
f:id:akiyoko:20151025223118p:plain


2.3. 表示設定

[Preferences] > [Editor] > [General] > [Apparence]

行番号表示

[Show line numbers] にチェックを入れます。

空白スペースの可視化

[Show whitespaces] にチェックを入れます。

f:id:akiyoko:20151102104314p:plain


2.4. フォント設定

[Preferences] > [Editor] > [Color & Fonts] > [Font]

Scheme から [Save As] で、「Darcula copy」などという名前でコピーすると、フォントサイズが変更できるようになります。

「Size:10」くらいにしておきます。

f:id:akiyoko:20151102104337p:plain
f:id:akiyoko:20151102104356p:plain


3. Djangoプロジェクトの作成

以下の手順で、Djangoプロジェクト(サンプルとして https://github.com/akiyoko/django-mysite.git)を GitHub から Clone して、ローカル(デフォルトでは /Users/akiyoko/PycharmProjects/ 配下)に配置します。


PyCharm を起動し、[Check out from Version Control] > [GitHub] を選択します。

f:id:akiyoko:20151025220625p:plain

GitHub のアカウント/パスワードでログインします。
f:id:akiyoko:20151025220639p:plain

Master Password を設定すれば、GitHub のログインが省略できます(Master Password を入力する必要はありますが)。
f:id:akiyoko:20151025220703p:plain


Git Repository URL に「https://github.com/akiyoko/django-mysite.git」を指定します。
f:id:akiyoko:20151025220757p:plain
f:id:akiyoko:20151025220809p:plain


4. Vagrant連携

ソースコードをデプロイする先の Vagrantサーバを PyCharm 上で操作できるようにします。

4.1.

[Tools] > [Vagrant] > [Init in Project Root] を選択します。

f:id:akiyoko:20151025224853p:plain


/Users/akiyoko/PycharmProjects/django-mysite 配下に Vagrantfile が作成され、4.2. の [Instance folder] にディレクトリが設定されます。


4.2.

[Preferences] > [Tools] > [Vagrant] で、Vagrant の連携設定を確認します。

f:id:akiyoko:20151025225609p:plain

  • Vagrant executable: /usr/local/bin/vagarnt
  • Instance folder: /Users/akiyoko/PycharmProjects/django-mysite

になっていれば OK です。


4.3.

Vagrantfile のIPアドレスを変更して、192.168.33.10 固定でアクセスできるようにします。

vi /Users/akiyoko/PycharmProjects/django-mysite/Vagrantfile
<変更前>
---
  # config.vm.network "private_network", ip: "192.168.33.10"
---
<変更後>
---
  config.vm.network "private_network", ip: "192.168.33.10"
---

f:id:akiyoko:20151025225717p:plain


4.4.

[Tools] > [Vagrant] > [Up] でインスタンスを起動します。


起動後、

$ ssh vagrant@192.168.33.10

で、SSHアクセスできることを確認します。


5. デプロイ先のサーバの設定

デプロイ先となる Vagrantサーバの設定を行います。

5.1.

[Tools] > [Deployment] > [Configuration] で設定画面を開き、「+」ボタンをクリックしてサーバの設定を追加します。

f:id:akiyoko:20151025231125p:plain

  • Name: django-mysite
  • Type: SFTP

を設定して、[OK] します。


5.2.

以下、[Connection] タブの設定。

  • SFTP host: 192.168.33.10
  • User name: vagrant
  • Auth type: Password
  • Password: vagrant ([Save password] をチェック)

[Visible only for this project] もチェックしておきます。

f:id:akiyoko:20151025231154p:plain


以下、[Mappings] タブの設定。

  • Local path: /Users/akiyoko/PycharmProjects/django-mysite(デフォルト)
  • Deployment path on server 'django-mysite': /opt/webapps/mysite

f:id:akiyoko:20151025231215p:plain


以下、[Excluded path] タブの設定。

[Add local path]

/Users/akiyoko/PycharmProjects/django-mysite/.vagrant
/Users/akiyoko/PycharmProjects/django-mysite/Vagrantfile

[Add deployment path]

なし

f:id:akiyoko:20151206113528p:plain

なお、「.idea」や「.git」は、[Tools] > [Deployment] > [Options] にあらかじめ除外ファイルとして定義されているため、ここで指定する必要はありません。


[OK] ボタンをクリックして完了。


あるいは、
[Tools] > [Deployment] > [Options] の [Exclude items by name] に、以下のように「.vagrant」「Vagrantfile」「*.pyc」「*.swp」を加えておくと、上記の [Add local path] の設定が不要になるため、非常に便利です。

<変更前>
.svn;.cvs;.idea;.DS_Store;.git;.hg

<変更後>
.svn;.cvs;.idea;.DS_Store;.git;.hg;.vagrant;Vagrantfile;*.pyc;*.swp

f:id:akiyoko:20151122034541p:plain


5.3.

最後に、[Tools] > [Deployment] > [Automatic Upload] をチェックしておきます。


6. サーバの初期設定(on Vagrant)

ソースコードを同期する前に、サーバ側(Vagrant仮想環境)で、Djangoプロジェクトの箱を作成しておきます。

$ ssh vagrant@192.168.33.10

で、SSHログインします。

### 最低限のインストール
$ sudo apt-get update
$ sudo apt-get install -y git tree sqlite3

### pip をインストール
$ sudo apt-get install -y python-pip python-dev
$ pip --version
pip 1.5.4 from /usr/lib/python2.7/dist-packages (python 2.7)

### virtualenv, virtualenvwrapper をインストール
$ sudo pip install virtualenv virtualenvwrapper
$ virtualenv --version
13.1.2

### virtualenvwrapper の設定
$ cat << EOF >> ~/.bash_profile

if [ -f ~/.bashrc ]; then
    . ~/.bashrc
fi
EOF
$ cat << EOF >> ~/.bashrc

source /usr/local/bin/virtualenvwrapper.sh
export WORKON_HOME=~/.virtualenvs
EOF
$ source ~/.bashrc

### Djangoプロジェクトの virtualenv 環境を設定
$ mkvirtualenv mysite

### /opt/webapps 配下に Djangoプロジェクトの箱を作成
(mysite)$ sudo mkdir -p /opt/webapps
(mysite)$ sudo chown `whoami`. /opt/webapps


7. ソースコードを同期

サーバ側(Vagrant)にソースコードをアップロードします。


初回は、プロジェクトで右クリック > [Upload to django-mysite] でアップロードします。

f:id:akiyoko:20151025233507p:plain


8. サーバ側の Djangoアプリの起動確認(on Vagrant)

Djangoアプリの起動確認までを行います。

(mysite)$ cd /opt/webapps/mysite/
(mysite)$ pip install -r requirements.txt


データベースを初期化

### models を何も変更していなければ、python manage.py makemigrations はまだ実行不要
(mysite)$ python manage.py migrate


Djangoアプリを起動

(mysite)$ python manage.py runserver 0.0.0.0:8000

ブラウザで
http://192.168.33.10:8000/
あるいは
http://192.168.33.10:8000/polls/
にアクセスして動作確認ができれば、一旦 runserver は停止しておきます。


9. Project Interpreter の設定

ローカル側(PyCharm)のソースコードの Reference を解決したり、サーバ側の Djangoアプリをデバッグ起動させたりするのに、Python Interpreter の設定を行います。


基本的には、

  • Project Interpreter(PyCharm 上のソースコードの Reference 解決)
  • Run/Debug Configuration(Runserver/Debug 起動時の Interpreter)

のいずれにも、サーバ側の virtualenv の Python Interpreter を設定します。
(Run/Debug Configuration は、10. で設定します。)
 

9.1.

[Preferences] > [Project: django-mysite] > [Project Interpreter] から、[Python Interpreter] の右側の歯車アイコンをクリックし、[Add Remote] を選択します。

f:id:akiyoko:20151026000532p:plain


[Deployment configuration] をクリックすると、Deployment での設定した内容が反映されます。
f:id:akiyoko:20151211210801p:plain

ここで、Pythonのパスを virtualenv のものに変更しておきます。
Python interpreter path: /home/vagrant/.virtualenvs/mysite/bin/python
f:id:akiyoko:20151211210831p:plain

作成した Remote Interpreter が選択されていることを確認して、[OK] をクリックします。
f:id:akiyoko:20151211210851p:plain


9.2.

ここで、Python コードに赤いアンダーライン(参照エラー)が出ないようにするために、[File] > [Invalidate Caches / Restart] を選択し、[Invalidate and Restart] をクリックします。
f:id:akiyoko:20151122041314p:plain
(PyCharm が再起動され、再インデックスが実行されるので、多少時間がかかる場合があります。)


適当な Python ファイルを開き、赤いアンダーライン(参照エラー)が出ていないことを確認します。
f:id:akiyoko:20151122040424p:plain


10. Run/Debug 設定

10.1.

[Run] > [Edit Configurations] から設定画面を開き、[Configuration] タブで以下を設定します。

f:id:akiyoko:20151210021803p:plain

「OK」をクリックします。


10.2.

[Run] > [Run 'django-mysite'](あるいは右上の ▶アイコン)をクリックし、サーバが起動されることを確認します。


f:id:akiyoko:20151122043222p:plain


10.3.

[Run] > [Debug 'django-mysite'](あるいは右上の虫アイコン)をクリックし、デバッガが起動されることを確認します。


f:id:akiyoko:20151122043233p:plain


PyCharm上で作成したブレークポイントで止めたプロセスは、

  • 一行ずつ進める ・・・ F8
  • 終了する ・・・ ctl + F9

などの操作ができます。


Djangoプロジェクトの基本的な開発環境設定は、以上で終了です。


11. 便利なショートカットなど
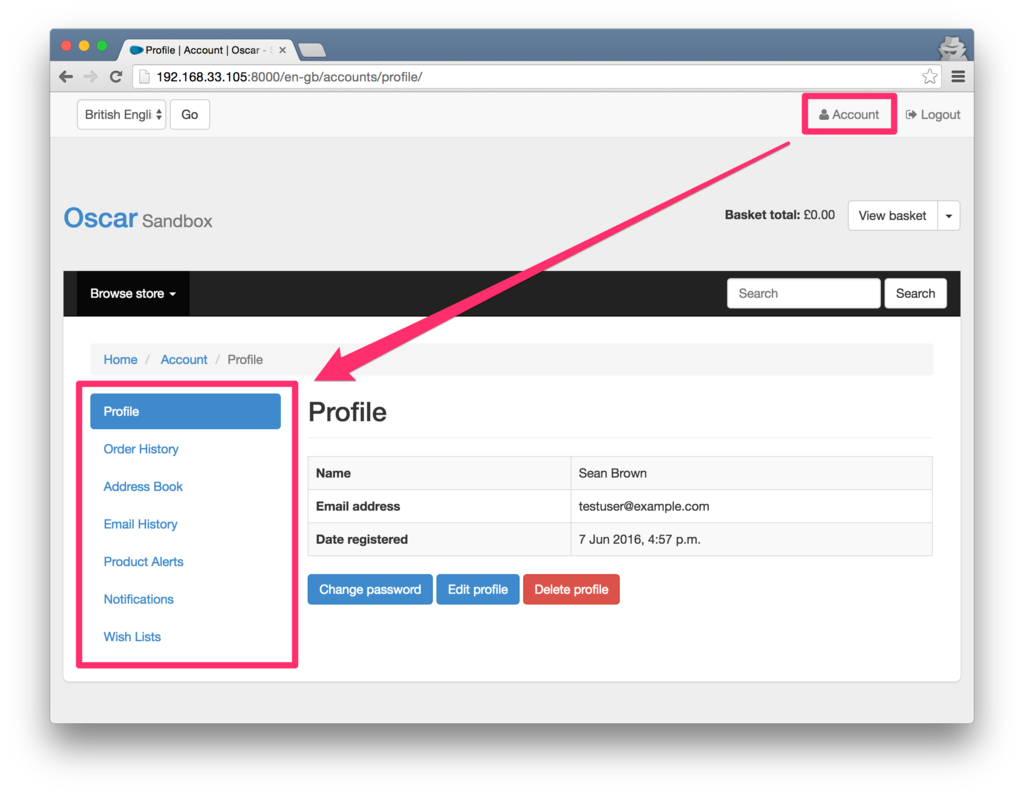
11.1. ショートカット

検索
ショートカット説明
shift + cmd + fgrep検索
opt + cmd + ↓ (↑)grep検索結果の前後を表示
cmd + fファイル内検索
(shift +) cmd + gファイル内検索結果の前後を表示
cmd + b関数・メソッドの宣言にジャンプ
opt + cmd + F7関数・メソッドを使用している箇所を検索
opt + cmd + ← (→)履歴の前後を表示


ファイルを開く
ショートカット説明
shift x 2 (素早く2回)クイック検索
cmd + e最近開いたファイルを開く
shift + cmd + oファイル名でファイルを開く


差分表示
ショートカット説明
(Project ビューで) cmd + d別ファイルとの Diff


その他
ショートカット説明
cmd + ↑ナビゲーションバーを操作
opt + F12Terminal を開閉
shift + cmd + a利用できるアクションを検索


11.2. 開いているファイルを Project ビューで表示する

Projectビューの [Scroll from Source] アイコンをクリック

f:id:akiyoko:20151102105407p:plain

あるいは、Projectビューの歯車アイコンから、

  • [Autoscroll to Source] (Projectビューからシングルクリックでソースビューを開く)
  • [Autoscroll from Source] (ソースビューを開くとProjectビューに該当モジュールがフォーカスする)

にチェックを入れておくと便利です。
(私の場合は、[Autoscroll to Source] だけにチェックを入れています。)

f:id:akiyoko:20151102105436p:plain


Mezzanine プロジェクトの開発環境を PyCharm で設定する

$
0
0

はじめに

以前に「見よ!これが Python製の WordPress風フルスタックCMSフレームワーク「Mezzanine(メザニン)」だ!」という記事で、Python製の WordPress風フルスタックCMSフレームワーク「Mezzanine」を紹介しましたが、今回は、その Mezzanine プロジェクトの開発環境を、Mac版 PyCharm Professional Edition で設定するための手順を書いてみます。


PyCharm Professional Edition は Homebrew-Cask でインストールしています。

<過去記事>
akiyoko.hatenablog.jp

PyCharm の初期設定は済んでいるという前提で進めます。

<過去記事>
akiyoko.hatenablog.jp

やりたいこと

  • 最新版の Mezzanine プロジェクトを Vagrant サーバにインストール
  • Vagrant サーバと Mac上の PyCharm とのソースコード同期設定
  • リモートデバッグ設定
  • Mezzanine テーマを変更

環境

<クライアント>

  • Mac OS X 10.10.5
  • PyCharm (Professional Edition) 5.0.4

<サーバ>

  • Ubuntu 14.04 LTS(on Vagrant)
    • IPアドレス:192.168.33.103
    • ログインユーザ:vagrant

<Mezzanineプロジェクト>

  • Django 1.9.5
  • Mezzanine 4.1.0
  • Cartridge 0.11.0


1. PyCharm の設定(1)

1.1. Pure Python Project を作成

PyCharm を起動し、 [Create New Project] をクリックします。

[Pure Python] を選択し、

Location/Users/akiyoko/PycharmProjects/mezzanine_project
Interpreter(適当)

を設定します。Interpreter は、後でリモート側の virtualenv のものに変更するので、ここでは適当なものを選択しておきます。

f:id:akiyoko:20160313142425p:plain

ここで、[Django] プロジェクトではなく [Pure Python] を選択した理由は、[Pure Python] プロジェクトにしておかないとリモートデバッグ機能が使えない(はずだ)からです。


1.2. Vagrant連携

[Tools] > [Vagrant] > [Init in Project Root] を選択します。


PyCharm 上で、Vagrantfile を開いて編集します。

<変更後>

  config.vm.network "private_network", ip: "192.168.33.103"

[Tools] > [Vagrant] > [Up] でインスタンスを起動します。


2. Vagrantサーバの初期設定

Vagrant サーバに ssh で乗り込みます。

$ ssh vagrant@192.168.33.103


2.1. 最低限のインストール

$ sudo apt-get update
$ sudo apt-get -y install python-dev git tree


2.2. MySQL をインストール

Ubuntu サーバに MySQL をインストールします。

sudo apt-get -y install mysql-server
(root/rootpass)
sudo apt-get -y install mysql-client libmysqlclient-dev python-mysqldb

$ mysql --version
mysql  Ver 14.14 Distrib 5.5.47, for debian-linux-gnu (x86_64) using readline 6.3

sudo mysql_install_db

### 文字化け対策(セクションの最後に以下の設定を追加)
### http://blog.snowcait.info/2014/06/04/mariadb-utf8/
$ sudo vi /etc/mysql/my.cnf
---
[mysqld]
  ・
  ・
# ssl-ca=/etc/mysql/cacert.pem
# ssl-cert=/etc/mysql/server-cert.pem
# ssl-key=/etc/mysql/server-key.pem

# Character set settings
character-set-server = utf8

[mysqldump]
  ・
  ・
---

$ sudo service mysql restart

$ sudo mysql_secure_installation
Enter current password for root (enter for none):
Change the root password? [Y/n] n
Remove anonymous users? [Y/n] Y
Disallow root login remotely? [Y/n] Y
Remove test database and access to it? [Y/n] Y
Reload privilege tables now? [Y/n] Y
参考


データベース、データベースユーザを作成します。
なお、データベース名は Djangoプロジェクト名と合わせて myproject とします。

データベース名myproject
データベースユーザmyprojectuser
データベースユーザパスワードmyprojectuserpass
$ mysql -u root -p
mysql> create database myproject character set utf8;
mysql> create user myprojectuser@localhost identified by "myprojectuserpass";
mysql> grant all privileges on myproject.* to myprojectuser@localhost;
mysql> flush privileges;
mysql> exit


2.3. pip をインストール

Python 2.7.9 以降であれば pip がバンドルされているが、Ubuntu 14.04LTS では Python 2.7.6 が標準なので、手動でインストールします。

「sudo apt-get -y install python-pip」でインストールすると pip のバージョンが古いので、get-pip.py で最新版を入れることにします。

$ wget https://bootstrap.pypa.io/get-pip.py
$ sudo -H python get-pip.py
$ pip --version
pip 8.1.0 from /usr/local/lib/python2.7/dist-packages (python 2.7)

2.4. virtualenv, virtualenvwrapper をインストール

### virtualenv, virtualenvwrapper をインストール
$ sudo -H pip install virtualenv virtualenvwrapper

### virtualenvwrapper の設定
$ cat << EOF >> ~/.bash_profile

if [ -f ~/.bashrc ]; then
    . ~/.bashrc
fi
EOF
$ cat << EOF >> ~/.bashrc

source /usr/local/bin/virtualenvwrapper.sh
export WORKON_HOME=~/.virtualenvs
EOF
$ source ~/.bashrc


2.5. Mezzanineプロジェクトを作成

Overview — Mezzanine 4.1.0 documentation
に従って、Mezzanineプロジェクトのインストールをします。

### Djangoプロジェクトの virtualenv 環境を設定して activate
$ mkvirtualenv myproject

### /opt/webapps 配下にプロジェクトの外箱を作成
$ sudo mkdir -p /opt/webapps/myproject
$ sudo chown -R `whoami`. /opt/webapps

### イメージライブラリのインストール
### http://mezzanine.jupo.org/docs/overview.html#dependencies
$ sudo apt-get -y install libjpeg8 libjpeg8-dev
$ sudo apt-get -y build-dep python-imaging

### MySQLライブラリのインストール
$ pip install MySQL-python

### Mezzanine プロジェクトを作成
$ cd /opt/webapps/myproject/
### Cartridge のインストール
$ pip install -U cartridge

$ pip list |grep Django
Django (1.9.5)
$ pip list |grep Mezzanine
Mezzanine (4.1.0)
$ pip list |grep Cartridge
Cartridge (0.11.0)

### プロジェクトのディレクトリ構造は
### myproject/ as <repository_root> also as <django_project_root>
### └─ config/ as <configuration_root>
$ mezzanine-project -a cartridge config .

$ tree -a /opt/webapps/myproject/
/opt/webapps/myproject/
├── config
│   ├── dev.db
│   ├── __init__.py
│   ├── local_settings.py
│   ├── settings.py
│   ├── urls.py
│   └── wsgi.py
├── deploy
│   ├── crontab.template
│   ├── gunicorn.conf.py.template
│   ├── local_settings.py.template
│   ├── nginx.conf.template
│   └── supervisor.conf.template
├── .DS_Store
├── fabfile.py
├── .gitignore
├── .hgignore
├── __init__.py
├── manage.py
└── requirements.txt


2.6. Django のデータベース設定を変更

### デフォルトで用意されている config/dev.db は不要なので削除
$ rm config/dev.db

### MySQL用の設定変更
$ vi config/local_settings.py

<変更前>
---
DATABASES = {
    "default": {
        "ENGINE": "django.db.backends.sqlite3",
        "NAME": "dev.db",
        "USER": "",
        "PASSWORD": "",
        "HOST": "",
        "PORT": "",
    }
}
---

<変更後>
---
DATABASES = {
    "default": {
        "ENGINE": "django.db.backends.mysql",
        "NAME": "myproject",
        "USER": "myprojectuser",
        "PASSWORD": "myprojectuserpass",
        "HOST": "localhost",
        "PORT": "",
    }
}


2.7. デモ用のレコードを投入

createdb でデモ用のレコードを投入することができます。

### migrate実行
### --noinput オプションを付けると、デモ用の初期データ(site, superuser, 画像などのコンテンツ, etc)を自動登録
### --nodata オプションを付けると、デモ用画像やギャラリーなどのコンテンツを static 配下に自動作成しない
$ python manage.py createdb --noinput

### とりあえずデータベースをバックアップ
### http://weblabo.oscasierra.net/mysql-mysqldump-01/
### ちなみに、リストアするときは mysql -u root -p myproject < ~/myproject_init.dump
$ mysqldump --single-transaction -u root -p myproject > ~/myproject_init.dump


2.8. runserver で起動

$ python manage.py runserver 0.0.0.0:8000

http://192.168.33.103:8000/admin/
にブラウザからアクセスします。
(admin/default)


疎通がOKなら、runserver を一旦停止します。


3. PyCharm の設定(2)

3.1. デプロイ先サーバ設定

[Tools] > [Deployment] > [Options] の [Exclude items by name] に以下を設定します。

.svn;.cvs;.idea;.DS_Store;.git;.hg;.vagrant;Vagrantfile;*.pyc;*.swp;*.db;*.sock;*.pid

f:id:akiyoko:20160625112113p:plain

[Tools] > [Deployment] > [Configuration] で設定画面を開き、「+」ボタンをクリックしてサーバの設定を追加します。

Namemezzanine_project
TypeSFTP

f:id:akiyoko:20160313155825p:plain

各種設定をします。

[Connection]

[Visible only for this project] にチェックを入れます。

SFTP host192.168.33.103
Port22
Root path/([Autodetect] はクリックしない。「/home/vagrant」だとファイルを同期ダウンロードできなくなる)
User namevagrant
Passwordvagant([Save password] にチェックを入れる)

f:id:akiyoko:20160313155856p:plain

[Mappings]

[Use this server as default] をクリックします。

Local path/Users/akiyoko/PycharmProjects/mezzanine_project(デフォルトのまま)
Deployment path/opt/webapps/myproject

f:id:akiyoko:20160313155920p:plain


3.2. ソースコードの同期

プロジェクトで右クリック > [Deployment] > [Download from mezzanine_project] を選択して、Vagrantサーバから PyCharm にプロジェクトをダウンロードします。


ここで、[Tools] > [Deployment] > [Automatic Upload] にチェックを入れます。


3.3. ローカル側でソースコードを Git管理

まず、不要なファイルを削除します。
Mercurialは使わないので .hgignore を Projectペイン上で削除します。


次に、PyCharm の Terminal を開きます。

まだ git config -l の設定をしていなければ、PyCharm の Terminal で以下を設定します。

$ cd ~/PycharmProjects/mezzanine_project/
$ git config --global user.name akiyoko
$ git config --global user.email akiyoko@users.noreply.github.com
$ git config --global color.ui auto

git init する前に、.gitignore に PyCharm 用の設定を追加しておきます。

.gitignore

*.pyc
*.pyo
*.db
.DS_Store
.coverage
local_settings.py
/static

# PyCharm
.idea/
.vagrant/
Vagrantfile


一旦コミットします。

$ git init
$ git add .
$ git commit -m "Initial commit"


3.4. Project Interpreter の設定

[Preferences] > [Project: mezzanine_project] > [Project Interpreter] から、[Python Interpreter] の右側の歯車アイコンをクリックし、[Add Remote] を選択します。


[Vagrant] を選択し、

Vagrant Instance Folder/Users/akiyoko/PycharmProjects/mezzanine_project(デフォルトのまま)
Vagrant Host URLssh://vagrant@127.0.0.1:2222(デフォルトのまま)
Python interpreter path/home/vagrant/.virtualenvs/myproject/bin/python

を入力して、OK をクリックします。

f:id:akiyoko:20160313160715p:plain

作成した Remote Interpreter が選択されていることを確認して、[OK] をクリックします。


ここで、Python モジュールに参照エラーが出ないようにするために、[File] > [Invalidate Caches / Restart] を選択し、[Invalidate and Restart] をクリックして、PyCharm を再起動しておきます。


3.5. Run/Debug設定

Project ペインの manage.py ファイルで右クリック > [Create "manage"] を選択します。

Namemanage
Scriptmanage.py
Script parametersrunserver 0.0.0.0:8000
Environment variablesPYTHONUNBUFFERED=1(デフォルトのまま)
Python interpreterProject Default (Remote Python 2.7.6 Vagrant VM at ~/PycharmProjects/mezzanine_project (/home/vagrant/.virtualenvs/myproject/bin/python))
Working directory/opt/webapps/myproject
Path mappings - Local path/Users/akiyoko/PycharmProjects/mezzanine_project
Path mappings - Remote path/opt/webapps/myproject

ここで、「Add content roots to PYTHONPATH」と「Add source roots to PYTHONPATH」のチェックを外します。

f:id:akiyoko:20160314074038p:plain

デバッグ実行できるか確認できれば、OKです。


3.6. テンプレート設定

ここで、Mezzanine本体の templates をコピーしておきます。

Vagrant サーバ側で、

$ cd /opt/webapps/myproject/
### Mezzanine のテンプレートをコピー
$ cp -a ~/.virtualenvs/myproject/lib/python2.7/site-packages/mezzanine/core/templates .
### Cartridge のテンプレートをコピー
$ cp -a ~/.virtualenvs/myproject/lib/python2.7/site-packages/cartridge/shop/templates .

を実行した後、PyCharm 上でファイルを同期(ダウンロード)します。


テンプレート(htmlファイル)が参照エラーで真っ赤に染まってしまっている場合は、[Preferences] > [Languages & Frameworks] > [Python Template Languages] から、「Template language」を「Django」に設定すれば解消するはずです。

f:id:akiyoko:20160313161637p:plain


4. テーマ変更

参考


試しに、
https://github.com/thecodinghouse/mezzanine-themes.git
の moderna テーマを入れてみます。


ローカル側で、以下を実行します。

$ cd ~/dev/
$ git clone https://github.com/thecodinghouse/mezzanine-themes.git
$ cp -a mezzanine-themes/moderna ~/PycharmProjects/mezzanine_project/

コマンドでコピーしたファイルはサーバ側に自動転送されないので、[Deployment] > [Upload to mezzanine_project] で手動アップロードしておきます。


コピーしたテーマを Djangoアプリケーションとして設定するために、config/settings.py の INSTALLED_APPS の最後、および TEMPLATES/DIRS の先頭に追加します。

config/settings.py

TEMPLATES = [
    {
        "BACKEND": "django.template.backends.django.DjangoTemplates",
        "DIRS": [
            os.path.join(PROJECT_ROOT, "moderna/templates"),
            os.path.join(PROJECT_ROOT, "templates")
        ],
        "APP_DIRS": True,
        ・
        ・
]

INSTALLED_APPS = (
    ・
    ・
    "mezzanine.twitter",
    # "mezzanine.accounts",# "mezzanine.mobile","moderna",
)

まとめ

Mezzanine は普通の Django プロジェクトなので、インストールやテンプレートの設定自体は Django のものと何ら変わりません。


あとはドキュメントを読むだけですね。

Mezzanine — Mezzanine 4.1.0 documentation


参考

最新版 Mezzanine インストール時のパッケージ情報
$ pip freeze
beautifulsoup4==4.4.1
bleach==1.4.2
Cartridge==0.11.0
chardet==2.3.0
Django==1.9.5
django-contrib-comments==1.7.0
filebrowser-safe==0.4.3
future==0.15.2
grappelli-safe==0.4.2
html5lib==0.9999999
Mezzanine==4.1.0
MySQL-python==1.2.5
oauthlib==1.0.3
Pillow==3.2.0
PyPDF2==1.25.1
pytz==2016.3
reportlab==3.3.0
requests==2.9.1
requests-oauthlib==0.6.1
six==1.10.0
tzlocal==1.2.2
xhtml2pdf==0.0.6


各種 URLconf

config/urls.py

from __future__ import unicode_literals

from django.conf.urls import include, url
from django.conf.urls.i18n import i18n_patterns
from django.contrib import admin
from django.views.i18n import set_language
from mezzanine.core.views import direct_to_template
from mezzanine.conf import settings

from cartridge.shop.views import order_history


admin.autodiscover()

# Add the urlpatterns for any custom Django applications here.# You can also change the ``home`` view to add your own functionality# to the project's homepage.

urlpatterns = i18n_patterns(
    # Change the admin prefix here to use an alternate URL for the# admin interface, which would be marginally more secure.
    url("^admin/", include(admin.site.urls)),
)

if settings.USE_MODELTRANSLATION:
    urlpatterns += [
        url('^i18n/$', set_language, name='set_language'),
    ]

urlpatterns += [

    # Cartridge URLs.
    url("^shop/", include("cartridge.shop.urls")),
    url("^account/orders/$", order_history, name="shop_order_history"),

    # We don't want to presume how your homepage works, so here are a# few patterns you can use to set it up.# HOMEPAGE AS STATIC TEMPLATE# ---------------------------# This pattern simply loads the index.html template. It isn't# commented out like the others, so it's the default. You only need# one homepage pattern, so if you use a different one, comment this# one out.

    url("^$", direct_to_template, {"template": "index.html"}, name="home"),

    # HOMEPAGE AS AN EDITABLE PAGE IN THE PAGE TREE# ---------------------------------------------# This pattern gives us a normal ``Page`` object, so that your# homepage can be managed via the page tree in the admin. If you# use this pattern, you'll need to create a page in the page tree,# and specify its URL (in the Meta Data section) as "/", which# is the value used below in the ``{"slug": "/"}`` part.# Also note that the normal rule of adding a custom# template per page with the template name using the page's slug# doesn't apply here, since we can't have a template called# "/.html" - so for this case, the template "pages/index.html"# should be used if you want to customize the homepage's template.# NOTE: Don't forget to import the view function too!# url("^$", mezzanine.pages.views.page, {"slug": "/"}, name="home"),# HOMEPAGE FOR A BLOG-ONLY SITE# -----------------------------# This pattern points the homepage to the blog post listing page,# and is useful for sites that are primarily blogs. If you use this# pattern, you'll also need to set BLOG_SLUG = "" in your# ``settings.py`` module, and delete the blog page object from the# page tree in the admin if it was installed.# NOTE: Don't forget to import the view function too!# url("^$", mezzanine.blog.views.blog_post_list, name="home"),# MEZZANINE'S URLS# ----------------# ADD YOUR OWN URLPATTERNS *ABOVE* THE LINE BELOW.# ``mezzanine.urls`` INCLUDES A *CATCH ALL* PATTERN# FOR PAGES, SO URLPATTERNS ADDED BELOW ``mezzanine.urls``# WILL NEVER BE MATCHED!# If you'd like more granular control over the patterns in# ``mezzanine.urls``, go right ahead and take the parts you want# from it, and use them directly below instead of using# ``mezzanine.urls``.
    url("^", include("mezzanine.urls")),

    # MOUNTING MEZZANINE UNDER A PREFIX# ---------------------------------# You can also mount all of Mezzanine's urlpatterns under a# URL prefix if desired. When doing this, you need to define the# ``SITE_PREFIX`` setting, which will contain the prefix. Eg:# SITE_PREFIX = "my/site/prefix"# For convenience, and to avoid repeating the prefix, use the# commented out pattern below (commenting out the one above of course)# which will make use of the ``SITE_PREFIX`` setting. Make sure to# add the import ``from django.conf import settings`` to the top# of this file as well.# Note that for any of the various homepage patterns above, you'll# need to use the ``SITE_PREFIX`` setting as well.# url("^%s/" % settings.SITE_PREFIX, include("mezzanine.urls"))

]

# Adds ``STATIC_URL`` to the context of error pages, so that error# pages can use JS, CSS and images.
handler404 = "mezzanine.core.views.page_not_found"
handler500 = "mezzanine.core.views.server_error"


/home/vagrant/.virtualenvs/myproject/local/lib/python2.7/site-packages/mezzanine/urls.py

"""This is the main ``urlconf`` for Mezzanine - it sets up patterns forall the various Mezzanine apps, third-party apps like Grappelli andfilebrowser."""from __future__ import unicode_literals
from future.builtins importstrfrom django.conf.urls import include, url
from django.contrib.sitemaps.views import sitemap
from django.views.i18n import javascript_catalog
from django.http import HttpResponse

from mezzanine.conf import settings
from mezzanine.core.sitemaps import DisplayableSitemap


urlpatterns = []

# JavaScript localization feature
js_info_dict = {'domain': 'django'}
urlpatterns += [
    url(r'^jsi18n/(?P<packages>\S+?)/$', javascript_catalog, js_info_dict),
]

if settings.DEBUG and"debug_toolbar"in settings.INSTALLED_APPS:
    try:
        import debug_toolbar
    exceptImportError:
        passelse:
        urlpatterns += [
            url(r'^__debug__/', include(debug_toolbar.urls)),
        ]

# Django's sitemap app.if"django.contrib.sitemaps"in settings.INSTALLED_APPS:
    sitemaps = {"sitemaps": {"all": DisplayableSitemap}}
    urlpatterns += [
        url("^sitemap\.xml$", sitemap, sitemaps),
    ]

# Return a robots.txt that disallows all spiders when DEBUG is True.ifgetattr(settings, "DEBUG", False):
    urlpatterns += [
        url("^robots.txt$", lambda r: HttpResponse("User-agent: *\nDisallow: /",
                                                   content_type="text/plain")),
    ]

# Miscellanous Mezzanine patterns.
urlpatterns += [
    url("^", include("mezzanine.core.urls")),
    url("^", include("mezzanine.generic.urls")),
]

# Mezzanine's Accounts appif"mezzanine.accounts"in settings.INSTALLED_APPS:
    # We don't define a URL prefix here such as /account/ since we want# to honour the LOGIN_* settings, which Django has prefixed with# /account/ by default. So those settings are used in accounts.urls
    urlpatterns += [
        url("^", include("mezzanine.accounts.urls")),
    ]

# Mezzanine's Blog app.
blog_installed = "mezzanine.blog"in settings.INSTALLED_APPS
if blog_installed:
    BLOG_SLUG = settings.BLOG_SLUG.rstrip("/") + "/"
    blog_patterns = [
        url("^%s" % BLOG_SLUG, include("mezzanine.blog.urls")),
    ]
    urlpatterns += blog_patterns

# Mezzanine's Pages app.
PAGES_SLUG = ""if"mezzanine.pages"in settings.INSTALLED_APPS:
    # No BLOG_SLUG means catch-all patterns belong to the blog,# so give pages their own prefix and inject them before the# blog urlpatterns.if blog_installed andnot BLOG_SLUG.rstrip("/"):
        PAGES_SLUG = getattr(settings, "PAGES_SLUG", "pages").strip("/") + "/"
        blog_patterns_start = urlpatterns.index(blog_patterns[0])
        urlpatterns[blog_patterns_start:len(blog_patterns)] = [
            url("^%s" % str(PAGES_SLUG), include("mezzanine.pages.urls")),
        ]
    else:
        urlpatterns += [
            url("^", include("mezzanine.pages.urls")),
        ]


/home/vagrant/.virtualenvs/myproject/local/lib/python2.7/site-packages/mezzanine/core/urls.py

from __future__ import unicode_literals

from django.conf.urls import url
from django.contrib.auth import views as auth_views

from mezzanine.conf import settings
from mezzanine.core import views as core_views


urlpatterns = []

if"django.contrib.admin"in settings.INSTALLED_APPS:
    urlpatterns += [
        url("^password_reset/$", auth_views.password_reset,
            name="password_reset"),
        url("^password_reset/done/$", auth_views.password_reset_done,
            name="password_reset_done"),
        url("^reset/done/$", auth_views.password_reset_complete,
            name="password_reset_complete"),
        url("^reset/(?P<uidb64>[0-9A-Za-z_\-]+)/(?P<token>.+)/$",
            auth_views.password_reset_confirm, name="password_reset_confirm"),
    ]

urlpatterns += [
    url("^edit/$", core_views.edit, name="edit"),
    url("^search/$", core_views.search, name="search"),
    url("^set_site/$", core_views.set_site, name="set_site"),
    url("^set_device/(?P<device>.*)/$", core_views.set_device,
        name="set_device"),
    url("^asset_proxy/$", core_views.static_proxy, name="static_proxy"),
    url("^displayable_links.js$", core_views.displayable_links_js,
        name="displayable_links_js"),
]


/home/vagrant/.virtualenvs/myproject/local/lib/python2.7/site-packages/mezzanine/generic/urls.py

from __future__ import unicode_literals

from django.conf.urls import url

from mezzanine.generic import views


urlpatterns = [
    url("^admin_keywords_submit/$", views.admin_keywords_submit,
        name="admin_keywords_submit"),
    url("^rating/$", views.rating, name="rating"),
    url("^comment/$", views.comment, name="comment"),
]


/home/vagrant/.virtualenvs/myproject/local/lib/python2.7/site-packages/mezzanine/blog/urls.py

from __future__ import unicode_literals

from django.conf.urls import url

from mezzanine.blog import views
from mezzanine.conf import settings


# Trailing slahes for urlpatterns based on setup.
_slash = "/"if settings.APPEND_SLASH else""# Blog patterns.
urlpatterns = [
    url("^feeds/(?P<format>.*)%s$" % _slash,
        views.blog_post_feed, name="blog_post_feed"),
    url("^tag/(?P<tag>.*)/feeds/(?P<format>.*)%s$" % _slash,
        views.blog_post_feed, name="blog_post_feed_tag"),
    url("^tag/(?P<tag>.*)%s$" % _slash,
        views.blog_post_list, name="blog_post_list_tag"),
    url("^category/(?P<category>.*)/feeds/(?P<format>.*)%s$" % _slash,
        views.blog_post_feed, name="blog_post_feed_category"),
    url("^category/(?P<category>.*)%s$" % _slash,
        views.blog_post_list, name="blog_post_list_category"),
    url("^author/(?P<username>.*)/feeds/(?P<format>.*)%s$" % _slash,
        views.blog_post_feed, name="blog_post_feed_author"),
    url("^author/(?P<username>.*)%s$" % _slash,
        views.blog_post_list, name="blog_post_list_author"),
    url("^archive/(?P<year>\d{4})/(?P<month>\d{1,2})%s$" % _slash,
        views.blog_post_list, name="blog_post_list_month"),
    url("^archive/(?P<year>\d{4})%s$" % _slash,
        views.blog_post_list, name="blog_post_list_year"),
    url("^(?P<year>\d{4})/(?P<month>\d{1,2})/(?P<day>\d{1,2})/""(?P<slug>.*)%s$" % _slash,
        views.blog_post_detail, name="blog_post_detail_day"),
    url("^(?P<year>\d{4})/(?P<month>\d{1,2})/(?P<slug>.*)%s$" % _slash,
        views.blog_post_detail, name="blog_post_detail_month"),
    url("^(?P<year>\d{4})/(?P<slug>.*)%s$" % _slash,
        views.blog_post_detail, name="blog_post_detail_year"),
    url("^(?P<slug>.*)%s$" % _slash,
        views.blog_post_detail, name="blog_post_detail"),
    url("^$", views.blog_post_list, name="blog_post_list"),
]


/home/vagrant/.virtualenvs/myproject/local/lib/python2.7/site-packages/mezzanine/pages/urls.py

from __future__ import unicode_literals

from django.conf.urls import url
from django.conf import settings

from mezzanine.pages import page_processors, views


page_processors.autodiscover()

# Page patterns.
urlpatterns = [
    url("^admin_page_ordering/$", views.admin_page_ordering,
        name="admin_page_ordering"),
    url("^(?P<slug>.*)%s$" % ("/"if settings.APPEND_SLASH else""),
        views.page, name="page"),
]


/home/vagrant/.virtualenvs/myproject/local/lib/python2.7/site-packages/cartridge/shop/urls.py

from __future__ import unicode_literals

from django.conf.urls import url
from mezzanine.conf import settings

from cartridge.shop import views


_slash = "/"if settings.APPEND_SLASH else""

urlpatterns = [
    url("^product/(?P<slug>.*)%s$" % _slash, views.product,
        name="shop_product"),
    url("^wishlist%s$" % _slash, views.wishlist, name="shop_wishlist"),
    url("^cart%s$" % _slash, views.cart, name="shop_cart"),
    url("^checkout%s$" % _slash, views.checkout_steps, name="shop_checkout"),
    url("^checkout/complete%s$" % _slash, views.complete,
        name="shop_complete"),
    url("^invoice/(?P<order_id>\d+)%s$" % _slash, views.invoice,
        name="shop_invoice"),
    url("^invoice/(?P<order_id>\d+)/resend%s$" % _slash,
        views.invoice_resend_email, name="shop_invoice_resend"),
]
Viewing all 52 articles
Browse latest View live


<script src="https://jsc.adskeeper.com/r/s/rssing.com.1596347.js" async> </script>